Powering the station: Difference between revisions
Studenterhue (talk | contribs) More detailed instructions on setting up the singularity. Main idea to describe what you actually need to input, i.e. clicking on something this item or that item. It's probably due for a rewrite.... |
Forthwrong (talk | contribs) →End result: +main tl |
||
| Line 735: | Line 735: | ||
===End result=== | ===End result=== | ||
{{main|Singularity}} | |||
[[File:GoodSinguloManta.png|right|frame|A running engine.]] | [[File:GoodSinguloManta.png|right|frame|A running engine.]] | ||
The finished engine should look something like this, with all emitters on, field up and running, and collection arrays and their controllers on. If you're not planning on feeding the singularity bodies, it's a good idea to weld the doors shut. While you can leave the doors unwelded, it's usually safer since the singularity's electromagnetic pulses will open the door, leaving them open for [[Clown|some fool]] to wander into. | The finished engine should look something like this, with all emitters on, field up and running, and collection arrays and their controllers on. If you're not planning on feeding the singularity bodies, it's a good idea to weld the doors shut. While you can leave the doors unwelded, it's usually safer since the singularity's electromagnetic pulses will open the door, leaving them open for [[Clown|some fool]] to wander into. | ||
Revision as of 11:39, 1 March 2020
There are several distinct ways to supply the station with electricity, which can either be used exclusively or in combination with each other. The solar arrays are efficient and simple, yet leave no room for experimentation. The singularity engine is a spectacular and highly satisfying to set up, but there is very little room for experimentation and a lot of room for devastating errors. In contrast, there are probably as many different thermoelectric engine setups as there are engineers, and with it so many ways of generating billions and billions of watts of fire and joules of heat.
The experimental local generator

Burns plasma to make electricity. More a means of powering specific rooms rather than the entire station, for which the generator is unsuitable. Still, it can be a worthwhile backup generator for key areas such as medbay or the escape hallway as insurance against power outages. Insert a plasma tank, secure the floor bolts and flick the power switch. The generator doesn't burn fuel if the local APC's power cell is already fully charged. You can also insert a power cell and charge it that way if have ability to unlock the APC, since it can sometimes charge an APC that you don't want to charge.
The radioisotope thermoelectric generator

Uses the radioactive decay of a RTG fuel pellet to make electricity. You can expect a handful to a few ten kilowatts from these things, which is nice, because unlike the local generator, this is stationary. Unlike the real world, the fuel pellet will decay rather quickly whilst in the RTG, and there is no way to make more pellets. As a result, it's more suited as an emergency backup generator, like the experimental local generator, but for the whole power grid.
The solar arrays

Solar arrays are not a complicated affair and provide a decent amount of power once properly configured. This task can be handled by the AI in the first few minutes of any given round, which is great when the engineers have no clue how to do their job. They're also a single wire snip away from sabotage, so they should not be relied on completely in lieu of the generator if possible.
How it all works: The solar arrays
Each array is a fully automatic and for the most part self-contained system. It consists of:
- The solar tracker, which tracks the location of the sun.
- Solar panels to generate electricity.
- The control terminal, which aligns the panels to the sun.
- The array's output is channeled through a SMES unit, basically a huge rechargeable battery. For the connection, an electric terminal (not to be confused with data terminals) is required.
- Regular wiring then feeds a certain amount of power (depending on the SMES settings) to the station grid.
Auto-tracking doesn't work when there is no continuous connection between the tracker and control terminal. Damaged wiring will also prevent panels from rotating automatically, as they can't receive commands from the computer.
Keep in mind that the sun will always be moving in relation to the station, which means that the amount of electricity generated by each array won't be constant. For this reason, it's also best to leave the control terminal on the default settings (i.e. Auto) unless you want to babysit the arrays and rotate them manually.
Note: The computer is tied to the APC's equipment setting. If the APC has been switched off or drained at any point, it is necessary to reset the tracking program from Auto to Off and back to Auto.
Down to business: Configure the SMES units
Making use of the default settings of the SMES units will result in power failures within half an hour, or much less if telescience decides to play around with permaportals or something unforeseen happens. At the same time, the mechanics of the power grid are somewhat arcane, so setting up the SMES units wrong can cause power failures throughout the station including in key locations like the bridge.
To set up a SMES:
- Chose an appropriate Input value from the table below for the solar array in question.
- Make sure the Input is set to Auto, though it should be already.
- Likewise, pick the corresponding Output value.
- Set the Output to Online.
In case you consider deviating from these suggestions, be aware of two other things. The SMES unit's input should be set with a value no higher than what is indicated on the control terminal. It won't charge if it is set higher than what the arrays are producing, even if the difference is only a couple of watts. In addition, the output should have a value lower than the input in order to build up some reserves, because the SMES won't always be charging.
Note: the data in the following table may be incorrect, and some testing is required. If you do know the correct settings, please help us out.
| SMES | Image | Peak output, W | Suggested input, W |
Suggested output, W |
Info |
|---|---|---|---|---|---|
| North (catering maint.) |
 |
~100,000 | 85,000 | 40,000 | Supposedly the first SMES in the power-grid. This might mean that any superfluous power can be handed over to other SMES units, even if there isn't enough to power. |
| South (Research Wing maint.) |
 |
~100,000 | 85,000 | 40,000 | Don't set the output too high. Due to the way the power grid code works, it is second in line after the Port Aft Solar SMES and will receive its power overflow. If it's output is higher then the output of Port Aft Solar SMES, it will actually drain energy from the power grid! |
| West substation |  |
200,000 | 200,000 | 100,000 | If the engine is on, this SMES will help keep the lights on in the Portside of the station. However, that might not actually be desirable, as few station critical sections are in that part. If the engine has not been turned on, it would be wiser to just leave power uptake off. |
| East substation |  |
200,000 | 200,000 | 100,000 | If the engine is on, this SMES will help keep the lights on in the Starboard side of the station. Since the medbay and the mining section are here, recovering from a power failure here is much more difficult than for the Portside of the station. If the engine has not been turned on, it would be wiser to just leave power uptake off. |
| Inner Engineering |  |
200,000 | 200,000 | 100,000 | If the engine is turned on, these units can fill up regardless of settings, and if the engine is off, these aren't useful anyway, so be generous and make sure output level are always the highest in the station. |
| Array | Image | Peak output, W | Suggested input, W |
Suggested output, W |
Info |
|---|---|---|---|---|---|
| Aft/West (bridge maint.) |
 |
~90,000 | 70,000 | 40,000 | The smallest and thus least powerful array, so overoptimistic settings will deplete the SMES unit quickly. If you don't have Bridge- or Security-access, you might want to take a Space Pod and go through the airlock on the left. |
| Port/North (catering maint.) |
 |
~120,000 | 80,000 | 40,000 | Don't set the output too high. Due to the way the power grid code works, it is second in line after the aft solars and will always be loaded. |
| Starboard/South (near tech storage) |
 |
~120,000 | 85,000 | 60,000 | Pretty much identical to the port solars. Because it is last in line after the four engine substations (which amount to 40.000 W combined output by default), there is more leeway to use it as a buffer. |
| SMES | Image | Peak output, W | Suggested input, W |
Suggested output, W |
Info |
|---|---|---|---|---|---|
| Starboard/East (Starboard Crew Quarters maint) |
 |
120,000 | 110,000 | 40,000 | Because of advanced power-saving technologies, the NSS Destiny consumes minimal amounts of power! Such is the ingenuity of NanoTrasen shipwrights.
The starboard solars can take care of half of the approximately 80 kW normal total draw indefinitely. |
| Port/West (Port Crew Quarters maint) |
 |
120,000 | 110,000 | 40,000 (or 200,000) | And by "power-saving technologies", we mean the ship is like a third of the size of a standard NT station, so of course it uses less power than an whole entire space station would.
The port solars can generally be configured to output the surplus 40 kW that the starboard ones aren't providing, but upping it to 200 kW means it also deals with occasional spikes in power usage, but would be worth checking on occasion. |
| SMES | Image | Peak output, W | Suggested input, W |
Suggested output, W |
Info |
|---|---|---|---|---|---|
| Starboard/East Solars (Rightmost SMES) (Starboard/East Electrical Substation) |
 |
90,000 | 80,000 | 40,000 | Because of advanced power-saving technologies, the NSS Clarion consumes minimal amounts of power! Such is the brilliance of NanoTrasen shipwrights.
The starboard solars can comfortably cover about half of the ship's usual 75 kW load. |
| Port/West Solars (Leftmost SMES) (Port/West Electrical Substation) |
 |
90,000 | 80,000 | 40,000 (or 200,000) | And by "power-saving technologies", we mean the ship is like half of the size of a standard NT station, so of course it uses less power than an whole entire space station would.
Like the NSS Destiny's port solars, the output can be set to 40 kW to cover the remaining power load or increased to the full 200 kW to account for occasional spikes. |
| Array | Image | Peak output, W | Suggested input, W |
Suggested output, W |
Info |
|---|---|---|---|---|---|
| Port (Public Market maint.) |
 |
~97,000 | 80,000 | 40,000 | |
| Fore (EVA maint.) |
 |
~95,000 | 80,000 | 40,000 | |
| AI Satellite |  |
~95,000 | 80,000 | 40,000 | Each of the four arrays produces around 96,000 W, each connected to their own separate SMES in the deepest room in the satellite. Given the few things that need power here, these can be safely left at their default settings. |
| Array | Image | Peak output, W | Suggested input, W |
Suggested output, W |
Info |
|---|---|---|---|---|---|
| Aft Starboard (Secure Hangar maint.) |
 |
~120,000 | 100,000 | 55,000 | Supposedly the first of the arrays to come online and generate power. You might want to set these first. Secure Hangar is locked off to Security Officers, so you might want to get these via the maintenance entrance between AI Module Storage and Tool Storage. |
| Aft Port (Upper Cargo Bay maint.) |
 |
~85,000 | 70,000 | 40,000 | These solars pretty much have their own maintenance tunnel, right above Cargo, which you can enter via a grey maintenance access door below the Aft Podbay. |
| Bridge (Lower Medbay maint.) |
 |
~130,000 | 115,000 | 70,000 | Easiest way to get to these is probably to take the maintenance tunnel near Customs. |
| Array | Image | Peak output, W | Suggested input, W |
Suggested output, W |
Info |
|---|---|---|---|---|---|
| West/Port (Medbay maint.) |
 |
~130,000 | 90,000 | 50,000 | Supposedly the first of the arrays to come online and generate power. Make sure you add the missing wires together first! |
| East/Starboard (Security/Courtroom maint.) |
 |
~120,000 | 80,000 | 40,000 | Like the West Solars, you'll have to lay down a bit of wire before you can get the most power out of them. |
| South/Aft (Mechanics maint.) |
 |
~175,000 | 155,000 (or 200,000) | 70,000 | Hands down the biggest array on the station once you add back all the missing wires. Setting the input to max will probably do the trick. |
| Computer Core |  |
~115,000 | 100,000 | 55,000 | Command-locked and far away on the Research Station, so you'll have to ask the Research Director to set them. |
| AI Satellite |  |
~95,000 | 80,000 | 40,000 | Each of the four arrays produces around 96,000 W, each connected to their own separate SMES in the deepest room in the satellite. Given the few things that need power here, these can be safely left at their default settings. |
| Array | Image | Peak output, W | Suggested input, W |
Suggested output, W |
Info |
|---|---|---|---|---|---|
| Port (Medbay maint.) |
 |
~90,000 | 70,000 | 40,000 | Supposedly the first array to start generating power, so you might want to make setting this one priority. |
| Starboard (Hydroponics maint.) |
 |
~75,000 | 60,000 | 40,000 | Easily the smallest of the arrays, so high settings will deplete the SMES unit quickly. |
| Aft (Engineering Storage maint.) |
 |
~130,000 | 90,000 | 45,000 | Hands down the biggest array on the station. Setting the input to max will probably do the trick. |
| Vessel Engine |  |
~50,000 | 40,000 | 20,000 | Easily the smallest array on the map, even when you consider the panels directly attached to the Test Chamber. Really meant to be supplemented with furnace power. Better ask Telescience to be careful with portals. |
| Array | Image | Peak output, W | Suggested input, W |
Suggested output, W |
Info |
|---|---|---|---|---|---|
| North/West (In Space between QM & Kitchen maintenance) |
 |
~36,000 | 18,000 | 10,000 | Thought to be the first set of solar to be generating power, so it might be good to prioritize setting these. It's a good idea to set them with a space suit on or at least internals. |
| South/East (In Space between Medbay & Research maintenance) |
 |
~36,000 | 18,000 | 10,000 | Atlas is quite small, and there's not a lot of lighting and machinery consuming power, so demand is relatively small, on the scale of 10,000 to 30,000 W. You can afford to have low settings or even leave them at the default 10,000/10,000. Again, good idea to have a space suit or at least internals to set these. |
Hotwiring
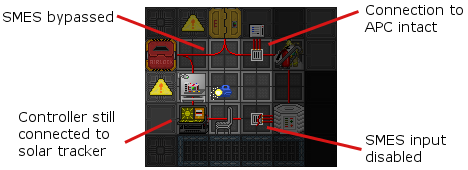
Since there is so much finicky stuff about the power gird, it is sometimes preferred to bypass the SMES units all together. To do this you need to have access to basic tools, a pair of insulated gloves and the SMES substations.
- Bypass the SMES by bridging the obvious gap on the floor. For more information on how to lay wires, please refer to Guide to Wiring.
- Disable the SMES on the input side. Setting its input to Off has the same effect, but this way ensures that the AI can't interfere. The solar arrays don't generate enough electricity to supply the station and charge the SMES units at the same time.
- Double-check that you haven't disconnected the control terminal or APC by accident.
As mentioned before, solar arrays don't produce a constant amount of power. While hotwiring means the SMES units won't provide power when the solars are offline, ideally, when one array does come online, it'll generate enough power to make up for the downtime, even if it may contribute only, say, 25 000 W to the total number. Typically, the station demands circa 170 000 W.
The thermoelectric generator
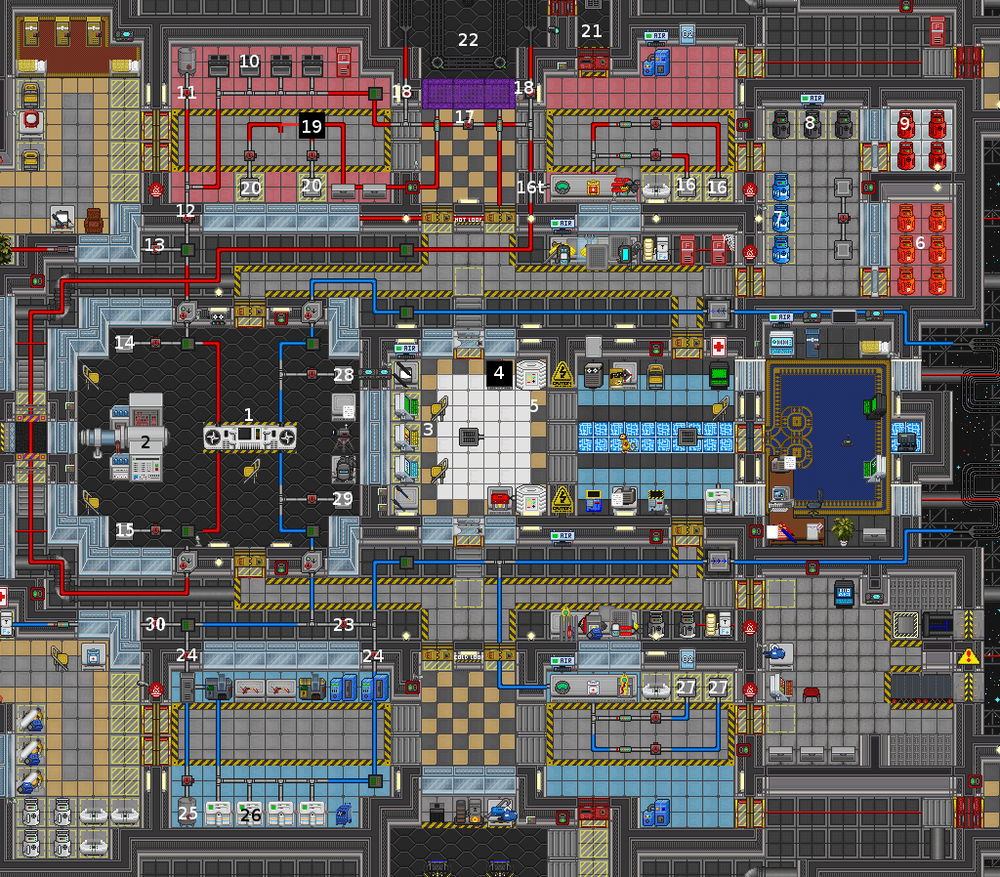
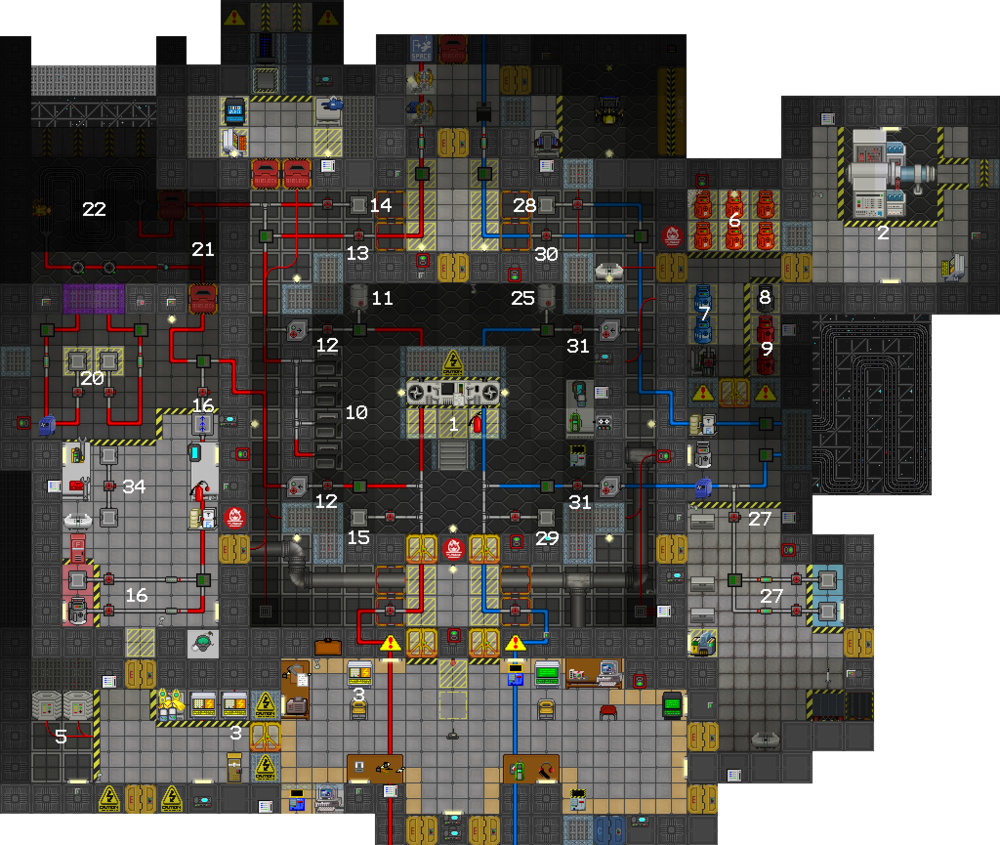
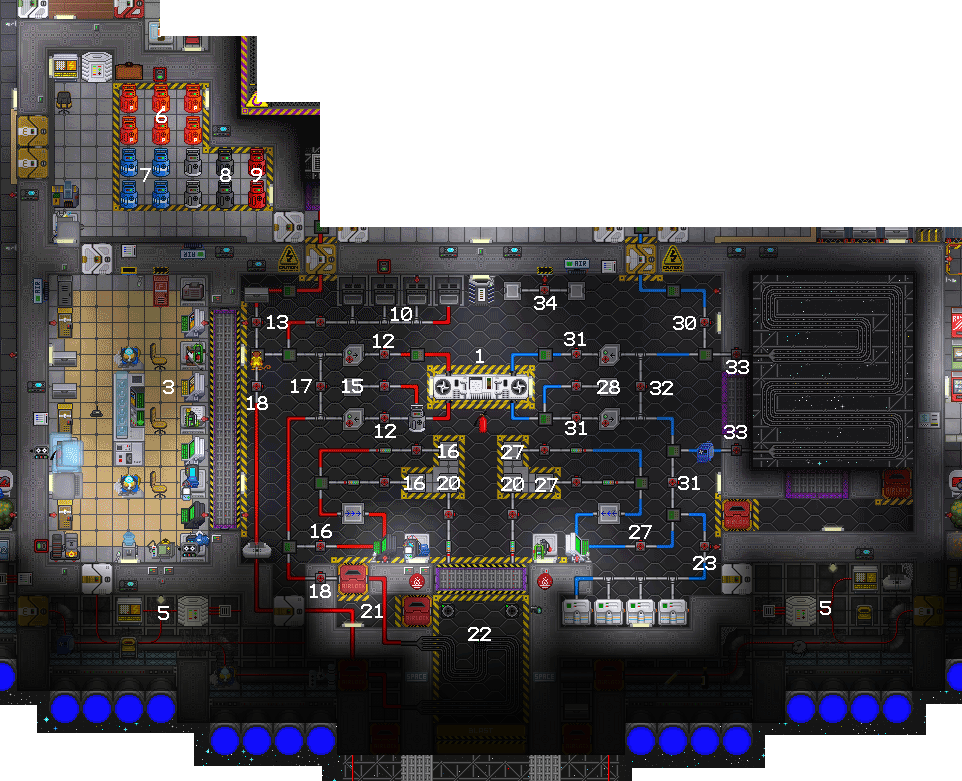
Map Legend
This section is collapsible, click the button to the right to open it. Not all of these items will be on each map, though many of them will be common to each map.
1 - The TEG, or Thermo-Electric Generator.
2 - The PTL or Power Transmission Laser.
3 - Engine Outpuit Monitoring Computer - Allows you to monitor the output of the engine remotely.
4 - Gas Mixing Control Computer - Allows you to control the Gas Mixer (19).
5 - Engineering SMES Units - Stores the power from the engine, like a battery.
6 - Plasma - This room is where the plasma canisters are stored. Equipped with a separate Firelock.
7 - Oxygen - These are the oxygen canisters.
8 - CO2 - These are the CO2 canisters.
9 - N2 - This room is where the N2 canisters are stored. Equipped with a separate Firelock.
10 - Furnaces - Allows you to burn char or other flammable objects in them to produce power.
11 - Hot Loop Pressure Tank - Allows you to release pressure from the hot loop into the tank.
12 - Hot Loop Manual Valves - Allows you to control whether the Hot Loop is running gasses through the TEG (1)
13 - Hot Loop Purge Valve - Controls flow to the Hot Loop Purge Pump to release pressure and gasses from the Hot Loop.
14 - Hot Loop Auxiliary Port 1 - Allows you to release Gas into the TEG Input end of the hot loop.
15 - Hot Loop Auxiliary Port 2 - Allows you to release Gas into the TEG Output end of the hot loop.
16 - Hot Loop Inlet Valves - Allows you to release Gas into the TEG Input end of the hot loop, before the heating portion. (Pumps controlled by the pump controller)
17 - Combustion Chamber Bypass Valve - Allows hot loop Gas to go continue to the TEG rather than into the Combustion Chamber to if you're not using it.
18 - Combustion Chamber Inlet and Outlet Valves - Allows hot loop Gas to enter and exit the Combustion Chamber
19 - Combustion Chamber Mixing Pump - Mixes the Gases contained in the Combustion Chamber Gas Ports (20) and sends it to the Combustion Chamber. Controlled by the Gas Mixing Control Computer (4)
20 - Combustion Chamber Gas Ports - Allows you to send Gases to the Combustion Chamber to be burned.
21 - Combustion Chamber Airlock - Allows you to enter and exit the Combustion Chamber without filling the room with hot gases.
22 - Combustion Chamber - Burns the gas mixes in (20) to heat up the hot loop Gases
23 - Freezer Room Bypass Valve - Allows cold loop Gas to continue to the TEG rather than into the freezers if you're not using them
24 - Freezer Room Inlet and Outlet Valves - Allows cold loop Gas to enter and exit the Freezers
25 - Cold Loop Pressure Tank - Allows you to release pressure from the cold loop into the tank
26 - Freezers - Cools the cold loop Gas using cryo cooling
27 - Cold Loop Inlet Valves - Allows you to release Gas into the TEG Input end of the cold loop, before the cooling portion. (Pumps controlled by the pump controller)
28 - Cold Loop Auxiliary Port 1 - Allows you to release Gas into the TEG Input end of the cold loop.
29 - Cold Loop Auxiliary Port 2 - Allows you to release Gas into the TEG Output end of the cold loop.
30 - Cold Loop Purge Valve - Controls flow to the Cold Loop Purge Pump to release pressure and gasses from the Cold Loop.
31 - Cold Loop Manual Valves - Allows you to control whether the Cold Loop is running gases through the TEG
32 - Cold Loop Bypass Valve - Allows Gas to go straight to the TEG rather than through the cold loop pipes exposed to space
33 - Cold Loop Inlet and Outlet Valves - Allows Gas to enter and exit the cold loop pipes going through space
34 - Manual Gas Mixer - Allows you to manually mix Gases without a Gas Mixer Control Computer
How it all works
The Engine is the heart of engineering and the best source of power on the station. It uses the heat gradient between a loop of hot gas and cold gas to produce up to billions of watts of electricity. It has boatloads of customizability, but is surprisingly forgiving; if you forget a step, usually nothing explodes or bursts, and the engine just doesn't generate power. If any pipes burst, it just takes a few seconds of welding, and, if there's a fire, it will tend to stay in engineering. Even if you screw up so badly that the entire engine is unsalvagable, there's always the solars to fall back on.
WARNING: There are a number of systems that are rather complicated and might even be bugged, so are best not be touched until you are more experienced at their use. These are : the Gas coolers (26) and the valves that lead to them (24), the emergency pressure release valves for the hot loop (13) and the cold loop (28). Instead, if you need to siphon of gas to release pressure or 'other safety reasons' use empty canisters on the auxiliary siphoning ports (14) and (29).
Start-up procedure: Basic Char Burn
This setup uses the energy produced from burning char to heat up the hot loop and the vacuum of space to cool the cold loop. It will produce about 200 to 500 kilowatts, which is enough to keep the whole station supplied with power and fill up all the SMES units.It can be considered the standard procedure for making sure the station doesn't brown out halfway during the round. However, the engineers will need to keep an eye on the furnaces, periodically refilling them with char if the round goes more than 30 minutes, and the Power Transmission Laser will not be used.
- Drag a fuel crate or two to the furnaces (10) and stuff 2-4 of them full of char and turn them on. You can load them one chunk at a time or click-drag the char sprite into the furnace to stuff the furnace with char until it's full.
- Use a wrench to connect 2 canisters of Plasma (6) to the 2 hot loop supply ports (16). This allows the gas in the canister to enter the hot loop.
- In this specific order, open up the 2 hot loop supply valves (16), the combustion chamber bypass valve (17) and the hot loop valve (12). This allows gas to flow through the hot loop, so it can actually be heated and sent to the generator in the first place. Since the combustion chamber isn't used in this setup, there's no need for gas to flow through it.
- Use a wrench to connect 2 canisters of Plasma (6) to the 2 cold loop supply ports (27). This allows gas in the canister to enter the cold loop.
- In this specific order, open up the 2 cold loop supply valves (27) and the freezer room bypass valve (23). The supply valves allow the gases to actually go through the whole cold loop and be sent to the generator. The freezers aren't used in this setup, so there's no need to have gases flowing into them.
- Drag a fuel crate or two to the furnaces (10) and stuff 2-4 of them full of char and turn them on. You can load them one chunk at a time or click-drag the char sprite into the furnace to stuff the furnace with char until it's full.
- Use a wrench to connect 2 canisters of Plasma (6) to the 2 hot loop supply ports (16). This allows the gas in the canister to enter the hot loop.
- In this specific order, open up the 2 hot loop supply valves (16) and the hot loop valves (12). This allows gas to flow through the hot loop, so it can actually be heated by the furnaces and sent to the generator in the first place.
- Use a wrench to connect 2 canisters of Plasma (6) to the 2 cold loop supply ports (27). This allows gas in the canister to enter the cold loop.
- In this specific order, open up the 2 cold loop supply valves (27). The supply valves allow the gases to actually go through the whole cold loop and be sent to the generator.
- Drag a fuel crate or two to the furnaces (10) and stuff 2-4 of them full of char and turn them on. You can load them one chunk at a time or click-drag the char sprite into the furnace to stuff the furnace with char until it's full.
- Use a wrench to connect 2 canisters of Plasma (6) to the 2 hot loop supply ports (16). This allows the gas in the canister to enter the hot loop.
- In this specific order, open up the 2 hot loop supply valves (16), the combustion chamber bypass valve (17), the furnace valve near the furnaces (10), and the hot loop valves (12). This allows gas to flow through the hot loop, so it can actually be heated and sent to the generator in the first place. Since the combustion chamber isn't used in this setup, there's no need for gas to flow through it.
- Use a wrench to connect 2 canisters of Plasma (6) to the 2 cold loop supply ports (27). This allows gas in the canister to enter the cold loop.
- In this specific order, open up the 3 cold loop supply valves (27) and the freezer room bypass valve (23). The supply valves allow the gases to actually go through the whole cold loop and be sent to the generator. The freezers aren't used in this setup, so there's no need to have gases flowing into them.
Don't forget to set up the SMES! The outputs on them are offline by default, so you'll obviously need to turn them online, and you'll need to configure their inputs/outputs. 200k/80k is usually sufficient.
But what about the pump control computer?
Safely ignorable. This setup usually doesn't generate high enough pressures (i.e. 15k+ kPa) to require fiddling with the pumps, and while ideally the pressure between the hot loop inlet and cold loop outlet should be the same, changing the pump settings alone might not always do the trick, and equilizing the pressures may not even be necessary on more advanced setups. Still, if you're so curious, here's a general rundown:
- Combustion Feed: Controls how much gas is going into the combustion chamber (22). Can be safely turned off since this setup doesn't use the chamber. Many people who do use it tend to keep this low to keep the burn going on longer.
- Hot Loop Gas Supply: Controls how much gas from the hot loop is going into the generator. Generally advised to keep it low to prevent pipes from bursting.
- Cold Loop Gas Supply: Controls how much gas from the cold loop is going into the generator. Any setting works really, cold loop tends to be fine and dandy at any pressure.
- Cold Loop Purge: Controls how much gas is exiting the cold loop and entering space when the cold loop purge valve is open. The cold loop is usually pretty chill and tends to not cause many problems, so you can leave it at default.
- Hot Loop Purge: Controls how much gas is exiting the hot loop and entering space when the hot loop purge valve is open. Basically an emergency release pump, might want to keep this on at max settings just in case.
The purge valves(13,30)?
This setup usually doesn't generate enough pressure to warrant opening these, so these can be safely be left untouched. In emergencies (i.e. a plasma fire escapes engineering) or other situations where you'd want to relieve some pressure, these can be turned on to let out all the pressure and hot gas into space. Remember to turn on the purge pumps on the pump control computer in this case.
The auxiliary ports(14,15,28,29)?
Ignorable. You can place gas canisters here and attempt to equalize the inlet pressures between the hot and cold loops or otherwise relieve inlet/outlet pressure, though it may not quite work out, and on some advanced setups, the pressures don't really matter. However, you can put empty canisters here to get super-hot/super-cold gases here, which you can use for more nefarious purposes...
The pressure tanks valves(11,25)?
Charburns usually don't generate enough pressure to necessitate diverting pressure into these things, so they're sort of showpieces here.
The freezers(26)?
Rather wonky at the moment. Sometimes they cooperate, sometimes not. You're welcome to try though. Just leave the freezer bypass valve alone and let the gas flow into them, turning the inlet/outlet valves (24) if applicable.
The gas mixer(4)/gas ports(20)/combustion chamber(22)?
This setup doesn't burn gases to heat up the hot loop, so you don't need to worry about it. Once you've gotten the basics down though and are clamoring for more advanced techniques, these things aren't too hard to pick up. Experiment! Which gases will you use, and in what proportions? Will you use one canister or two? How about the feed pump settings? And what will you do about the CO2? There's loads of possibilities here brings us to...
Start-up procedure: Hell BURN
Hell Burn setups involve using the combustion chamber to heat the gas in the hot loop. With the right setup, the engine can rapidly start producing over 1 megawatt of power, but the output can grow endlessly. Goon engineers like to compete and brag about their highest engine output, which usually ends up into the hundreds of gigawatts or even hundreds of terawatts! At that point though, it's little more then a pissing contest as even the mighty PTL can only process 999 terawatts at it's maximum setting, and the heat coming from the engine room is enough to become a problem on the rest of the station, causing things like pieces of paper to spontaneously catch fire and gas canisters in air supply rooms to explode.
The startup procedures for a hell burn is a secret shared between good engineers and CEs and is not going to be posted on the wiki. Suffice it to say it involves using the combustion chamber, with a mix of gasses made by using the combustion chamber mixing pump (19) (which is operated from the control room (4)) and using the RCD to make several holes in the combustion chamber to stimulate proper gas flow and in the floor in specific places of the engineering sector to prevent fires from consuming the corridors.
The Reactor Statistics Computer
When you're making hellburns, it's not just the raw amounts of heat and power that matter but also how much they are increasing (or not). This is where the Reactor Statistics Computer, that neat little computer with the red animated screen, comes in.
Because just so much is covered by its strangely 90s-era interface, it gets its own page here.
Tending to the engine: Holy Grail
So the basic start-up procedure will keep the station alive, but will rarely exceed 800 kilowatts of power. A good Hell-burn will produce enough power to burn gods, but it will also incinerate the rest of the station. The true aim of a good engineer is to run the engine on minimal fuel for maximum Watts. AND IT CAN BE DONE! Even with humble char and a little love'n'care you can produce a surge of over 4 megawatts of power, enough to send sparks flying and supervisors crying.
Here is a hint: Which way is the gas flowing, and what can you do for it? And you see those warning lights along the pipes? They are not a joke, if they are spazzing out, your work is calling.
The geothermal capture system
All about Hotspots
Hotspots are where magma is close enough to the surface to make magical geothermal heat energy. As you might expect, the hottest part of a hotspot is its center, and the temperature quickly tapers off the farther from the center you go. Each one of them is a 20x20 or so square, and Oshan Lab spawns with forty of them on the map. Occasionally, these hotspots move, though not all at once. They bounce off of the trench walls surrounding the map.
When these hotspots move, they cause quakes that result in certain effects depending on distance from the center. The particulars vary, but basically, if you see a message, the hotspot's within your screen; if you hear a rumbling, it's really close by; and if you fall on your ass, you're practically right on top of it. Hotter hotspots produce worse effects.
You've probably noticed these quakes before. If you've ever seen random burnt floor tiles with no apparent source or seen a message along the lines of "the ground rumbles softly" while walking through the station, then you've observed a nearby hotspot moving and quaking. Don't be too concerned; a single hotspot usually just causes tiny fires. Two is when they get annoying; together, they can outright throw you onto the floor, making you drop whatever items you were holding and giving you nasty bruises. Huge clusters of them are absolute clusterfucks; they can outright destroy plasmaglass in a single quake, tear off limbs, cause combustibles to explode, and, occasionally, just plain explode, occasionally multiple times.
Essential Equipment & Machinery
These items are essential to setting up the capture system:
 Dowsing Rod - Required to detect hotspots and find their centers. You need at least one.
 Stomper Unit - Pull this behind you. You need it to lock in hotspots.
 Power Shovel - How else will you dig holes for the vent units? With a spoon? You can leave this in your backpack; you won't use it very much.
 Unbuilt Vent Capture Unit - These actually generate the electricity. Keep one in your backpack for later.
 Reinforced Wire - You'll be laying down fairly long lines of cable, so you'll need quite a bit of wire. These reinforced wire coils are a lot longer than your average cable coils. As an added bonus, they're also slightly explosion-resistant! Feel free to take a coil or two and keep in your pockets or backpack.
 /
/  +
+  Oxygen/Air Mix Tank + Breath Mask - Fish can breathe underwater. You're not a fish, so you need to breathe a tank of oxygen/air mix in your hand and a breath mask (or equivalent) to breathe underwater.
These ones are not absolutely necessary, but are nevertheless quite useful.
 Flippers - Moving underwater (or in any fluid) significantly slows you down. Wearing a pair of flippers on your feet (or holding them--don't ask us how) negates that movement penalty, dramatically speeding you up.
 Wirecutters - If you wire something in the wrong place or the wrong way, you can cut it away with these.
 /
/  Wrench/Screwdriver - Two tools you might use to build vent units.
 +
+  Engineering Diving Suit - You don't need diving gear to walk on the seafloor around the station, but you might appreciate the extra light from the helmet. Plus, it looks pretty cool.
 Space GPS - If you get lost, click on the GPS in-hand, click the Select Destination button, and input the coordinates of some place that's on-station, like 200, 150, which is roughly the center of Engineering.
Hunting for & Centering Hotspots: The Hard Part
Once you've equipment and tools ready, it's time to head out the airlock and start finding hotspots. To see if you're near a hotspot, simply plop down a dowsing rod on the seafloor. If it detects a hotspot, the rod will stay white, and you'll have to pick it up and lay it down elsewhere. Hotspots are fairly large, so try somewhere fairly farther out. If the rod does detect a hotspot, the temperature indicator light on the top will turn a certain color, ranging from blue to purple to pink to red, with blue being the coolest and red the hottest. The rod will also give you an estimate of the distance to the center of the detected hotspot, and if you leave it there, it'll periodically broadcast said estimate to onlookers.
Get used to the blank white light. Though there's plenty of hotspots, they're all fairly spread out amongst Oshan Laboratory's huge map, so it's not uncommon to comb through huge swaths of the seafloor without finding any hotspots. Persevere and be patient.
Once you've finally discovered a hotspot, finding its center is fairly intuitive. If you take another reading in some direction, and the rod's estimate is lower, chances are that the center's in that direction. Conversely, if the estimate's higher, the center's probably in the opposite direction, and if it's the same, it's probably in a completely different direction. For example, if you plop a rod northwest of the your previous spot and get an estimate of 8 when your previous one was 9, you should continue northwest. Conversely, if it's 10, you should head the opposite direction, southeast, and if it's 9 again, you should try another direction entirely.
Doppler Shift
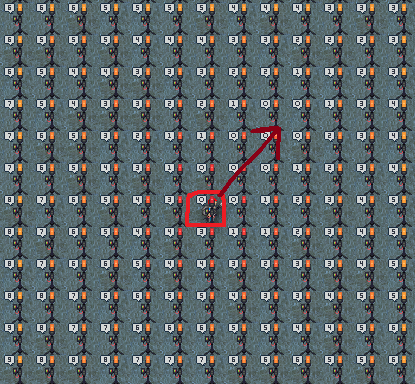
Remember how we said that hotspots move? Because they move, this actually causes the vibrations they produce to clump up in some places and spread out in others, affecting how dowsing rods estimate distance. This is what the "Distance readings may fluctuate based on the frequency of vibrational waves." bit in the Examine text for dowsing rods means and what the Manual calls "Doppler shift". Don't be deceived by use of a physics term; this version of Doppler shift is a simpler, more "gameified" version of the real life phenomenon. You don't need to learn any actual physics, and if you do want to anyways, a simple example or illustration will be more helpful than a textbook or lecture.
Every unpinned (that is, not locked in place by a stomper) hotspot has a general direction it'll go in and thus a path of squares its center will be in the future. If a rod is within this path, it will report that it's closer to the center than it actually is. In contrast, a rod directly opposite or "behind" the path will estimate that it's farther from the center than it actually is.
You can see this best in the picture to the right, which shows a hotspot heading northeast and with the center circled in red. As you can see, some of the rods northeast of the hotspot say they're right on or close to the center, even though they actually aren't. Meanwhile, the rods in the southwest say they're three or more tiles away from the center, even though they're directly adjacent to it.
What are the practical takeaways?
- If you find a square that the dowsing rod claims is the center, it might actually be where the center will be in the future, rather than where it is right now. In fact, you can often find whole patch of places with 0 for the distance to center estimate.
- To determine if the square actually is the current center, you can:
- Look for adjacent tiles with unusually high distance estimates. It'll likely be something like above example, which has two 3s and one 4 next to a 0.
- Leave a dowsing rod on the square and use the stomper unit on it. If it was the actual center, the hotspot will cheerily beep and proclaim "Hotspot pinned." If it wasn't, the hotspot will move, dragging the dowsing rod with it. You can then walk towards the rod and try stomping a different 0 square.
Overlapping Hotspots
When multiple hotspots are next to each other, the rods' center estimates often vary wildly. For example, you might plop down a rod in four different locations and get estimates of 10, 9, and 8, only for the next estimate to suddenly jump to 20. The rod isn't bugging out or anything; it's just adding up the distances. That 20 might mean 10 tiles away from the centers of two hotspots. That 8 might be 4 from two centers or 1 tile to one center and 7 tiles to the other. Or it might just be 8 from one center.
With a bit of intuition and some simple math, you can still decipher where the centers are. If you manage to find a corner of one hotspot where there isn't overlap (that is, readings of 10 and nothing above that), you could intuit the center based on which corner it is (i.e. if you've found the northwest corner of a hotspot, then the center is 10 tiles to the southeast.) From there, since you know where one hotspot is and thus how far you are its center at any point, you can use to decipher the dowsing rod readings. For example, if you get an estimate of 5 and know that there's a hotspot 3 tiles directly north of you, then that means there's another hotspot 2 tiles away in some direction.
Alternatively, you can ignore the distance estimates entirely and rely upon indicator light alone. Theoretically, you could use a single dowsing rod and find the center by the light alone. However, it's usually easier to make a grid of dowsing rods over an area and do readings around the rods with the reddest/pinkest/purplest lights.
Harvesting Hotspots: The Easy Part
Once you've finally found the center of the hotspot, everything afterwards is pretty easy.
- Drag the stomper unit directly over the center of the hotspot or directly adjacent to it (i.e., usually where the rod reads 0 or 1).
- Click on the stomper unit to lock the hotspot in place. Remember, hotspots occasionally move, so if you don't lock it, your vents will eventually lose heat and power. If you've correctly found the center, the stomper will beep out and state, "Hotspot pinned."
- Dig a hole in the hotspot center with the power shovel to make room for the vent unit.
- Construct the vent capture unit. Thanks to imcoder magic, you can either:
- Stand over the center of the hotspot and click on the unbuilt vent capture unit kit, as if you were constructing a table.
- Plop the unit over the center and use a screwdriver or wrench on it.
- Click on the vent unit while holding some wire to place some cable under the unit.
- Click on the square the unit's on to place some wire under you.
- Lay wire from the vent back to the station power grid. The safest practice is to connect it to the fork of wires just outside the Power Room, but wiring it to the super-convenient cable line connecting the Research Outpost to the station or any random wire is usually fine, so long as the connected vent(s) isn't/aren't outputting too much electricity.
- Pro-tip: Click on the wire while it's in your hand to start laying down cable as you move. Now, instead of constantly stopping every tile to lay down cable, you can just mosey down back to Engineering.
If you've wired it to the prong outside Engineering, don't forget to set up the SMES units in the Power Room. One vent unit at the center of a hotspot produces 330k watts, so you can afford to set input to max and set output fairly high.
Boosting Power Generation
One hotspot on its own provides plenty of power. With a few techniques, all of which are compatible with each other, you can jack it up even higher and turn the engine into multiple-megawatt beast for the PTL--and without a raging inferno! (Usually.)
Adding More Vents
Mechanically speaking, there's nothing stopping you from simply adding more vent units. All you have to do is dig more holes, construct more vent units, and wire them back the station. The vent units can share one cable, and it doesn't matter if a vent is over a line or "nub" of wire. It's that easy.
However, there's a catch: adding additional vents increases total power generation but decreases the individual power output of each vent units. Adding a second vent actually decreases total generation, but the third and fourth increase it by several tens of thousands. Afterwards, however, you get diminishing returns. Once you have six or seven vents, additional vents add only a couple thousand watts to the total.
Mining Under a Hotspot
If you go to a hotspot's corresponding area in the Trench and mine out the rock there, you tremendously boost the hotspot's heat and power generation, evidently because you're releasing energy trapped in rock above the magma heating a hotspot. Breaking just one square of asteroid adds tens of thousands of watts. If you take the time and effort to mine out all the rock, you can easily send the hotspot's power output into the megawatts.
Fortunately, mining the rock is easier than ever now. You'll just need:
 Controlled Demolition Pipe - These make holes in the seafloor, so you can access the energy-rich rock underneath them. They're found in engineering explosives crates (
 ).
). Sea Ladder - This contraption lets you easily move up and down the holes you've made to get into the Trench.
 /
/  +
+  Oxygen/Air Mix Tank + Breath Mask - Because you can't breathe in the Trench either, unless you're a squid.
 +
+  Engineering Diving Suit - This time, you do actually need the suit, since the Trench will give you horrific burns if you go in there without one. While the helmet is actually still unnecessary, the Trench is also fairly dark, so you'll appreciate the light from the helmet.
 Flippers - For reasons mentioned above
Once you've gotten your gear ready, head up the hotspot of interest on the station Z-level. Detonate the controlled demolition pipe by clicking on it in-hand, and, if you care for your safety, dropping it onto the ground. It doesn't matter where you detonate it, so long as it's within the hotspot.
The resulting explosion should create a fairly sizable hole on surface seafloor. While you're holding the sea ladder, click on any part of the hole to deploy the ladder. Click on the ladder to climb up/down. You should end up in the hotspot's corresponding area in the Trench. The coordinates of the station Z-level match up with the Trench's, so an man-made hole on 209, 23 on the station Z-level should take you to 209, 23 in the Trench. Check with a GPS unit if you want to be sure.
Now that you're under the hotspot, start breaking the rock. If you see sparks fly when you destroy it, then you've definitely found a hotspot. It doesn't matter how you break it; you get the boost either way. You could mine it with hand tools, mining phasers, the Cutter Blades on your departmental minisub's Industrial Utility Arms--the list goes on. Heck, you could blow it with pipebombs or a TTV from Research if you're feeling really ambitious.
Just be prepared to be there for a while. There's a 20x20 area in the Trench to you have to clear, though, thankfully, if there's a cavern in the area, you don't have to mine as much rock.
It's best to do this when the hotspot is locked down. Whenever a hotspot moves, its corresponding region in the Trench also moves, so if you don't lock it in place, you'll have to keep mining more and more rock as the hotspot moves over other parts of the Trench. Also, mining the rock under a hotspot makes its quakes much stronger, so you'll essentially create a 1906 San Francisco quake generator just aching to roam into the station if you mine the rock under it and leave it unpinned.
If the Miners are around, you can also just ask them to mine the hotspot if you're busy or want to find other hotspots. Don't forget to tell them the GPS coordinates of the hotspot you want them to mine under.
Stacking Hotspots
If you activate the stomper in any place besides the center, it'll push the hotspot away from the stomper. If you push multiple hotspot centers into the same tile, the extra hotspot multiplies the effects of the other hotspots, sending heat and power output through the roof.
This is harder than it sounds. First, the stomper unit usually only moves the hotspot one or two tiles, so relocating hotspots takes a fairly long time. This is partially the reason the stomper has an automatic mode, which you can toggle via right-clicking on the stomper. Second, when you get the hotspots to overlap, stomping one often moves both of them, so you actually have to keep track of two hotspots. For this reason, some Engineers actually prefer to stomp the hotspots really close to together and let them naturally drift into the same spot.
My legs instantly turned into cranberry sauce.
Stacking hotspots is a more exact science than it would seem, with a single fully excavated hotspot being perfectly capable of putting you down more effectively than you may expect, and two being nothing short of lethal. Trying to get multiple hotspots isn't difficult, except for the part where you need to get to the middle and actually pin the damned things. There's a few ways to keep a hotspot in place without pinning it, the most efficient being to deploy four Stompers just barely out of range of your initial hotspot, penning in any hotspot that you move in range. Of course, over time natural drift might cause you to lose your Stompers, so be ready with spares.
The singularity engine
This engine uses the radiation released from quantum effects in a black hole contained by an energy field to produce electricity, like a solar panel for Hawking radiation. It's the sole power source on Manta, and singularity engine setups can be assembled on other stations. With an average power output range above 600 kilowatts, it's a little bit better than your average charburn and somewhat more dangerous, though definitely quite a sight to behold once finished.
Unless you're on Manta, most of the required components are not on the station at roundstart, so you'll have to gather the parts yourself, either by exploring the Adventure Zone with a friendly Research team or ordering the parts from Quartermaster for a hefty amount of cash, with some extra assistance from the Mechanics to ease the workload/costs. Here's a quick rundown of the required items.
 4x Field Generator
 4x Emitters
 +
+  4x Radiation Collection Array + 4x Plasma tanks (more is better, but 4 is often convenient)
 1x Radiation Collection Controller
 1x Gravitional Singularity Generator
Be sure to also grab a wrench and welder so you secure the components together. Get some wires too, if you're building a singulo engine from scratch. While they're technically optional, meson goggles, magnetic boots, and a radiation suit & hood are nice to have after the singulo's set up; mesons let you stare at the singulo without getting stunned, magboots let you resist the singulo's pull, and rad gear protects you from the occasional outburst of ionizing radiation from the singulo.
During its lifetime, the singulo occasionally releases electromagnetic pulses, opening up doors and causing electronics to malfunction, with the exact same effects as EMP grenades. Cyborgs, especially those with light chests, arms, and/or legs, should be careful, as these EMPs can significantly damage these components. Regular humans and other organic lifeforms do not have to worry so much, but they may find that their headsets and other radios aren't working as they should be.
How it all goes together
Once you've found enough parts, you'll have to put them in the proper arrangement. Here are a few guildlines:
- The gravitional singularity generator needs to be in the center of a 5x5 or bigger containment to spawn a singularity.
- That means that the field generators need to be at least 5 squares apart from each other.
- The emitters should be aimed at the field generators, with at least one emitter to a field generator. Emitters can shoot through windows and have lots of range, so you afford a little protective glass or space between the emitters and field generators.
- Don't forget: emitters need power to be able to shoot at the field generators, so remember to wire them up so they'll receive power.
- The radiation collectors and the array controller can be put just about anywhere. The controllers can accommodate up to 8 collectors and should be wired to the main power grid.
How to start it
Don't forget to put on your Mesons, lest you get blinded and fall on your face while staring at the singularity. If you're not a fan of constantly dragged into the center of an infinitely strong gravitational field, don't forget your magboots.
- Secure the Emitters so they're aimed at the field generators.
- To turn an emitter on, either right-click one and choose Rotate or hold down Ctrl and click on one to start pulling and move in the right-direction--don't forget to cancel your pull by clicking anywhere on the screen that isn't a directly adjacent tile.
- To secure an emitter, click on it with a wrench, then click on it with a lit welder. You can click on a welder while it's in your hand to turn it on, and it's a good idea wear a welding mask, flipped down, to shield your eyes. After a while, you should get the message "You weld the emitter in place".
- Secure the Field Generators. To secure a generator, click on it with a wrench to bolt it down and then click on it with a lit welder to firmly affix it to the floor, as you would with an emitter.
- Secure the Gravitional Singularity Generator. Simply clicking on it with a wrench will do.
- Get plasma tanks from the tank dispenser. The number of tanks is determined by the number of radiation collection arrays (one for each array), i.e. 4 tanks for 4 arrays. To take a plasma tank out of the dispenser, click on it to access its interface and then click on the link labeled "Plasma" to take the tank out.
- Place the plasma tanks into the collection arrays by clicking on array while holding a plasma tank, so they can actually use the radiation to make electricity.
- Turn on all collection arrays and array controllers by clicking on them. Arrays can't make electricity if they're off, obviously.
- Turn on all emitters. For each emitter:
- Click on the emitter with an Engineer ID to lock/unlock the console.
- Click on it to turn it on/off.
- It's a good idea to wait about a minute after the last emitter is on so the field generators receive some power.
- CAREFULLY Turn on all field generators
- Unlock it with your Engineer ID.
- Click on it. This will spawn a containment field between the two field generators, keeping the singularity within the beam and not eating up the station. This field will shock you if you're one square away from it, that's why you should...
- RUN towards the outside! (The second time you do this you'll know when to run and when not to, but until then, do it every time)
- Lock all of the emitters' consoles by clicking on it with your ID again if you have not done so already. Don't want some random clown to turn them off and release the singularity, after all, unless...
That's all! Don't forget to setup the SMES units, so that the station can actually receive power from the singulo. Something like 70k/30k for each usually works.
The Engine Control Computer
If you're an Engineer on Manta (or, for whatever reason, Linemap or any of the pre-Cogmap1 maps), not only do you have all the necessary components spawn in Engineering at roundstart, you also have the privilege of getting an Engine Control Computer, sometimes known as the Engine Master, giving you an alternative to step 8. Because you're letting a computer turn on the field generators rather than going up to each one and activating them manually, you avoid the risk of getting shocked by a containment beam.
To use to the Engine Control Computer, first do the above first seven steps (i.e.securing the components and activating the collectors and emitters), but instead of manually turning on the field generators, you do the following steps:
- Open the computer's terminal
- Put your ID Card in your hand and click on the link at the bottom of the terminal window to insert it
- Type login. Optionally, remove your card.
- type dir. This will display all programs in the folder you're currently in
- type run EngineMaster This will start the EngineMaster program
- type rescan This will scan for active equipment (it might not give you a 'done', just wait a few seconds, if you don't get a response, it's probably all well and good.)
- type startup This will start the emitters and then the field generators. Don't close the program until the singularity is spawned.
NOTE: The AI can handle all the computer work for you if you ask nicely and you've secured all the emitters and field generators. The AI cannot start the engine without someone setting those up.
End result
- Main article: Singularity
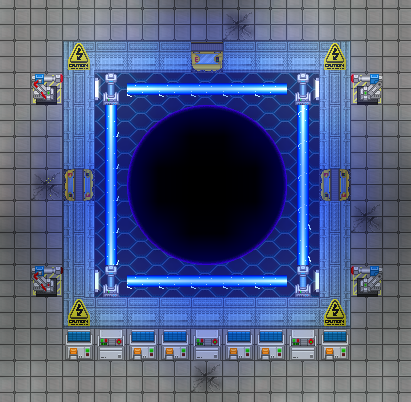
The finished engine should look something like this, with all emitters on, field up and running, and collection arrays and their controllers on. If you're not planning on feeding the singularity bodies, it's a good idea to weld the doors shut. While you can leave the doors unwelded, it's usually safer since the singularity's electromagnetic pulses will open the door, leaving them open for some fool to wander into.
OH FUCK IT'S LOOSE
Maybe someone forgot to turn on the emitters before the field generators (it happens to all of us, and fortunately we usually make it only once). Maybe someone deliberately turned off the emitters and field generators and let the containment field die down (which would take quite some time; the field generators take quite a while to die down). Maybe the gods were crazy and unleashed a singularity on the world. Whatever the case, you've a massive black hole roaming about, free and uncontained, and no doubt carving a massive hole in the station as it vaporizes everything in its path.
Do not fret too much. Though Lord Singuloth is ever-hungry and insatiable, he is also very lazy and rather fickle, indecisive,even. When loose, he is quite tame and prefers to dine rather than gorge. He will often be leisurely eat away at the station, munching away at entire floors while dragging floor tiles, people, lockers, and other unanchored objects towards him. Some few seconds later, he will then quietly retreat some distance back into empty space, seemingly to ruminate his latest meal and partake in all its flavors and tinges. Afterwards, he may perhaps decide he likes the taste and slowly saunter back for seconds. Or he may venture off, wandering about, in search of new tastes and flavors. But then, he may have second thoughts and amble back in to feed again.
Point is, a loose singularity tends to quite destructive but relatively slow at actually destroying things (and certainly no where near as quick as other versions of it.) You should still be worried; this thing can still eat entire rooms, depressurize whatever's left, and severely mess up electronics, including headsets. You'll definitely need a space suit, meson goggles, and a jetpack if you're going to seriously deal with this thing. It's still a good idea to call the shuttle, even if you think you can handle the thing, if only just for good measure, and it's an even better idea to evacuate everyone to Escape for the time being.
Fortunately for you, your fellow Engineer, and everyone else, there is any easy solution: blow it up. If a bomb explodes and the singularity's center is caught in the blast radius, the singularity will magically dissipate and disappear. Given that the singularity is 5x5, you basically need a bomb that go at least 3 or 4 tiles.
The bomb can't just be thrown into the singularity; otherwise, it'll just be disintegrated by the singulo. It's better (and easier) if the bomb explodes somewhere near the edge of the singularity, the closer, the better (though, obviously, the closer it is, the more likely it'll be sucked in). A TTV will definitely work, maybe a bit too well; a pipe bomb may be also be suitable. Microbomb implants, big and small are perfect; the singularity will swallow and kill the implanted, triggering the bomb and causing an explosion right in center.
Manta: Singularity Busters
Manta Engineers have exclusive access to a tool specifically made to deal with loose singularities (singulooses?): the Singularity Buster Rocket Launcher, found in the CE's private quarters and in anti-singularity packs from Cargo.
Operating ones of these babies is simple: simple click on the launcher with a rocket in-hand to load it into the launcher, click on the launcher to pick it up, and click on any square to fire it. No need to worry about recoil or backblast, but you do need to aim carefully. The rocket must hit the 3x3 square that comprises the center of the singulo. The singulo's own gravitational pull can deflect rockets off-course, and in the time it takes for the rocket to fly, the singulo might have already wandered away from the rocket's flight path. There's also a chance for the buster rocket to actually create another singularity, but it's very rare.
Besides the weird aiming issues, there's one other catch: unlike other explosives, which instantly destroy the singularity when it's in their blast radius, the singularity rockets instead cause the singularity to downgrade into a black hole. Said black hole at least disappears after a while, but in the meantime, it'll rip and tear through everything in its path, much faster than a normal singulo. Not too bad if the singulo's hanging out in open sea, but not so manageable if singularity's still inside Engineering or some other vital station area, though some may argue being torn apart by a black hole temporarily is better than being slowly consumed by the singularity until round end.
Speaking of other explosives, in a pinch, you can destroy the singulo with Torpedos, if you can aim them so they detonate close to their 3x3 center. Explosive & high-explosive torpedos are preferred, whose explosion radii are roughly on par with weaker TTVs or stronger pipebombs. Should the torpedo tubes be inoperable/unavailable, sufficient brute force, on par with five or more extinguisher smacks, can send the torpedo off in the direction it's facing.
The power transmission laser
The power transmission laser, or PTL for short, rewards engineers who go above and beyond the usual power supply. Using the interface on the laser system (click the lower left side of control panel sprite), the laser can receive power as an input and then output it, just like a SMES unit can. Once the PTL finishes charging (indicated by a nice little charging meter above the controls, just like those sci-fi movies), the PTL outputs its power in the form of a huge laser beam that gets sent all the way across the station Z-Level and, presumably, to some other people in need of power somewhere in space. As the PTL continues running,the engineers get a share of the money earned to their bank accounts, and the rest of the station starts receiving a steady amount of extra cash into the payroll budgets, depending on how much power is transmitted. There are a few restrictions to keep in mind, however:
- The PTL will not input any more than half of the total engine output, even if you set it beyond that threshold on the console.
- The PTL also cannot transmit power beyond 999 TW (terawatts). You need to have an insanely powerful engine setup for this to be a problem, but it's worth mentioning.
- Finally, the PTL obviously cannot transmit power when the door blocking the laser is closed.
Setting up the PTL is much like setting up an SMES Unit. However, instead of clicking on plus and minus signs to set the input and output levels, you input a number between 1 and 999 (the default is 1, but you can click on the number itself to input a different value) and then pick a suitable watt range, such as W, KW, MW, etc. As with an SMES, setting output slightly lower than input is preferred (though having them be the same is also viable, if the PTL already some charge stored). A misconfigured PTL won't exactly fail, but it will output sporadic bursts, which tend to be less efficient at earning credits than a steady continuous beam.
You'll need to constantly micromanage the laser input with the total engine output to make sure that your cash-making machine isn't at the expense of station function, but with sufficiently high-power engine setups, this won't be an issue. Experiment with how much power you're able to get away with beaming into space!
| Department Guides | |
|---|---|
| Engineering | Making and Breaking · Construction · Gas · Power Grid · Thermoelectric Generator · Singularity Generator · Geothermal Generator · Catalytic Generator · Nuclear Generator · Mining · Materials and Crafting · Wiring · Hacking · MechComp · Mechanic components and you · Control Unit · Ruckingenur Kit · Reactor Statistics Computer · Cargo Crates |
| Medsci | Doctoring · Genetics · Robotics · Telescience · Plasma Research · Artifact Research · Chemistry · Chemicals · ChemiCompiler · Decomposition |
| Security | Security Officer · Contraband · Forensics · Space Law |
| Service | Foods and Drinks · Botany · Writing · Piano Song Dump · Instruments |
| The AI | Artificial Intelligence · AI Laws · Chain of Command · Guide to AI · Humans and Nonhumans · Killing the AI |
| Computers | Computers · TermOS · ThinkDOS · Packets |
