User:Ilysen/Sandbox: Difference between revisions
Created page with "===Standard Items=== The equipment listed below doesn't have any job requirement, i.e. whether the uplink owner is an Engineer or Medical Doctor or whatever doesn't af..." |
m wow this is awful. gonna need to stop here for now |
||
| (4 intermediate revisions by the same user not shown) | |||
| Line 1: | Line 1: | ||
= | {{Historical|Notes=Pathology has been officially discontinued by the developers and removed from the game.}} | ||
This page documents the pathology system, which allowed players to build their own [[Virus|viruses]] out of microbodies and symptoms. It had its own area in medbay, accessible to all medical staff -- the [[Pathology]] lab, complete with quarantine cells and a [[Science_Objects#ValuChimp|ValuChimp]] for easy test subjects. | |||
{| | |||
Pathology has a long and storied history and was present as far back as 2010, with the most recent iteration of the system dating back to 2014 after being reworked. As the game evolved, it became a pretty contentious feature. It was mainly used to create superviruses that would either scour the station of life in a creative variety of ways or turn everyone into unkillable self-reviving monsters. By May 2020, things weren't looking good; the original creator was long-gone, and the admin team decided to suspend player access to pathology for the second time pending another rework, for a number of reasons explained in [https://forum.ss13.co/showthread.php?tid=14435 this forum thread]. | |||
Pathology remained in the game's code for another four years. During this time, the entire system was tied to a server config option; you could enable access on a local copy of the game to mess with it, but the official servers kept it disabled. It received occasional tweaks and changes (such as the addition of a dedicated Pathologist job) and was sometimes re-enabled for playtesting, but a rework failed to materialize as nobody stepped up to the plate to attempt to salvage what was a very controversial feature to begin with. | |||
References and code tying the system to the rest of the game were gradually removed until finally, in July 2024, pathology was [https://github.com/goonstation/goonstation/pull/19688 entirely removed] from the code and entered into history. While the [[Pathology|pathology labs]] still remain on a few maps, the machinery inside has been replaced with nonfunctional replicas that don't actually do anything. | |||
What follows is a description of how the system used to work, and the things you could do with it. | |||
== Stats == | |||
[[File:Patho manip.PNG|right|frame|The Manipulate tab in the Pathogen Manipulator, used to change a pathogens stats.]] | |||
These were numerical values between 0 and 50 that influenced how well a pathogen could do certain things. A pathologist could set these stats directly in the Pathogen Manipulator. | |||
* '''Advance''' Rate: This determined how quickly the pathogen would advance through its Stages. It also determined how quickly it goes down through its stages when suppressed or in remission. | |||
* '''Spread''': This determined how well the pathogen would spread from person to person, although spread also depended on the pathogen's symptoms. A pathogen with 0 spread would not spread at all by itself. | |||
* '''Suppression Threshold''': This determines how easily a pathogen could be suppressed via its Suppressant. | |||
Pathogens had a limited amount of points to spread over these stats, so if it is very good in some stats, the other stats will probably be lower to compensate. The amount of points a pathogen had to spread was known as its '''Passive Capacity'''. | |||
== Microbody Type == | |||
There were four different types of microbody that served as the medium of a pathogen, plus a fifth that only occurs when the admins bombard the station with diseased burgles. Each one had its own pros and cons. Specific samples had their own types, and they couldn't be changed, so you'd need to find a sample with the type you wanted and then build off of that for your disease. | |||
The microbody type influenced a handful of things: | |||
* '''Stages''': The maximum stage that the pathogen could reach. The higher a pathogen's current stage in an infectee, the more intense their symptoms would be. | |||
* '''Active Capacity''': How many symptoms (and of what length) the pathogen could support. Adding any more would destroy the pathogen. More on these later! | |||
* '''Activity''': How often the pathogen could trigger its symptoms. This also differed depending on the pathogen's stage. | |||
* '''Growth Medium''': What type of Growth Medium needed to be added to a petri dish in order for the pathogen to grow. This was a chemical, and without it, the sample would become starved of nutrients and eventually die. | |||
* '''Anti-Agent''': What type of Anti-Agent needed to be used to make a cure in the Synth-O-Matic. This is a chemical. | |||
* '''Vaccinable''': If a vaccine could be made for the pathogen. | |||
* '''Auto-Immunization''': If you were immune to the pathogen after you have been cured of it once. | |||
The different microbody types were as follows: | |||
{| class="wikitable" | |||
! Microbody | |||
! Stages | |||
! Activity | |||
! Active Capacity | |||
! Growth medium | |||
! Anti-agent | |||
! Vaccinable | |||
! Self-<br>immunization | |||
! Admin-only | |||
|- id="Virus" | |||
!Virus | |||
|5 | |||
|1, 5, 20, 30, 40 | |||
|12 | |||
|Egg | |||
|Antiviral Agent | |||
|{{Yes}} | |||
|{{Yes}} | |||
|{{No}} | |||
|- id="Parasite" | |||
!Parasite | |||
|5 | |||
|50, 40, 30, 20, 10 | |||
|18 | |||
|Parasitic Medium | |||
|Biocide | |||
|{{No}} | |||
|{{Yes}} | |||
|{{No}} | |||
|- id="Bacterium" | |||
!Bacterium | |||
|3 | |||
|30, 30, 30 | |||
|25 | |||
|Bacterial Medium | |||
|Spaceacillin | |||
|{{Yes}} | |||
|{{Yes}} | |||
|{{No}} | |||
|- id="Fungus" | |||
!Fungus | |||
|1 | |||
|10 | |||
|∞ | |||
|Fungal Medium | |||
|Biocide | |||
|{{Yes}} | |||
|{{Yes}} | |||
|{{No}} | |||
|- id="mutatis" | |||
!Great Mutatis | |||
|5 | |||
|20, 20, 20, 20, 20 | |||
|∞ | |||
|Stable Mutagen | |||
|Mutation Inhibitor | |||
|{{No}} | |||
|{{Yes}} | |||
|{{Yes}} | |||
|} | |||
Let's say you were infected by a '''virus''' pathogen. It would start out in stage 1, as all infections do. While in stage 1, it'd only have a 1% chance to trigger its symptoms, which is very low! But as it progressed through the stages, it would trigger more and more, with up to a 40% chance to trigger symptoms at stage 5. | |||
Something like a '''parasite''' pathogen, on the other hand, would start out at 40% in stage 1, so it might spread very quickly! But as it progressed through the stages, it would trigger less and less; this made it helpful for diseases meant to spread and act quickly, or that had more passive effects that didn't need to trigger as often. | |||
'''Bacteria''' pathogens had constant activity throughout their stages, but they could only progress up to stage 3. This meant that their symptoms will be a bit weaker, and some really strong effects might never be able to trigger at all -- stuff like gibbing from tier 5 symptoms, for instance. That said, you could put a lot more symptoms on it than on a virus or parasite, so it made sense for pathogens with a big variety of effects. | |||
On its surface, '''fungus''' pathogens seem as though they were pretty awful. And they sure were! But the main purpose of a fungus wasn't as an actual spreader itself -- instead, you could cultivate lots of symptoms with it, even if you never intended to infect anyone with that pathogen itself. You'll see what this came in handy for later. | |||
== Suppressant == | |||
The suppressant, like the microbody type, was an inherent, unchangeable property of a pathogen sample. It was a specific type of stimulus that the pathogen is weak to. When a pathogen was exposed to its suppressant, it might start to regress through its stages, becoming less powerful. Prolonged exposure might even cause it to go into remission, eventually being cured completely. There were a handful of different suppressants, which could be applied in different ways. | |||
You weren't told explicitly what a pathogen's suppressant was, so it requires a little bit of detective work! Suppressants were split into a few different groups; a quick inspection with a '''health analyzer''' or '''microscope''' could tell you the group, but not the exact suppressant itself. To find out the precise type, you'd simply put a petri dish with a sample of the pathogen under a microscope and use a dropper to drip a little bit of a related chemical into the dish. If the pathogen reacted, you'd know that you found the correct suppressant! You could also tell what the suppressant is by the color that the pathogen was when seen under a microscope. | |||
{| class="wikitable" | |||
! Group | |||
! Suppressant | |||
! Trigger | |||
! Color | |||
! Associated Chemicals | |||
|- | |||
| rowspan="2" | Thermal | |||
| Heat | |||
| Afflicted needs to have a high body temperature | |||
| Blue | |||
| Phlogiston, Chlorine Trifluoride | |||
|- | |||
| Cold | |||
| Afflicted needs to have a low body temperature | |||
| Red | |||
| Cryostylane, Cryoxadone | |||
|- | |- | ||
| rowspan="2" | Sedative | |||
| Sedative | |||
| Afflicted needs to sleep | |||
| Green | |||
| Morphine, Ketamine | |||
|- | |||
| Muscle Relaxant | |||
| Afflicted needs to have related chemicals in bloodstream, or receive electric shocks | |||
| White | |||
| Haloperidol, Neurotoxin | |||
|- | |||
| rowspan="2" | Medical | |||
| Brute Medicine | |||
| Afflicted needs to have related chemicals in bloodstream | |||
| Black | |||
| Styptic Powder, Synthflesh | |||
|- | |||
| Burn Medicine | |||
| Afflicted needs to have related chemicals in bloodstream | |||
| Cyan | |||
| Silver Sulfadiazine, Synthflesh | |||
|- | |||
| rowspan="2" | Gastronomical | |||
| Fat | |||
| Afflicted needs to have related chemicals in bloodstream | |||
| Orange | |||
| Partially Hydrogenated Space-Soybean Oil, Space-Soybean Oil, Porktonium, Cholesterol | |||
|- | |||
| Chicken Soup | |||
| Afflicted needs to have related chemicals in bloodstream | |||
| Pink | |||
| Chicken Soup | |||
|- | |||
| rowspan="2" | Radioactive | |||
| Radiation | |||
| Afflicted needs to be irradiated | |||
| Viridian | |||
| Radium, Unstable Mutagen, Uranium, Polonium | |||
|- | |||
| Mutagen | |||
| Afflicted needs to have related chemicals in bloodstream | |||
| Olive Drab | |||
| Unstable Mutagen, Stable Mutagen | |||
|} | |||
Suppressants also had a use in manufacturing cures, but weren't necessary for them. | |||
== Symptoms == | |||
[[Image: Symptom2.PNG|frame|border|A virus type pathogen with one tier 2 symptom and three tier 1 symptoms]] | |||
Time for the fun part! Symptoms are what determined what your pathogen would actually do. Most of the time in creating a pathogen went into finding the symptoms you wanted. Each sample came with its own random set of low-tier ones. | |||
| | |||
Each symptom had a unique code that is made of segments, each of which was a combination of three letters or digits. There were five different tiers of symptoms, with tier 1 symptoms being the weakest but only needing one segment, while tier 5 were the strongest but needed five segments to compensate. | |||
Turn your attention to the image on the right. Everything after the || is the pathogen's symptoms! The individual symptom's codes were separated with |, so as you can see, we have four different symptoms -- one tier 2 symptom (ffe 001) and three tier 1 symptoms (2e6, ffe, 9dd). | |||
=== Examining Symptoms === | |||
To find out which symptoms a code corresponded to, we'd need to use one of the lab's tools: the microscope. [[Image: Microscope.png]] | |||
[[Image: Microscope-zoom1.PNG|right|frame|border|The view visible through the Microscope, after Step 4]] | |||
[[Image: Microscope-zoom2.PNG|border|frame|The view visible through the Microscope after dripping some Pepper in, after Step 8]] | |||
# Remove your sample from the Pathogen Manipulator and put it into a petri dish, then put the petri dish into the microscope so you can inspect it. | |||
# ''Optional:'' If you thought things might take a while, you'd want to put some of the appropriate nutrient type into the petri dish as well to keep the sample alive. | |||
# Clicking the microscope would then allow you to view the sample in two different ways: zoomed-out, or zoomed-in. Checking symptoms would necessitate a zoomed-in view. | |||
# The first part of the output in our example (suppressed by something affecting neural activity) shows that the pathogen's suppressant is of the '''sedative''' variety. | |||
# The rest is a bunch of hints, with the code next to each hint showing which symptom code gave them. Now you'd just need to figure out what symptoms these hints referred to. This is documented in the [[Pathogen Symptoms & Mutations]] page! | |||
# Now, armed with the knowledge that ''''ffe001'''' is a '''tier 2''' symptom with the hint ''''The pathogen appears to generate a high amount of fluids.'''' we can deduce that it must be either the '''Sneezing''' or the '''Coughing''' symptom. | |||
# If you wanted to find out which one of the two, you'd get ourselves some pepper from the kitchen and use a [[Medical_Objects#Dropper|Dropper]] to drip some of it into the petri dish, then observe the microscope's output again. | |||
# As you can see in the last part, the sample exhibits the behavior of Sneezing when it interacts with pepper, so you'd know that it is '''Sneezing''', and not '''Coughing'''! | |||
=== Finding new Symptoms === | |||
Pregenerated samples contained tier 3 samples at best. To find bigger and badder ones, you'd need to use the DNA Analyzer function of the Pathogen Manipulator. | |||
[[Image: SplitPatho1.PNG|border|frame|The pathogen sample we are splitting. (Before Step 1)]] | |||
[[Image: SplitPathoNew.PNG|border|frame|The resulting segments we will receive. (After Step 1)]] | |||
First, you'd press the 'Split DNA' button, which would destroy the sample entirely. Its symptoms would then be broken up into the individual segments, and you'd be able to combine the segments to try to find new symptom codes. Of course, you didn't need to do this completely at random! Each time you tested a combination, the lights on the right side would show you some information about the attempt: | |||
* If your combination was '''Stable''', it was a valid symptom that you could put into a pathogen! | |||
* If it was '''Transient''', that means that while it is not necessarily '''Stable''', there is another symptom code that starts with your combination that ''is'' stable. | |||
[[Image: SplitPatho3.PNG|border|frame|The segment '91d' after being tested.]] | |||
For instance, in our example we start with the segment ''''91d''''. We see that '91d' is both Stable and Transient. This means that you could put '91d' as a symptom into a pathogen and it would work! Furthermore, it also tells us that there was at least one other valid symptom that starts with '91d'. | |||
Looking a bit lower, the Types analysis reveals that there are two '''Good Transient''' symptoms and one '''Bad Transient''' symptom. Symptoms were split into two categories: '''Good Symptoms''' were generally the kind that a person would be happy to have, while '''Bad Symptoms''' were usually the ones that harmed them. | |||
The big red lamp on the right side that says '''"Bad"''' tells us what kind the symptoms we just tested is. | |||
From this information, you'd know that: | |||
* '91d' is a valid symptom, and it's a negative one. | |||
* There were three other symptoms that started with '91d' -- two of them good, and one of them bad. | |||
To find more advanced symptoms, the natural next step would be to add more segments onto '91d': | |||
[[Image: SplitPatho4.png|border|frame|The segment combination '91d 91d' after being tested.]]<br/> | |||
Huzzah! As you can see, this is also a valid symptom! It is even transient, so there is another Symptom of at least Tier 3 that starts with '91d 91d'.<br/> | |||
We also now know that '91d 91d' is a '''Good''' Symptom, which might be nice if we are a non-traitor pathologist.<br/> | |||
If we check the [[Pathogen Symptoms & Mutations]] page, we see that it must be one of the following:<br/> | |||
* Detoxication | |||
* Oxygen Farts | |||
* Wound Mending | |||
* Burn Healing | |||
<br/> | |||
On the other hand, if you are a traitorous pathologist, you may wish to instead try more combinations that start with '91d 91d' in order to find the higher tier symptom that is harmful.<br/> | |||
There are always '''6''' different Segments in each round, but you can see that the pathogen we split only had 4 different Segments. (91d, a62, df6, f10)<br/> | |||
This means that I may not necessarily be able to find this higher tier Symptom with the Segments I have available, because what if the combination I need is something like '91d 91d aca'?<br/> | |||
For this reason it is usually a good idea to first make a Fungus with every kind of Segment (and lots of them, so you can use them to combine more often before having to load in a new sample).<br/> | |||
=== Splicing Pathogens === | |||
Alright, so how do we make a testing pathogen for finding new combinations? And how do we put the combinations we find into an actual pathogen?<br/> | |||
Well, for this we will be using the Splicing system!<br/> | |||
First of all, we should get ourselves plenty of different samples. This can be done at the Synth-O-Matic! [[Image: Synth-O-Matic.png]]<br/> | |||
For making a testing pathogen, Fungus is a good choice, since it can support an infinite amount of Segments. Other microbodies will collapse if you try to Splice too many Symptoms onto them! (See Section on Microbodies)<br/> | |||
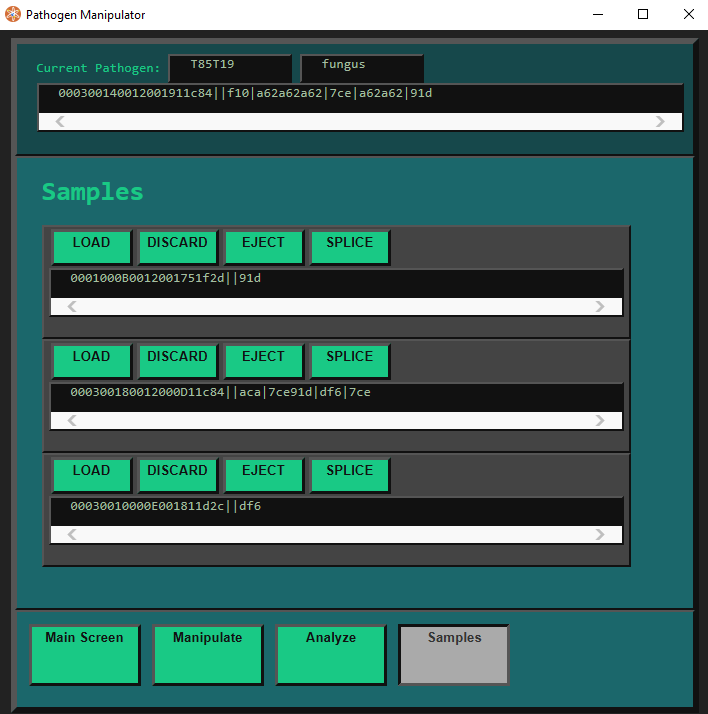
Once you have your Samples, just put them all into the Pathogen Manipulator by clicking. It can hold up to 4 at a time. (Counting the currently active Sample.)<br/> | |||
[[Image: SplicePatho1.PNG]]<br/> | |||
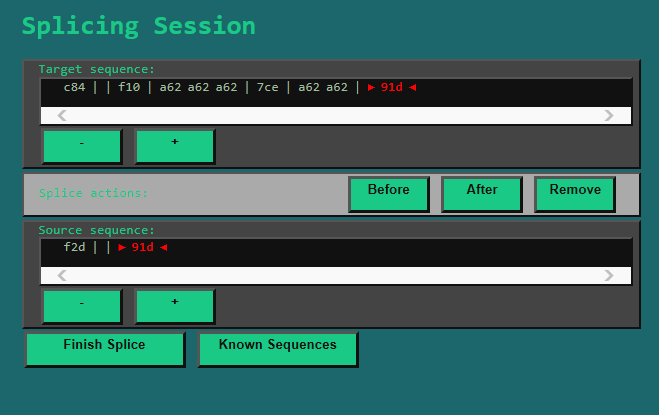
Next, simply click a '''SPLICE''' button to start splicing the active Sample together with the Sample whose '''SPLICE''' button you clicked.<br/> | |||
[[Image: SplicePatho2.PNG]]<br/> | |||
Now you can splice any Symptom Segments you want from the bottom Sample into the top Sample with the '''Before''' and '''After''' buttons.<br/> | |||
The '''Remove''' button can be used to remove any Segments you do not want.<br/> | |||
The '''+''' and '''-''' buttons let you change the size of your selection, so you can transfer more than one Segment at once.<br/> | |||
Remember that all the Symptoms (the stuff between the |s) in the top Sample will need to be valid Symptoms, or the Sequence will collapse and the Sample will be lost!<br/> | |||
The Sequence will also collapse if the amount of Symptom Segments exceeds the Microbodies' Active Capacity. (as mentioned in the section on Microbodies).<br/> | |||
Another tip: the part before the || is the Suppressant code, do not modify it, and do not attempt to put the one from the bottom into the top sample. There is no point and it'll probably mess up your Sample.<br/> | |||
(In this case that would be f2d.)<br/> | |||
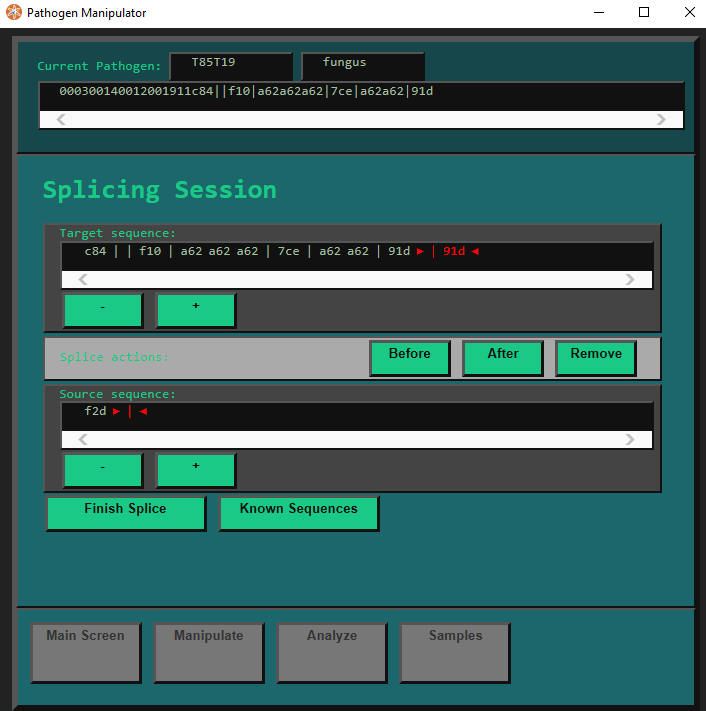
Here is what we end up with in this case:<br/> | |||
[[Image: SplicePatho3.PNG]]<br/> | |||
Once you are done, click the '''Finish Splice''' button.<br/> | |||
Now we do this for all the other Samples too, and end up with a really long supersample, which we can use to experiment and find new Symptom Codes!<br/> | |||
[[Image: SplicePatho4.PNG]] | |||
=== | === Growing more Pathogen === | ||
Of course, using the DNA Analyzer on a Sample will destroy the Sample, and we wouldn't want to use up the Sample we just put so much work into, right? That is why we simply make it grow to obtain more Samples that are exactly the same as our initial one! | |||
# Put the sample from the vial into a petri dish. | |||
# Add some nutrients to the petri dish, of the appropriate type for the microbody. The table for this can be found [[Guide_to_Pathology#Microbody_Type|here]].<br/> | |||
# Wait a minute or two until the pathogen starts to grow. | |||
# Transfer pathogen from the dish into vials, making sure to keep some in the dish so it can continue to multiply. | |||
A sample needs to have at least 2 units of pathogen (a mechanical dropper can be used to transfer exactly 2 units). | |||
All you need to watch out for is the pathogen running out of nutrients and not to remove the last bit of pathogen from the petri dish. | |||
You can also use the Incubator, it will automatically keep one petri dish supplied with nutrients, and you can use a vial on it to fill it with pathogen (if there is enough in the petri dish). If you are familiar with a reagent heater, the Incubator looks fairly similar. [[File:IncubatorV2-32x32.png]] | |||
== Handling Infections == | |||
It should be noted that deliberately spreading/infecting people with pathogens is considered [[Grief]]. If you're really to give people a beneficial pathogen, please ask them first! (And remember, silence does not imply consent.) | |||
* | How do pathogens spread? All pathogens spread through blood and liquid samples of it, and some pathogens have Symptoms that allow it to spread by other means. | ||
* | *'''Pathogen Reagent''' - You know that "pathogen" reagent you manipulate when using incubators and microscopes and such? If you get it injected into your bloodstream (for whatever reason), you will be infected with it. Getting splashed with pathogen can infect you too, but the chance of catching it is reduced by disease resistance, which is mainly modified by clothing. Naturally, a biosuit/hood or a spacesuit/helmet combo will protect against any diseases splashed onto a person. | ||
* | *'''Blood''' - Blood from an afflicted person can also infect those who receive said blood, such as by [[Medical Objects#Syringe|syringe]] or [[Medical Objects#Hypospray|hypospray]]. If you do not know the donor, it's not always apparent that the blood is infected; you often need to put some blood a blood slide and run it through the centrifuge first to tell. You might expect a [[Vampire]] to be especially at risk for pathogens because they "handle" blood so much, but Vampires are handily immune to diseases. | ||
*'''Spreading Symptoms''' - If pathogen has one or more spreading Symptoms (coughing, sneezing, farting, hugging, etc...), and its Spread Stat is not 0, it will also be able to spread itself! How exactly this goes down depends on the Symptom in question, you can read up on this on the [[Pathogen Symptoms & Mutations]] page. | |||
**'''Disease Clouds''' - Some Symptoms make clouds of "disease particles". Walking through them has a 10% chance to infect you. This is blocked entirely by all varieties of space helmets and diving helmets, [[Clothing#Gas Mask|gas masks]] (and its emergency and [[Security Objects#NT-SO Gas Mask|NT-SO]] variants), [[Medical Objects#Sterile Mask|sterile masks]], [[Clothing#Biosuit|biohoods]], [[Medical Objects#Surgical Face Shield|surgical face shields]], and [[Clothing#Plague Doctor Mask|plague doctor masks]]. You might not expect it, but [[Janitor#The Janitor's Arsenal|janitor equipment]] can clear away disease particles, though [[Engineering Objects#Air Scrubber|air scrubbers]] can't. | |||
**'''Disease Puddles''' - The Sweating Symptom specifically creates puddles of "weirdly colored sweat". Anyone who walks over these has a 4% chance to get infected, which, like pathogen splashes, is reduced by disease resistance. These puddles can be cleaned up by most [[Janitor#The Janitor's Arsenal|janitor equipment]], naturally. | |||
**'''Touch''' - The Sweating and Oxycontin Production Symptoms also specifically allow the possibility of the disease spreading via punches/kicks, grabs, and disarms, with Oxycontin Production also allowing hugs to infect people. A successful infection is indicated by a distinct message. | |||
Notice that unlike in real life, there are no animal vectors or fomites (infected surfaces), and airborne and touch transmission are possible only via specific, highly-visible Symptoms. That means it's usually fine to handle an afflicted person's items or be in the same room as them, though for the last it's obviously a different story if they're sneezing, coughing, or otherwise spreading the pathogen due to a Symptom. | |||
Also unlike in real life, a person can be afflicted with only one pathogen at a time. Someone already infected can only get a new infection if they are exposed to a pathogen with at least one Symptom that is higher in tier than the highest tier Symptom in the existing pathogen, in which case the new disease "overwrites" the prevoius one. For example, say you're afflicted with a pathogen whose highest tier Symptom is Oxygen Farts, tier 2 Symptom. You can't get infected by a pathogen whose highest tier Symptom is Snapping, another tier 2 Symptom, but you can be infected by one with Projectile Bee Egg Sneezing, a tier 3 Symptom, in which case you lose the pathogen with Oxygen Farts but gain the one with Projectile Bee Egg Sneezing. | |||
But more like real life, if someone gets infected and is cured, they're immune to it. They can't get infected again! | |||
== Curing Disease == | |||
Oh no, there is a horrible disease going around the station and for some reason it is your duty to cure it! Don't worry, there are several ways you can accomplish this, and most of them are pretty simple.<br/> | |||
=== QM === | |||
'''Do you have Cargo access? Do you really not want to bother with pathology? Then this is the way for you!<br/>''' | |||
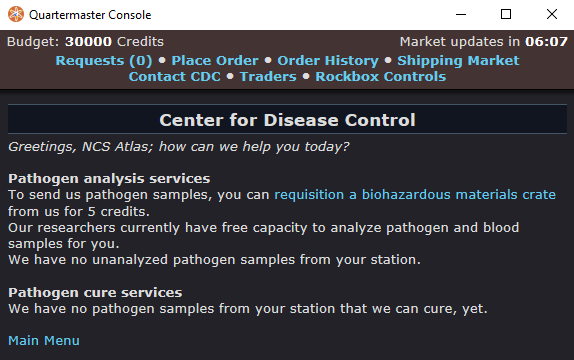
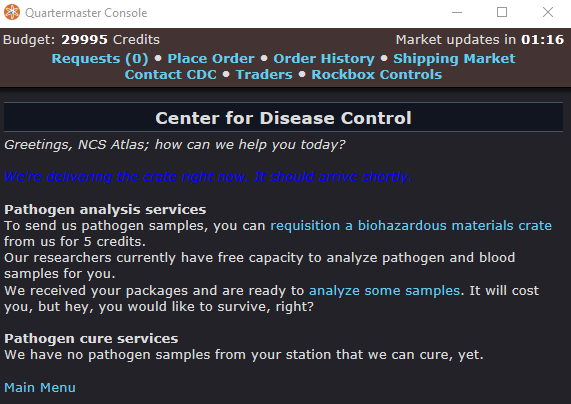
Simply go to the Cargo Console and use the '''Contact CDC''' button.<br/> | |||
[[Image: CuringPatho1.PNG]]<br/> | |||
Then requisition a '''Biohazard Material Crate''' from them.<br/> | |||
[[Image: CuringPatho2.PNG]]<br/> | |||
Shortly after the crate will arrive, just like any other kind of QM crate.<br/> | |||
Now just put a sample of the pathogen into the crate and send it back out, as if you were selling something. The easiest way to do this is to just take blood from an infected person. The CDC even send an empty syringe in the crate for just that purpose!<br/> | |||
[[Image: CuringPatho3.PNG]]<br/> | |||
Shortly after the CDC should be ready to start analysis on the sample you sent, simply click on '''analyze some samples''' and then click on the sample you want analyzed. Presumably there will be only one, it's pretty rare that several samples get sent to the CDC in a round!<br/> | |||
[[Image: CuringPatho4.PNG]]<br/> | |||
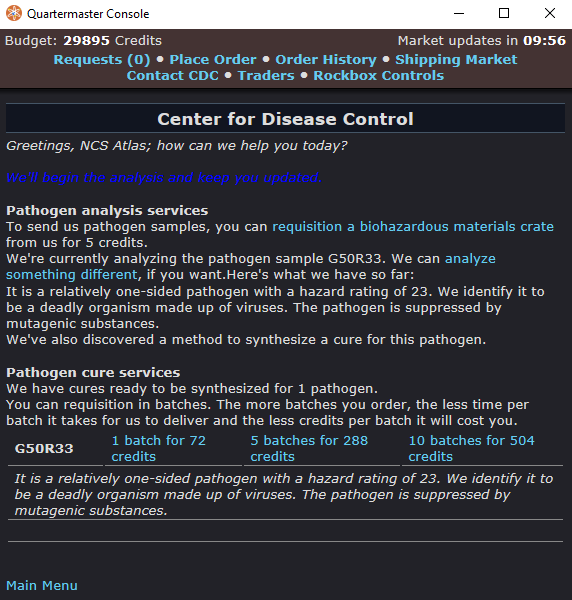
They analyze the sample pretty much instantly, once that has happened you can simply order batches of cures from them that will then arrive shortly after, just like regular QM orders.<br/> | |||
Each batch contains several cures, simply stab an infected person with one of these, and their pathogen will go into remission. It will then slowly go down through the stages and cure itself once it is done. | |||
=== Cure Manufacturing === | |||
'''Do you like doing things the proper way? Did the traitor pathologist not blow up the lab after they were done? Then this is the correct way for you!<br/>''' | |||
[[Image: CuringPatho5.PNG|border|frame|The Synth-O-Matic UI, which can be used to synthesize cures.]] | |||
# Take a blood sample from an infected person using a syringe. | |||
# Inject the blood into a blood slide. There are some around the lab and in the path-o-matic vendor. | |||
# Put the blood slide into a microscope and check what kind of Microbody you are dealing with. You will need to know this to figure out the appropriate anti-agent. You can check these in the table [[Guide_to_Pathology#Microbody_Type|here]]. | |||
# Put the blood slide and a clean petri dish into a centrifuge and start it. [[Image: Centrifuge.png]] | |||
# After a short time, you should have a proper pathogen sample inside the petri dish. Take it out of the machine. | |||
# Give it nutrient to grow more of it as outlined in the [[Guide_to_Pathology#Growing_more_Pathogen|Pathogen Growing section]]. | |||
# Put some of the samples from this into vials and put the vials into the Synth-O-Matic. [[Image: Synth-O-Matic.png]]<br/> | |||
# Add some of the appropriate anti-agent from the Path-O-Matic vendor and pick the '''anti-agent''' option when putting it in. Don't worry about the '''suppressant''' option, it is not necessary right now. | |||
# Once both things are in the Synth-O-Matic, simply click the vial in the list of inserted vials and then select the '''Synthesize serum by irradiation''' option. | |||
# After a second or two, the machine should spit out some cures. If you did everything correctly, stabbing one of these into someone should put the infection into remission. (If you did not, they will instead infect people.) | |||
=== Curing via Suppression === | |||
'''Do you not have access to QM or a Pathology Lab? Do you not want to do any fancy science stuff? Then this is the section for you.<br/>''' | |||
Figure out the Suppressant as described in the section on Suppressants up above. Then expose yourself to it until your Pathogen goes into remission. It's that simple!<br/> | |||
A humble '''health analyzer''' will tell you the Suppressant Group of the disease. From then you really only have two different options that you need to try. You'll know you have the right Suppressant if you get a message about feeling better, or if the Stage of your Infection (as seen on the health analyzer) decreases. | |||
==Supplementary Video== | |||
<youtube>0PzqGcL7g1M</youtube> | |||
{{Archive}} | |||
Latest revision as of 01:46, 2 July 2024
| This page is about discontinued content. The following information is not current. It is kept for historical purposes. Pathology has been officially discontinued by the developers and removed from the game. |
This page documents the pathology system, which allowed players to build their own viruses out of microbodies and symptoms. It had its own area in medbay, accessible to all medical staff -- the Pathology lab, complete with quarantine cells and a ValuChimp for easy test subjects.
Pathology has a long and storied history and was present as far back as 2010, with the most recent iteration of the system dating back to 2014 after being reworked. As the game evolved, it became a pretty contentious feature. It was mainly used to create superviruses that would either scour the station of life in a creative variety of ways or turn everyone into unkillable self-reviving monsters. By May 2020, things weren't looking good; the original creator was long-gone, and the admin team decided to suspend player access to pathology for the second time pending another rework, for a number of reasons explained in this forum thread.
Pathology remained in the game's code for another four years. During this time, the entire system was tied to a server config option; you could enable access on a local copy of the game to mess with it, but the official servers kept it disabled. It received occasional tweaks and changes (such as the addition of a dedicated Pathologist job) and was sometimes re-enabled for playtesting, but a rework failed to materialize as nobody stepped up to the plate to attempt to salvage what was a very controversial feature to begin with.
References and code tying the system to the rest of the game were gradually removed until finally, in July 2024, pathology was entirely removed from the code and entered into history. While the pathology labs still remain on a few maps, the machinery inside has been replaced with nonfunctional replicas that don't actually do anything.
What follows is a description of how the system used to work, and the things you could do with it.
Stats
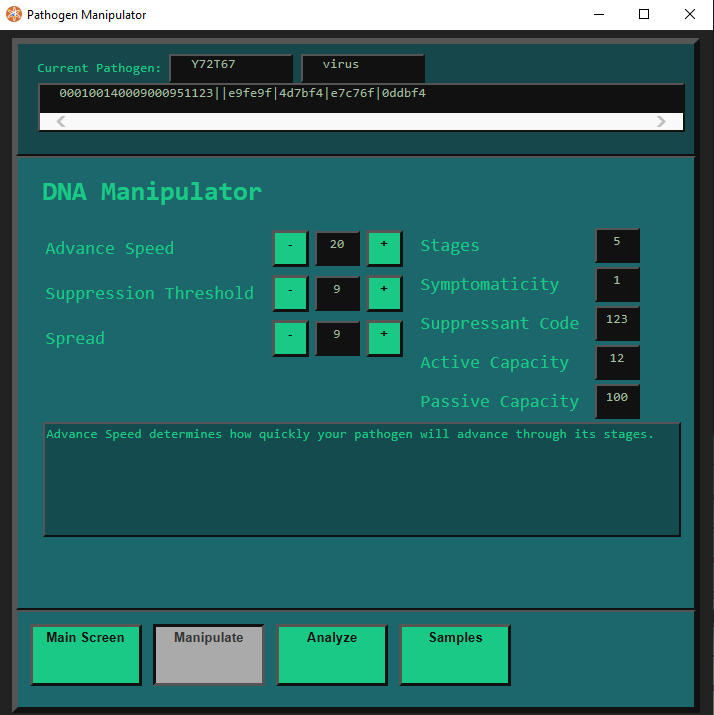
These were numerical values between 0 and 50 that influenced how well a pathogen could do certain things. A pathologist could set these stats directly in the Pathogen Manipulator.
- Advance Rate: This determined how quickly the pathogen would advance through its Stages. It also determined how quickly it goes down through its stages when suppressed or in remission.
- Spread: This determined how well the pathogen would spread from person to person, although spread also depended on the pathogen's symptoms. A pathogen with 0 spread would not spread at all by itself.
- Suppression Threshold: This determines how easily a pathogen could be suppressed via its Suppressant.
Pathogens had a limited amount of points to spread over these stats, so if it is very good in some stats, the other stats will probably be lower to compensate. The amount of points a pathogen had to spread was known as its Passive Capacity.
Microbody Type
There were four different types of microbody that served as the medium of a pathogen, plus a fifth that only occurs when the admins bombard the station with diseased burgles. Each one had its own pros and cons. Specific samples had their own types, and they couldn't be changed, so you'd need to find a sample with the type you wanted and then build off of that for your disease.
The microbody type influenced a handful of things:
- Stages: The maximum stage that the pathogen could reach. The higher a pathogen's current stage in an infectee, the more intense their symptoms would be.
- Active Capacity: How many symptoms (and of what length) the pathogen could support. Adding any more would destroy the pathogen. More on these later!
- Activity: How often the pathogen could trigger its symptoms. This also differed depending on the pathogen's stage.
- Growth Medium: What type of Growth Medium needed to be added to a petri dish in order for the pathogen to grow. This was a chemical, and without it, the sample would become starved of nutrients and eventually die.
- Anti-Agent: What type of Anti-Agent needed to be used to make a cure in the Synth-O-Matic. This is a chemical.
- Vaccinable: If a vaccine could be made for the pathogen.
- Auto-Immunization: If you were immune to the pathogen after you have been cured of it once.
The different microbody types were as follows:
| Microbody | Stages | Activity | Active Capacity | Growth medium | Anti-agent | Vaccinable | Self- immunization |
Admin-only |
|---|---|---|---|---|---|---|---|---|
| Virus | 5 | 1, 5, 20, 30, 40 | 12 | Egg | Antiviral Agent | Yes | Yes | No |
| Parasite | 5 | 50, 40, 30, 20, 10 | 18 | Parasitic Medium | Biocide | No | Yes | No |
| Bacterium | 3 | 30, 30, 30 | 25 | Bacterial Medium | Spaceacillin | Yes | Yes | No |
| Fungus | 1 | 10 | ∞ | Fungal Medium | Biocide | Yes | Yes | No |
| Great Mutatis | 5 | 20, 20, 20, 20, 20 | ∞ | Stable Mutagen | Mutation Inhibitor | No | Yes | Yes |
Let's say you were infected by a virus pathogen. It would start out in stage 1, as all infections do. While in stage 1, it'd only have a 1% chance to trigger its symptoms, which is very low! But as it progressed through the stages, it would trigger more and more, with up to a 40% chance to trigger symptoms at stage 5.
Something like a parasite pathogen, on the other hand, would start out at 40% in stage 1, so it might spread very quickly! But as it progressed through the stages, it would trigger less and less; this made it helpful for diseases meant to spread and act quickly, or that had more passive effects that didn't need to trigger as often.
Bacteria pathogens had constant activity throughout their stages, but they could only progress up to stage 3. This meant that their symptoms will be a bit weaker, and some really strong effects might never be able to trigger at all -- stuff like gibbing from tier 5 symptoms, for instance. That said, you could put a lot more symptoms on it than on a virus or parasite, so it made sense for pathogens with a big variety of effects.
On its surface, fungus pathogens seem as though they were pretty awful. And they sure were! But the main purpose of a fungus wasn't as an actual spreader itself -- instead, you could cultivate lots of symptoms with it, even if you never intended to infect anyone with that pathogen itself. You'll see what this came in handy for later.
Suppressant
The suppressant, like the microbody type, was an inherent, unchangeable property of a pathogen sample. It was a specific type of stimulus that the pathogen is weak to. When a pathogen was exposed to its suppressant, it might start to regress through its stages, becoming less powerful. Prolonged exposure might even cause it to go into remission, eventually being cured completely. There were a handful of different suppressants, which could be applied in different ways.
You weren't told explicitly what a pathogen's suppressant was, so it requires a little bit of detective work! Suppressants were split into a few different groups; a quick inspection with a health analyzer or microscope could tell you the group, but not the exact suppressant itself. To find out the precise type, you'd simply put a petri dish with a sample of the pathogen under a microscope and use a dropper to drip a little bit of a related chemical into the dish. If the pathogen reacted, you'd know that you found the correct suppressant! You could also tell what the suppressant is by the color that the pathogen was when seen under a microscope.
| Group | Suppressant | Trigger | Color | Associated Chemicals |
|---|---|---|---|---|
| Thermal | Heat | Afflicted needs to have a high body temperature | Blue | Phlogiston, Chlorine Trifluoride |
| Cold | Afflicted needs to have a low body temperature | Red | Cryostylane, Cryoxadone | |
| Sedative | Sedative | Afflicted needs to sleep | Green | Morphine, Ketamine |
| Muscle Relaxant | Afflicted needs to have related chemicals in bloodstream, or receive electric shocks | White | Haloperidol, Neurotoxin | |
| Medical | Brute Medicine | Afflicted needs to have related chemicals in bloodstream | Black | Styptic Powder, Synthflesh |
| Burn Medicine | Afflicted needs to have related chemicals in bloodstream | Cyan | Silver Sulfadiazine, Synthflesh | |
| Gastronomical | Fat | Afflicted needs to have related chemicals in bloodstream | Orange | Partially Hydrogenated Space-Soybean Oil, Space-Soybean Oil, Porktonium, Cholesterol |
| Chicken Soup | Afflicted needs to have related chemicals in bloodstream | Pink | Chicken Soup | |
| Radioactive | Radiation | Afflicted needs to be irradiated | Viridian | Radium, Unstable Mutagen, Uranium, Polonium |
| Mutagen | Afflicted needs to have related chemicals in bloodstream | Olive Drab | Unstable Mutagen, Stable Mutagen |
Suppressants also had a use in manufacturing cures, but weren't necessary for them.
Symptoms

Time for the fun part! Symptoms are what determined what your pathogen would actually do. Most of the time in creating a pathogen went into finding the symptoms you wanted. Each sample came with its own random set of low-tier ones.
Each symptom had a unique code that is made of segments, each of which was a combination of three letters or digits. There were five different tiers of symptoms, with tier 1 symptoms being the weakest but only needing one segment, while tier 5 were the strongest but needed five segments to compensate.
Turn your attention to the image on the right. Everything after the || is the pathogen's symptoms! The individual symptom's codes were separated with |, so as you can see, we have four different symptoms -- one tier 2 symptom (ffe 001) and three tier 1 symptoms (2e6, ffe, 9dd).
Examining Symptoms
To find out which symptoms a code corresponded to, we'd need to use one of the lab's tools: the microscope. ![]()


- Remove your sample from the Pathogen Manipulator and put it into a petri dish, then put the petri dish into the microscope so you can inspect it.
- Optional: If you thought things might take a while, you'd want to put some of the appropriate nutrient type into the petri dish as well to keep the sample alive.
- Clicking the microscope would then allow you to view the sample in two different ways: zoomed-out, or zoomed-in. Checking symptoms would necessitate a zoomed-in view.
- The first part of the output in our example (suppressed by something affecting neural activity) shows that the pathogen's suppressant is of the sedative variety.
- The rest is a bunch of hints, with the code next to each hint showing which symptom code gave them. Now you'd just need to figure out what symptoms these hints referred to. This is documented in the Pathogen Symptoms & Mutations page!
- Now, armed with the knowledge that 'ffe001' is a tier 2 symptom with the hint 'The pathogen appears to generate a high amount of fluids.' we can deduce that it must be either the Sneezing or the Coughing symptom.
- If you wanted to find out which one of the two, you'd get ourselves some pepper from the kitchen and use a Dropper to drip some of it into the petri dish, then observe the microscope's output again.
- As you can see in the last part, the sample exhibits the behavior of Sneezing when it interacts with pepper, so you'd know that it is Sneezing, and not Coughing!
Finding new Symptoms
Pregenerated samples contained tier 3 samples at best. To find bigger and badder ones, you'd need to use the DNA Analyzer function of the Pathogen Manipulator.

First, you'd press the 'Split DNA' button, which would destroy the sample entirely. Its symptoms would then be broken up into the individual segments, and you'd be able to combine the segments to try to find new symptom codes. Of course, you didn't need to do this completely at random! Each time you tested a combination, the lights on the right side would show you some information about the attempt:
- If your combination was Stable, it was a valid symptom that you could put into a pathogen!
- If it was Transient, that means that while it is not necessarily Stable, there is another symptom code that starts with your combination that is stable.
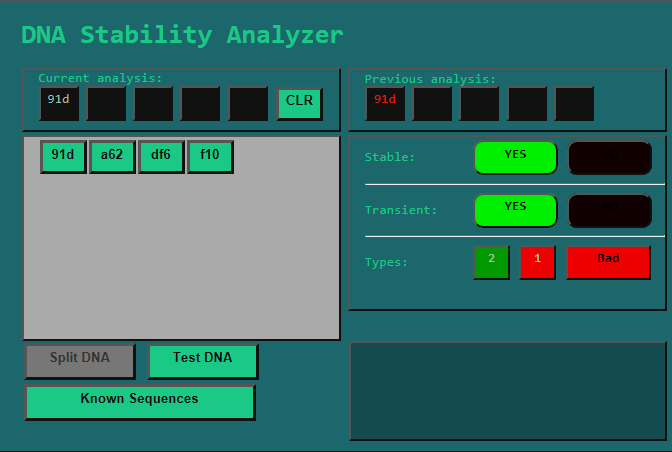
For instance, in our example we start with the segment '91d'. We see that '91d' is both Stable and Transient. This means that you could put '91d' as a symptom into a pathogen and it would work! Furthermore, it also tells us that there was at least one other valid symptom that starts with '91d'.
Looking a bit lower, the Types analysis reveals that there are two Good Transient symptoms and one Bad Transient symptom. Symptoms were split into two categories: Good Symptoms were generally the kind that a person would be happy to have, while Bad Symptoms were usually the ones that harmed them.
The big red lamp on the right side that says "Bad" tells us what kind the symptoms we just tested is.
From this information, you'd know that:
- '91d' is a valid symptom, and it's a negative one.
- There were three other symptoms that started with '91d' -- two of them good, and one of them bad.
To find more advanced symptoms, the natural next step would be to add more segments onto '91d':
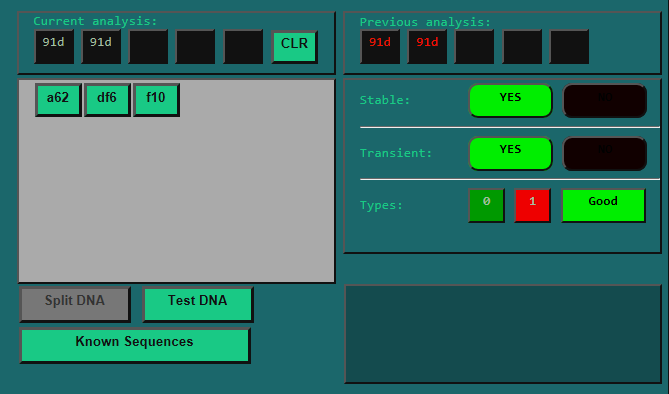
Huzzah! As you can see, this is also a valid symptom! It is even transient, so there is another Symptom of at least Tier 3 that starts with '91d 91d'.
We also now know that '91d 91d' is a Good Symptom, which might be nice if we are a non-traitor pathologist.
If we check the Pathogen Symptoms & Mutations page, we see that it must be one of the following:
- Detoxication
- Oxygen Farts
- Wound Mending
- Burn Healing
On the other hand, if you are a traitorous pathologist, you may wish to instead try more combinations that start with '91d 91d' in order to find the higher tier symptom that is harmful.
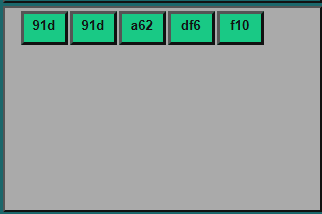
There are always 6 different Segments in each round, but you can see that the pathogen we split only had 4 different Segments. (91d, a62, df6, f10)
This means that I may not necessarily be able to find this higher tier Symptom with the Segments I have available, because what if the combination I need is something like '91d 91d aca'?
For this reason it is usually a good idea to first make a Fungus with every kind of Segment (and lots of them, so you can use them to combine more often before having to load in a new sample).
Splicing Pathogens
Alright, so how do we make a testing pathogen for finding new combinations? And how do we put the combinations we find into an actual pathogen?
Well, for this we will be using the Splicing system!
First of all, we should get ourselves plenty of different samples. This can be done at the Synth-O-Matic! ![]()
For making a testing pathogen, Fungus is a good choice, since it can support an infinite amount of Segments. Other microbodies will collapse if you try to Splice too many Symptoms onto them! (See Section on Microbodies)
Once you have your Samples, just put them all into the Pathogen Manipulator by clicking. It can hold up to 4 at a time. (Counting the currently active Sample.)
Next, simply click a SPLICE button to start splicing the active Sample together with the Sample whose SPLICE button you clicked.
Now you can splice any Symptom Segments you want from the bottom Sample into the top Sample with the Before and After buttons.
The Remove button can be used to remove any Segments you do not want.
The + and - buttons let you change the size of your selection, so you can transfer more than one Segment at once.
Remember that all the Symptoms (the stuff between the |s) in the top Sample will need to be valid Symptoms, or the Sequence will collapse and the Sample will be lost!
The Sequence will also collapse if the amount of Symptom Segments exceeds the Microbodies' Active Capacity. (as mentioned in the section on Microbodies).
Another tip: the part before the || is the Suppressant code, do not modify it, and do not attempt to put the one from the bottom into the top sample. There is no point and it'll probably mess up your Sample.
(In this case that would be f2d.)
Here is what we end up with in this case:
Once you are done, click the Finish Splice button.
Now we do this for all the other Samples too, and end up with a really long supersample, which we can use to experiment and find new Symptom Codes!

Growing more Pathogen
Of course, using the DNA Analyzer on a Sample will destroy the Sample, and we wouldn't want to use up the Sample we just put so much work into, right? That is why we simply make it grow to obtain more Samples that are exactly the same as our initial one!
- Put the sample from the vial into a petri dish.
- Add some nutrients to the petri dish, of the appropriate type for the microbody. The table for this can be found here.
- Wait a minute or two until the pathogen starts to grow.
- Transfer pathogen from the dish into vials, making sure to keep some in the dish so it can continue to multiply.
A sample needs to have at least 2 units of pathogen (a mechanical dropper can be used to transfer exactly 2 units). All you need to watch out for is the pathogen running out of nutrients and not to remove the last bit of pathogen from the petri dish.
You can also use the Incubator, it will automatically keep one petri dish supplied with nutrients, and you can use a vial on it to fill it with pathogen (if there is enough in the petri dish). If you are familiar with a reagent heater, the Incubator looks fairly similar. ![]()
Handling Infections
It should be noted that deliberately spreading/infecting people with pathogens is considered Grief. If you're really to give people a beneficial pathogen, please ask them first! (And remember, silence does not imply consent.)
How do pathogens spread? All pathogens spread through blood and liquid samples of it, and some pathogens have Symptoms that allow it to spread by other means.
- Pathogen Reagent - You know that "pathogen" reagent you manipulate when using incubators and microscopes and such? If you get it injected into your bloodstream (for whatever reason), you will be infected with it. Getting splashed with pathogen can infect you too, but the chance of catching it is reduced by disease resistance, which is mainly modified by clothing. Naturally, a biosuit/hood or a spacesuit/helmet combo will protect against any diseases splashed onto a person.
- Blood - Blood from an afflicted person can also infect those who receive said blood, such as by syringe or hypospray. If you do not know the donor, it's not always apparent that the blood is infected; you often need to put some blood a blood slide and run it through the centrifuge first to tell. You might expect a Vampire to be especially at risk for pathogens because they "handle" blood so much, but Vampires are handily immune to diseases.
- Spreading Symptoms - If pathogen has one or more spreading Symptoms (coughing, sneezing, farting, hugging, etc...), and its Spread Stat is not 0, it will also be able to spread itself! How exactly this goes down depends on the Symptom in question, you can read up on this on the Pathogen Symptoms & Mutations page.
- Disease Clouds - Some Symptoms make clouds of "disease particles". Walking through them has a 10% chance to infect you. This is blocked entirely by all varieties of space helmets and diving helmets, gas masks (and its emergency and NT-SO variants), sterile masks, biohoods, surgical face shields, and plague doctor masks. You might not expect it, but janitor equipment can clear away disease particles, though air scrubbers can't.
- Disease Puddles - The Sweating Symptom specifically creates puddles of "weirdly colored sweat". Anyone who walks over these has a 4% chance to get infected, which, like pathogen splashes, is reduced by disease resistance. These puddles can be cleaned up by most janitor equipment, naturally.
- Touch - The Sweating and Oxycontin Production Symptoms also specifically allow the possibility of the disease spreading via punches/kicks, grabs, and disarms, with Oxycontin Production also allowing hugs to infect people. A successful infection is indicated by a distinct message.
Notice that unlike in real life, there are no animal vectors or fomites (infected surfaces), and airborne and touch transmission are possible only via specific, highly-visible Symptoms. That means it's usually fine to handle an afflicted person's items or be in the same room as them, though for the last it's obviously a different story if they're sneezing, coughing, or otherwise spreading the pathogen due to a Symptom.
Also unlike in real life, a person can be afflicted with only one pathogen at a time. Someone already infected can only get a new infection if they are exposed to a pathogen with at least one Symptom that is higher in tier than the highest tier Symptom in the existing pathogen, in which case the new disease "overwrites" the prevoius one. For example, say you're afflicted with a pathogen whose highest tier Symptom is Oxygen Farts, tier 2 Symptom. You can't get infected by a pathogen whose highest tier Symptom is Snapping, another tier 2 Symptom, but you can be infected by one with Projectile Bee Egg Sneezing, a tier 3 Symptom, in which case you lose the pathogen with Oxygen Farts but gain the one with Projectile Bee Egg Sneezing.
But more like real life, if someone gets infected and is cured, they're immune to it. They can't get infected again!
Curing Disease
Oh no, there is a horrible disease going around the station and for some reason it is your duty to cure it! Don't worry, there are several ways you can accomplish this, and most of them are pretty simple.
QM
Do you have Cargo access? Do you really not want to bother with pathology? Then this is the way for you!
Simply go to the Cargo Console and use the Contact CDC button.
Then requisition a Biohazard Material Crate from them.
Shortly after the crate will arrive, just like any other kind of QM crate.
Now just put a sample of the pathogen into the crate and send it back out, as if you were selling something. The easiest way to do this is to just take blood from an infected person. The CDC even send an empty syringe in the crate for just that purpose!
Shortly after the CDC should be ready to start analysis on the sample you sent, simply click on analyze some samples and then click on the sample you want analyzed. Presumably there will be only one, it's pretty rare that several samples get sent to the CDC in a round!
They analyze the sample pretty much instantly, once that has happened you can simply order batches of cures from them that will then arrive shortly after, just like regular QM orders.
Each batch contains several cures, simply stab an infected person with one of these, and their pathogen will go into remission. It will then slowly go down through the stages and cure itself once it is done.
Cure Manufacturing
Do you like doing things the proper way? Did the traitor pathologist not blow up the lab after they were done? Then this is the correct way for you!
- Take a blood sample from an infected person using a syringe.
- Inject the blood into a blood slide. There are some around the lab and in the path-o-matic vendor.
- Put the blood slide into a microscope and check what kind of Microbody you are dealing with. You will need to know this to figure out the appropriate anti-agent. You can check these in the table here.
- Put the blood slide and a clean petri dish into a centrifuge and start it.

- After a short time, you should have a proper pathogen sample inside the petri dish. Take it out of the machine.
- Give it nutrient to grow more of it as outlined in the Pathogen Growing section.
- Put some of the samples from this into vials and put the vials into the Synth-O-Matic.

- Add some of the appropriate anti-agent from the Path-O-Matic vendor and pick the anti-agent option when putting it in. Don't worry about the suppressant option, it is not necessary right now.
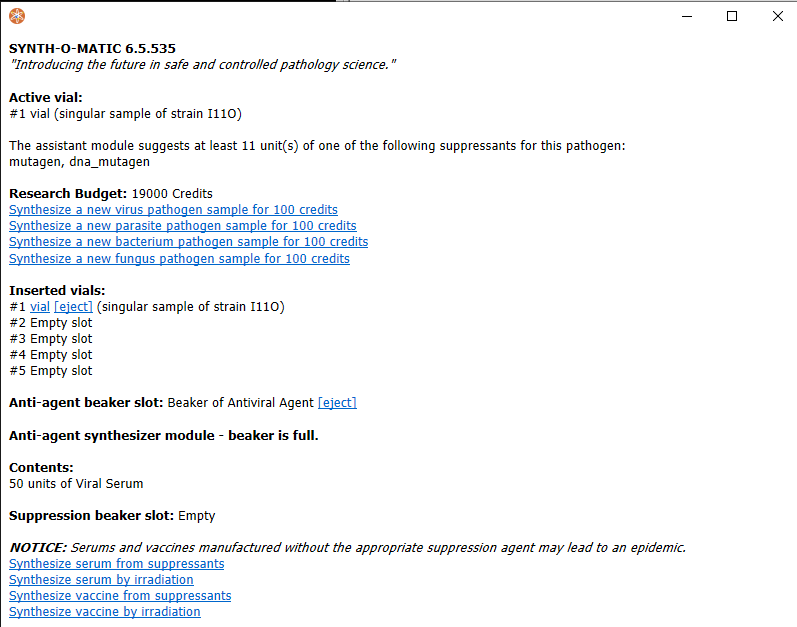
- Once both things are in the Synth-O-Matic, simply click the vial in the list of inserted vials and then select the Synthesize serum by irradiation option.
- After a second or two, the machine should spit out some cures. If you did everything correctly, stabbing one of these into someone should put the infection into remission. (If you did not, they will instead infect people.)
Curing via Suppression
Do you not have access to QM or a Pathology Lab? Do you not want to do any fancy science stuff? Then this is the section for you.
Figure out the Suppressant as described in the section on Suppressants up above. Then expose yourself to it until your Pathogen goes into remission. It's that simple!
A humble health analyzer will tell you the Suppressant Group of the disease. From then you really only have two different options that you need to try. You'll know you have the right Suppressant if you get a message about feeling better, or if the Stage of your Infection (as seen on the health analyzer) decreases.
Supplementary Video
