Guide to Wiring: Difference between revisions
Studenterhue (talk | contribs) It flows from radiation collectors? The age is obvious. I'm rewriting this section. |
Studenterhue (talk | contribs) A more professional way to mark this as needing updates |
||
| (20 intermediate revisions by 7 users not shown) | |||
| Line 1: | Line 1: | ||
== | == Why learn wiring? == | ||
* The [[Geothermal Generator]] requires wiring vents to the station yourself. | |||
* If there is a break in the grid of wires, e.g. due to an explosion or sabotage, you obviously need to know wiring to fix it. And you should fix it because if nothing's getting power, nothing can be done, whether it's [[Medical Doctor#The Cloner|cloning]], [[Chemistry#Chem Dispenser|chemistry]], or [[Foods and Drinks#Dispenser|booze]]. | |||
* [[Power_Grid#Solar_Generator|Hotwiring the solars]] lets you direct more power to the station's machines and devices at the cost of none going into storage. This naturally requires wiring knowledge. | |||
*[[ | * If you are an [[Antagonist|antag]] and want to hotwire the engine directly to the power grid so that the APCs randomly shock people and electrified devices hurt more, you need wiring know-how. Similar deal if you want to cut wires. | ||
* Wire art is fun! | |||
== Tools for wiring == | == Tools for wiring == | ||
| Line 14: | Line 11: | ||
You will need: | You will need: | ||
* '''Wire''' - Obviously you need some wire to lay down. It can be found in yellow toolboxes or [[Tool Storage|tool storage]], as well as just lying around. | * [[Image:Wire.png]] '''Wire''' - Obviously you need some wire to lay down. It can be found in yellow toolboxes or [[Tool Storage|tool storage]], as well as just lying around. [[Quartermaster#Basic Materials|Cargo]] sells both generic red wire and wire in many other colors for the more aesthetically inclined in the "Basic Materials" section; those who aren't [[quartermaster]]s or the [[Chief Engineer]] can request them at [[Computers#Supply Request Console|Supply Request Consoles]]. | ||
* ''' | * [[Image:WirecuttersV2-32x32.png]][[Image:WirecuttersYellow-32x32.png]] '''Wirecutters''' - Everyone makes mistakes sometimes, and this lets you cut wire you have placed. | ||
* '''Insulated Gloves''' - Cutting powered cables with wire cutters will shock or kill you if you do not have these equipped! | * [[Image:Glovesy.png]] '''Insulated Gloves''' - Cutting powered cables with wire cutters will shock or kill you if you do not have these equipped! | ||
* '''Crowbar''' - Wiring is often under floor tiles. A crowbar will let you pry up the floor and get to work. | * [[Image:CrowbarV2-32x32.png]] [[File:CrowbarRed-32x32.png]][[Image:CrowbarYellow-32x32.png]] '''Crowbar''' - Wiring is often under floor tiles. A crowbar will let you pry up the floor and get to work. | ||
You may want: | You may want: | ||
* '''T-Ray Scanner''' - This will pulse and let you see past floor bits so you don't have to pry up every floorboard to find the break. | * [[Image:MultitoolV2-32x32.png]] '''Multitool''' - Use this on a wire to see if it's actually receiving power and thus connected properly. | ||
* [[Image:TRayScannerV2-32x32.gif]] '''T-Ray Scanner''' - This will pulse and let you see past floor bits so you don't have to pry up every floorboard to find the break. | |||
Alright! Now that you have all your gear (Hopefully) you can get to replacing damaged wire or running your own! | Alright! Now that you have all your gear (Hopefully) you can get to replacing damaged wire or running your own! | ||
== Laying | == Wire Laying: The Basics == | ||
# Stand beside the spot where you want to place the wire. | |||
# Face the direction you want it to travel. | |||
* If you click the tile the other wire is on instead of the other wire, a little circle will appear. | # While holding the wire, click directly on the wire you want to attach it to! | ||
#* If you click the tile the other wire is on instead of the other wire, a little circle will appear. It may look like one wire, but it's actually just two wires on top of each other. They aren't connected! No power will flow here. Cut it and try again. | |||
There you go! That is really all you need to know to wire anything on the station! Watch out for the little circles in the wire and you should be good! Before you try rewiring a whole room or anything like that, grab some wire, head into the chapel, pull up the floor and get practicing! | There you go! That is really all you need to know to wire anything on the station! Watch out for the little circles in the wire and you should be good! Before you try rewiring a whole room or anything like that, grab some wire, head into the chapel, pull up the floor and get practicing! | ||
== | ==Wiring Techniques== | ||
{{Wip|Reason=Screenshots for "Clicking the tiles" and "Clicking the wire stumps" need to be updated. They're at least a decade old.}} | |||
Ever wondered how people make all those crazy beautiful wire art designs? Or just want to know how to make a nice, clean wire curve? This section will show you how. | |||
===Clicking the coil=== | |||
Need to lay down some wire over a long distance? Tired of having to manually lay down wire? Just click on the wire in-hand (or use the activate-item hotkey, which is usually {{key|C}} or {{key|PgDown}}) to switch to wire-laying mode! In this way, as you walk over a valid floor tile, you'll lay down wire as you go, on every tile you walk on, greatly reducing time and tedium. | |||
===Clicking the tiles=== | ===Clicking the tiles=== | ||
[[File:WiringDemo1.gif|frame|left|Clicking on the same tile while facing down.]] | |||
If you're clicking the square you're standing in, a line of wire will be laid from the center of the tile to the edge of the tile in the direction you're currently facing (which is generally the direction you last moved).{{clear}} | |||
[[File:WiringDemo2.gif|frame|left|Clicking an adjacent tile.]] | |||
[[File:WiringDemo3.gif|frame|right|Clicking a diagonally adjacent tile.]] | |||
If you click '''another''' tile, a line of wire will be laid in the center of '''that''' tile running toward the tile you were on. | |||
This works even diagonally, although since you can't "face" diagonally you can't lay diagonal wires in your own tile using just this method.{{clear}} | |||
===Clicking the wire stumps=== | |||
[[File:WiringDemo4.gif|frame|left|Clicking on the same tile and stepping aside.]] | |||
You can do a lot with just straight lines, but knowing how to do curves opens up many more opportunities. Luckily, it's pretty simple. | |||
[[File: | Just click on the square you're standing on, as normal, and step aside.{{clear}} | ||
[[File:WiringDemo5.gif|frame|left|Clicking the adjacent wire.]] | |||
Click on the adjacent '''wire''' (clicking on the "nub"/"circle" in the center will make it easier), and presto, you've got a basic curve! | |||
Now, this is just one of many possible curves you can do, but the techniques for making the others follow a similar pattern. There are different shapes for when you're northwest of the wire, west of it, even southwest of it. Move around and don't be afraid to experiment! | |||
''' | Do note however, that if you'll be wiring the station this way, this is actually theoretically bad. Wires that don't link up at a center-of-tile junction '''don't''' share power with each other. Cutting the wire will also unravel that whole section (one tile) of wire. Since you use just as much wire to make a curved line of wiring between two tiles as two segments that meet at the center, it's almost never worth the bother except for aesthetic reasons. You can lay down some awesome wire art this way, though.{{clear}} | ||
===Click-dragging the tiles=== | |||
You can also lay down cable coil simply by dragging and dropping adjacent tiles. Unlike other methods, you don't have to actually be facing the tile you want to add wire too; you can put down cable directly behind you for example. The game also knows that, nine times out of ten, you want to add to existing wire instead of making a separate cable, so if you click drag from a tile that already has cable to one that doesn't, the game will automatically connect the new wire and old wire together, without creating little nubbins. | |||
The | And, of course, you can still make all of the same shapes, but this time more intuitively. The particular curves and lines you'll make all depends on which tile you click-drag to, whether or not there was already wire at that location, and what direction that wire was facing. | ||
---- | ---- | ||
{{Department Guides}} | |||
Latest revision as of 05:52, 11 August 2023
Why learn wiring?
- The Geothermal Generator requires wiring vents to the station yourself.
- If there is a break in the grid of wires, e.g. due to an explosion or sabotage, you obviously need to know wiring to fix it. And you should fix it because if nothing's getting power, nothing can be done, whether it's cloning, chemistry, or booze.
- Hotwiring the solars lets you direct more power to the station's machines and devices at the cost of none going into storage. This naturally requires wiring knowledge.
- If you are an antag and want to hotwire the engine directly to the power grid so that the APCs randomly shock people and electrified devices hurt more, you need wiring know-how. Similar deal if you want to cut wires.
- Wire art is fun!
Tools for wiring
A lot of people get this wrong, so pay attention!
You will need:
 Wire - Obviously you need some wire to lay down. It can be found in yellow toolboxes or tool storage, as well as just lying around. Cargo sells both generic red wire and wire in many other colors for the more aesthetically inclined in the "Basic Materials" section; those who aren't quartermasters or the Chief Engineer can request them at Supply Request Consoles.
 Wirecutters - Everyone makes mistakes sometimes, and this lets you cut wire you have placed.
 Insulated Gloves - Cutting powered cables with wire cutters will shock or kill you if you do not have these equipped!

 Crowbar - Wiring is often under floor tiles. A crowbar will let you pry up the floor and get to work.
You may want:
 Multitool - Use this on a wire to see if it's actually receiving power and thus connected properly.
 T-Ray Scanner - This will pulse and let you see past floor bits so you don't have to pry up every floorboard to find the break.
Alright! Now that you have all your gear (Hopefully) you can get to replacing damaged wire or running your own!
Wire Laying: The Basics
- Stand beside the spot where you want to place the wire.
- Face the direction you want it to travel.
- While holding the wire, click directly on the wire you want to attach it to!
- If you click the tile the other wire is on instead of the other wire, a little circle will appear. It may look like one wire, but it's actually just two wires on top of each other. They aren't connected! No power will flow here. Cut it and try again.
There you go! That is really all you need to know to wire anything on the station! Watch out for the little circles in the wire and you should be good! Before you try rewiring a whole room or anything like that, grab some wire, head into the chapel, pull up the floor and get practicing!
Wiring Techniques
| This page is under construction. The following information may be incomplete. Screenshots for "Clicking the tiles" and "Clicking the wire stumps" need to be updated. They're at least a decade old. |
Ever wondered how people make all those crazy beautiful wire art designs? Or just want to know how to make a nice, clean wire curve? This section will show you how.
Clicking the coil
Need to lay down some wire over a long distance? Tired of having to manually lay down wire? Just click on the wire in-hand (or use the activate-item hotkey, which is usually C or PgDown) to switch to wire-laying mode! In this way, as you walk over a valid floor tile, you'll lay down wire as you go, on every tile you walk on, greatly reducing time and tedium.
Clicking the tiles
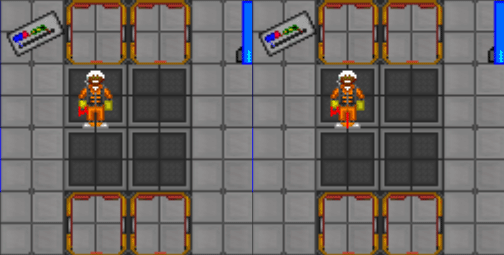
If you're clicking the square you're standing in, a line of wire will be laid from the center of the tile to the edge of the tile in the direction you're currently facing (which is generally the direction you last moved).
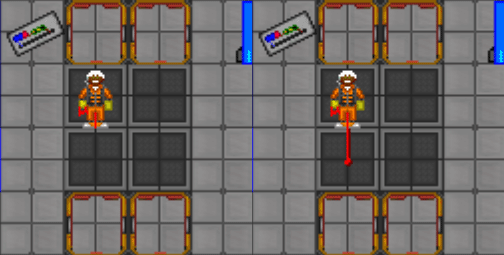
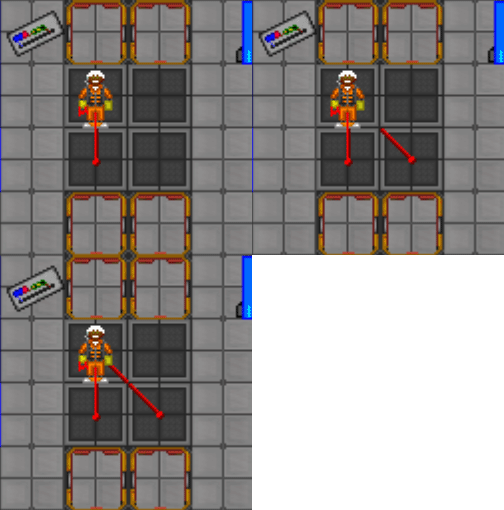
If you click another tile, a line of wire will be laid in the center of that tile running toward the tile you were on.
This works even diagonally, although since you can't "face" diagonally you can't lay diagonal wires in your own tile using just this method.
Clicking the wire stumps
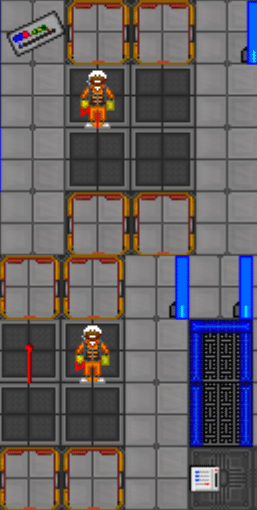
You can do a lot with just straight lines, but knowing how to do curves opens up many more opportunities. Luckily, it's pretty simple.
Just click on the square you're standing on, as normal, and step aside.
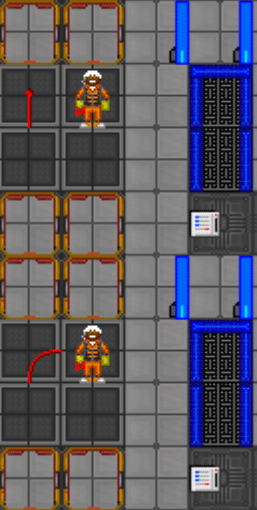
Click on the adjacent wire (clicking on the "nub"/"circle" in the center will make it easier), and presto, you've got a basic curve!
Now, this is just one of many possible curves you can do, but the techniques for making the others follow a similar pattern. There are different shapes for when you're northwest of the wire, west of it, even southwest of it. Move around and don't be afraid to experiment!
Do note however, that if you'll be wiring the station this way, this is actually theoretically bad. Wires that don't link up at a center-of-tile junction don't share power with each other. Cutting the wire will also unravel that whole section (one tile) of wire. Since you use just as much wire to make a curved line of wiring between two tiles as two segments that meet at the center, it's almost never worth the bother except for aesthetic reasons. You can lay down some awesome wire art this way, though.
Click-dragging the tiles
You can also lay down cable coil simply by dragging and dropping adjacent tiles. Unlike other methods, you don't have to actually be facing the tile you want to add wire too; you can put down cable directly behind you for example. The game also knows that, nine times out of ten, you want to add to existing wire instead of making a separate cable, so if you click drag from a tile that already has cable to one that doesn't, the game will automatically connect the new wire and old wire together, without creating little nubbins.
And, of course, you can still make all of the same shapes, but this time more intuitively. The particular curves and lines you'll make all depends on which tile you click-drag to, whether or not there was already wire at that location, and what direction that wire was facing.
| Department Guides | |
|---|---|
| Engineering | Making and Breaking · Construction · Gas · Power Grid · Thermoelectric Generator · Singularity Generator · Geothermal Generator · Catalytic Generator · Nuclear Generator · Mining · Materials and Crafting · Wiring · Hacking · MechComp · Mechanic components and you · Control Unit · Ruckingenur Kit · Reactor Statistics Computer · Cargo Crates |
| Medsci | Doctoring · Genetics · Robotics · Telescience · Plasma Research · Artifact Research · Chemistry · Chemicals · ChemiCompiler · Decomposition |
| Security | Security Officer · Contraband · Forensics · Space Law |
| Service | Foods and Drinks · Botany · Writing · Piano Song Dump · Instruments |
| The AI | Artificial Intelligence · AI Laws · Chain of Command · Guide to AI · Humans and Nonhumans · Killing the AI |
| Computers | Computers · TermOS · ThinkDOS · Packets |
