TEG Automation
See Also:
Controllable Devices
Tired of watching the TEG constantly?, Ever want to just outsource your job to a computer? Well this is for you.
These devices are able to recieve signals from MechComp to control the engine/toxins.
Wireless Devices
Frequencies
Most Atmos devices will use these frequencies.
- Engineering: 122.5
- Science: 122.9
- Security: ███
| Pump |
PumpPowered down pumps do not transfer gas, Meaning they can be used as controllable Electronic Valves, Commands
Pump Status The following is transmited whenever a pump recieves are command
Packet Examples Purge Hotloop:
Check All Pumps:
Set Pressure:
|
| Gas Mixer |
Gas MixerDid I hear you say "Adjustable combustion chamber temperatures?"
Commands
Packet Examples Set Ratio to 66:33:
Set Pressure to 75kPa:
Turn off mixer:
|
MechComp Devices
Connecting the generator and pressure will require using you multitool on them and selecting "Connect Component"
| The Generator |
The GeneratorEver wanted to boast about the engine output to the crew? Well now you can do it automatically! Outputs
Signal Fields
Use a WiFi signal splitter component to grab the values of these fields |
| Pressure Meter |
Pressure MeterThe main source of data for engine automation. Signal Fields
Use a WiFi signal splitter component to grab the values of these fields |
| Circulators (Blowers) |
Circulators (Blowers)Useful for optimizing the target pressure on the blowers. Inputs
|
Example Contraptions
Use these examples to help get started with making your own controllers.
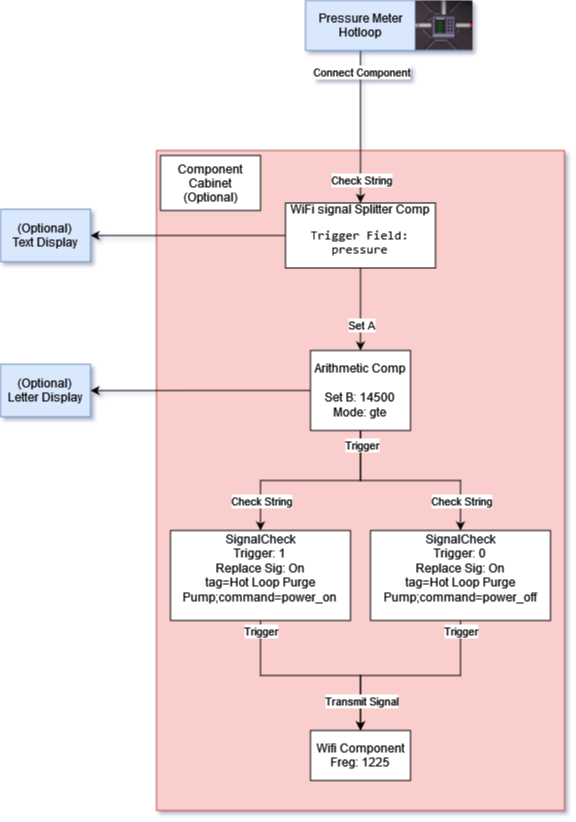
Hot Loop Auto-purge
Tired of your hot loop pipes rupturing and plasma flooding engineering? Well this is for you!
What it does?
- When the meter pressure is above
14500, the Arithmetic will send a 1 to both Signal Checks, Signal Check A then sends a WiFi packet to turn on the purge pump.
Mechlab Shopping List:
- 1x WiFi Signal Splitter Component.
- 1x Arithmetic Component.
- 2x Signal Check Component.
- 1x WiFi Component.
Optional:
- Letter Display (See if the pump is currently on).
- Text Display (Show off your current pipe pressure).
- Component Cabinet.
To Assemble (Or see wiring diagram below):
- Place and wrench components, Optionally: In a component cabinet.
- Interact with a multitool on a pressure meter, select "Connect Component".
- Use a pressure meter that is directly connecting to the furnaces/combustion chamber, Avoid meters on the output end of pipes.
- Interact with the WiFi signal splitter Component, select "Check String".
- Interact with the multitool to finish pairing.
- On the WiFi signal splitter Component set "trigger field" to
pressure. - Hold your multitool, Click and drag from the WiFi signal splitter Component to the Arithmetic Component.
- Select "Trigger" then "Set A".
- On Signal Check A, set: "Set B" =
14500; "Mode" =gte.- This compares if A >= B, B is your max pressure (Change "Mode" to lte to make this setup do something when the pressure is low, Eg. Turn on an inlet pump).
- On the Arithmetic component set "Set B" to
14500(This is your Auto-purge pressure). - On the Arithmetic component set "Mode" to
gte(Greather than or Equal) (Additionally, this is where you could turn this into an Auto-filler if the pressure is low). - Hold your multitool, Click and drag from the Arithmetic Component to both Signal Check Components.
- On Signal Check A, set: "Send Signal" =
tag=Hot Loop Purge Pump;command=power_on; "Trigger String" =1; Replace Signal =On. - On Signal Check B, set: "Send Signal" =
tag=Hot Loop Purge Pump;command=power_off; "Trigger String" =0; Replace Signal =On. - Hold your multitool, Click and drag both Signal Check Components to both the WiFi Component.
- On the WiFi component, set: "Frequency" =
1255. - Open the manual hot loop purge valve.
- If multiple purge lines, use the one before the engine inlet.
- Kick back and relax?
| Wiring Diagram |
Engine Power Output Display
Automagically brag about your engine output
Mechlab Shopping List:
- 1x WiFi Signal Splitter Component.
- 1x Text Display.
Optional:
- 1x Signal Build Component
To Assemble (Or see wiring diagram below):
- Place and wrench components.
- Interact with a multitool on the generator, select "Connect Component".
- Interact with the WiFi Signal Splitter Component, select "Check String".
- Interact with the multitool to finish pairing.
- On the WiFi Signal Splitter Component set "trigger field" to
powerfmt. - Hold your multitool, Click and drag from the WiFi Signal Splitter Component to the Text Display.
- Optional: Use a signal build component to add extra text to your display.
Contraption Ideas
- Using inlet pumps, add gas to hotloop if the pipe pressure is low.
- Add oxygen to hotloop every 10 seconds.
- Broadcast engine output to the Engineering radio, Or general radio :)
- Or Low/High Pressure alerts that are sent to radio or PDA.
- Set blowers to the ideal pressure value based on inlet/outlet pressure
Supplementary Video
| Department Guides | |
|---|---|
| Engineering | Making and Breaking · Construction · Gas · Power Grid · Thermoelectric Generator · Singularity Generator · Geothermal Generator · Catalytic Generator · Nuclear Generator · Mining · Materials and Crafting · Wiring · Hacking · MechComp · Mechanic components and you · Control Unit · Ruckingenur Kit · Reactor Statistics Computer · Cargo Crates |
| Medsci | Doctoring · Genetics · Robotics · Telescience · Plasma Research · Artifact Research · Chemistry · Chemicals · ChemiCompiler · Decomposition |
| Security | Security Officer · Contraband · Forensics · Space Law |
| Service | Foods and Drinks · Botany · Writing · Piano Song Dump · Instruments |
| The AI | Artificial Intelligence · AI Laws · Chain of Command · Guide to AI · Humans and Nonhumans · Killing the AI |
| Computers | Computers · TermOS · ThinkDOS · Packets |
