Powering the station: Difference between revisions
m kill me |
Studenterhue (talk | contribs) Add new gravitional singularity generator sprite |
||
| Line 281: | Line 281: | ||
|Radiation Collection Controller || [[File:Array controller.png]] || Controls the collection arrays. | |Radiation Collection Controller || [[File:Array controller.png]] || Controls the collection arrays. | ||
|- | |- | ||
|Gravitional Singularity Generator || | |Gravitional Singularity Generator || [[File:Gravitional Singularity Generator.png]] || Creates a singularity when it detects a containment field of a valid size. | ||
|- | |- | ||
|Plasma tank || [[File:Plasmatank.png]] || Collection arrays won't provide power if they don't have a plasma tank in them. | |Plasma tank || [[File:Plasmatank.png]] || Collection arrays won't provide power if they don't have a plasma tank in them. | ||
Revision as of 17:59, 23 June 2017
There are two distinct ways to supply the station with electricity, which can either be used exclusively or in combination with each other. The solar arrays are efficient and simple, yet leave no room for experimentation. In contrast, there are probably as many different engine setups as there are engineers.
The experimental local generator

More a means of powering specific rooms rather than the entire station, for which the generator is unsuitable. Still, it can be a worthwhile backup generator for key areas such as medbay or the escape hallway as insurance against power outages. Insert a plasma tank, secure the floor bolts and flick the power switch. The generator doesn't burn fuel if the local APC's power cell is already fully charged.
The solar arrays

Solar arrays are not a complicated affair and provide a decent amount of power once properly configured. This task can be handled by the AI in the first few minutes of any given round, which is great when the engineers have no clue how to do their job. They're also a single wire snip away from sabotage, so they should not be relied on completely in lieu of the generator if possible.
How it all works: The solar arrays
Each array is a fully automatic and for the most part self-contained system. It consists of:
- The solar tracker, which tracks the location of the sun.
- Solar panels to generate electricity.
- The control terminal, which aligns the panels to the sun.
- The array's output is channeled through a SMES unit, basically a huge rechargeable battery. For the connection, an electric terminal (not to be confused with data terminals) is required.
- Regular wiring then feeds a certain amount of power (depending on the SMES settings) to the station grid.
Auto-tracking doesn't work when there is no continuous connection between the tracker and control terminal. Damaged wiring will also prevent panels from rotating automatically, as they can't receive commands from the computer.
Keep in mind that the sun will always be moving in relation to the station, which means that the amount of electricity generated by each array won't be constant. For this reason, it's also best to leave the control terminal on the default settings (i.e. Auto) unless you want to babysit the arrays and rotate them manually.
Note: The computer is tied to the APC's equipment setting. If the APC has been switched off or drained at any point, it is necessary to reset the tracking program from Auto to Off and back to Auto.
Down to business: Configure the SMES units
Making use of the default settings of the SMES units will result in power failures within half an hour, or much less if telescience decides to play around with permaportals or something unforeseen happens. At the same time, the mechanics of the power grid are somewhat arcane, so setting up the SMES units wrong can cause power failures throughout the station including in key locations like the bridge.
To set up a SMES:
- Chose an appropriate Input value from the table below for the solar array in question.
- Make sure the Input is set to Auto, though it should be already.
- Likewise, pick the corresponding Output value.
- Set the Output to Online.
In case you consider deviating from these suggestions, be aware of two other things. The SMES unit's input should be set with a value no higher than what is indicated on the control terminal. It won't charge if it is set higher than what the arrays are producing, even if the difference is only a couple of watts. In addition, the output should have a value lower than the input in order to build up some reserves, because the SMES won't always be charging.
Note: the data in the following table may be incorrect, and some testing is required. If you do know the correct settings, please help us out.
| SMES | Image | Peak output | Suggested input |
Suggested output |
Info |
|---|---|---|---|---|---|
| Port aft (catering maint.) |
 |
~100,000 W | 85,000 W | 40,000 W | Supposedly the first SMES in the power-grid. This might mean that any superfluous power can be handed over to other SMES units, even if there isn't enough to power. |
| Starboard aft (Research Wing maint.) |
 |
~100,000 W | 85,000 W | 40,000 W | Don't set the output too high. Due to the way the power grid code works, it is second in line after the Port Aft Solar SMES and will receive its power overflow. If it's output is higher then the output of Port Aft Solar SMES, it will actually drain energy from the power grid! |
| Port substation |  |
200,000 W | 200,000 W | 100,000 W | If the engine is on, this SMES will help keep the lights on in the Portside of the station. However, that might not actually be desirable, as few station critical sections are in that part. If the engine has not been turned on, it would be wiser to just leave power uptake off. |
| Starboard substation |  |
200,000 W | 200,000 W | 100,000 W | If the engine is on, this SMES will help keep the lights on in the Starboard side of the station. Since the medbay and the mining section are here, recovering from a power failure here is much more difficult than for the Portside of the station. If the engine has not been turned on, it would be wiser to just leave power uptake off. |
| Inner Engineering |  |
200,000 W | 200,000 W | 100,000 W | If the engine is turned on, these units can fill up regardless of settings, and if the engine is off, these aren't useful anyway, so be generous and make sure output level are always the highest in the station. |
| Array | Image | Peak output | Suggested input |
Suggested output |
Info |
|---|---|---|---|---|---|
| Aft (bridge maint.) |
 |
~90,000 W | 70,000 | 40,000 | The smallest and thus least powerful array, so overoptimistic settings will deplete the SMES unit quickly. |
| Port (catering maint.) |
 |
~120,000 W | 80,000 | 40,000 | Don't set the output too high. Due to the way the power grid code works, it is second in line after the aft solars and will always be loaded. |
| Starboard (near tech storage) |
 |
~120,000 W | 85,000 | 60,000 | Pretty much identical to the port solars. Because it is last in line after the four engine substations (which amount to 40.000 W combined output by default), there is more leeway to use it as a buffer. |
Hotwiring
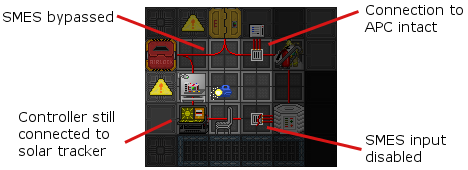
Since there is so much finicky stuff about the power gird, it is sometimes preferred to bypass the SMES units all together. To do this you need to have access to basic tools, a pair of insulated gloves and the SMES substations.
- Bypass the SMES by bridging the obvious gap on the floor. For more information on how to lay wires, please refer to Guide to Wiring.
- Disable the SMES on the input side. Setting its input to Off has the same effect, but this way ensures that the AI can't interfere. The solar arrays don't generate enough electricity to supply the station and charge the SMES units at the same time.
- Double-check that you haven't disconnected the control terminal or APC by accident.
As mentioned before, solar arrays don't produce a constant amount of power. While eliminating the SMES units from the equation does deprive the system of a buffer, there is almost always enough juice available to keep the APCs supplied, even if a single array may contribute only 25.000 W to the total number. Typically, the station demands circa 170.000 W.
The thermoelectric generator
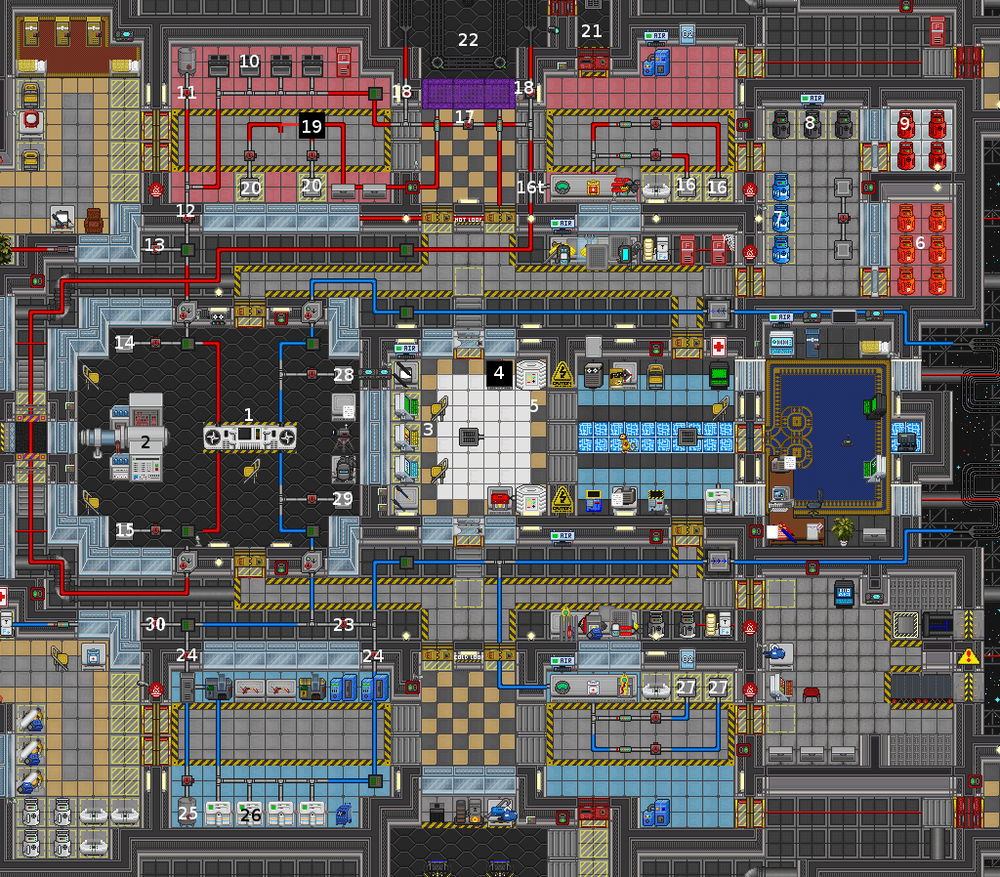
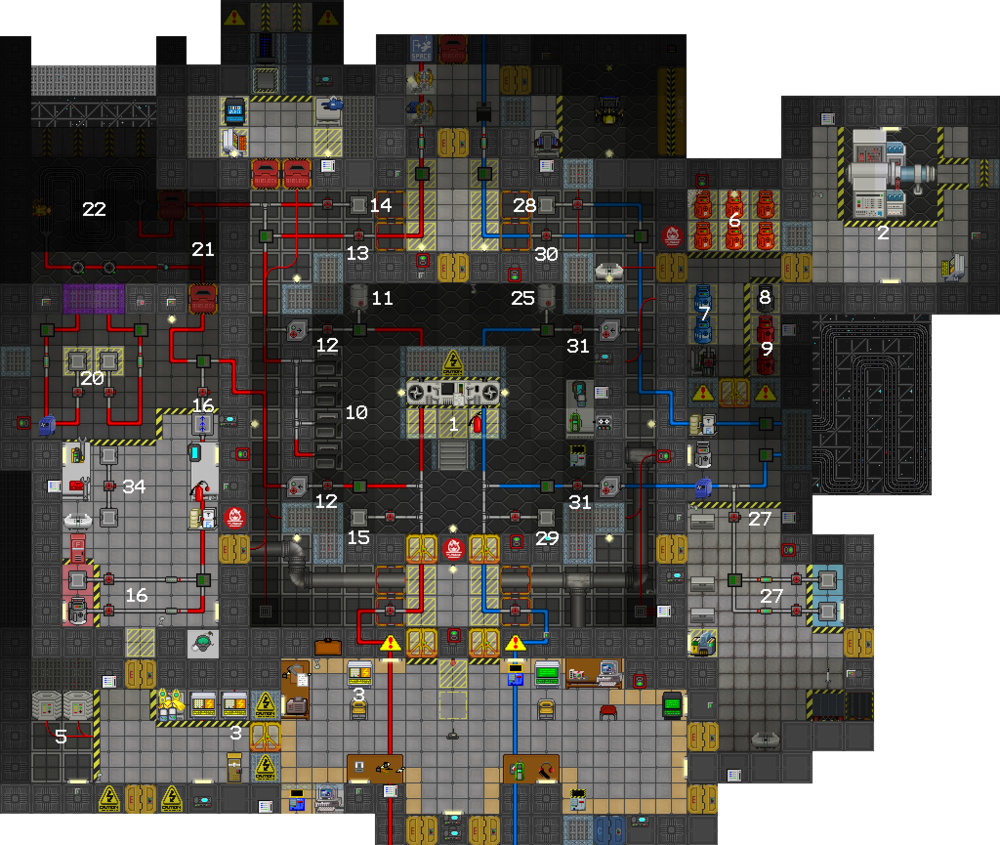
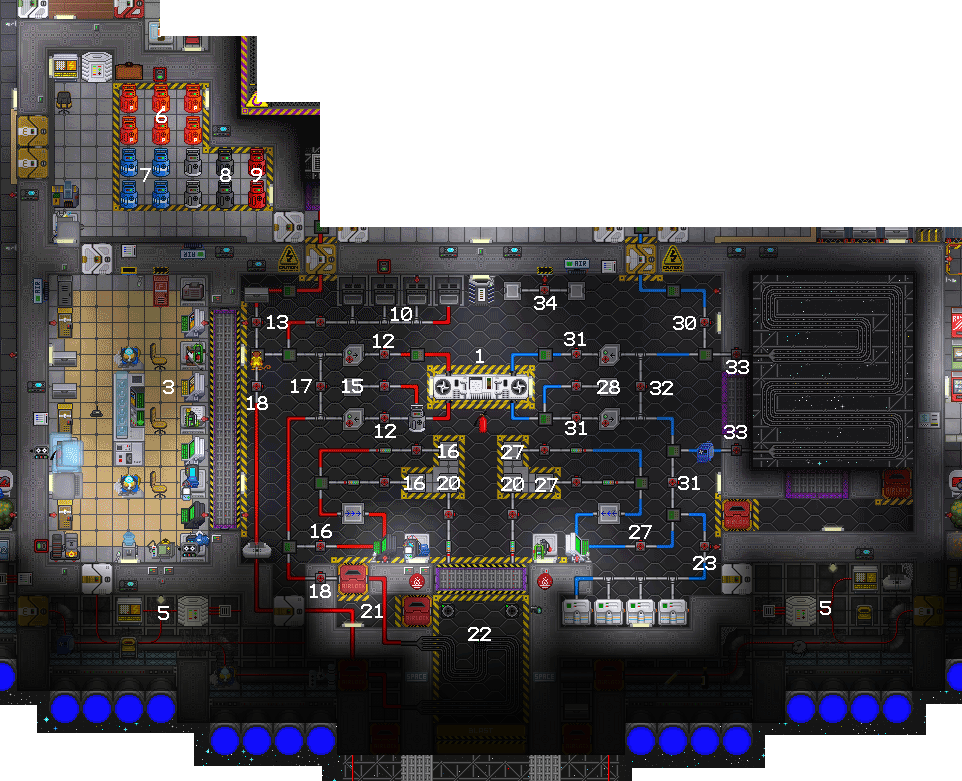
Map Legend
This section is collapsible, click the button to the right to open it. Not all of these items will be on each map, though many of them will be common to each map.
1 - The TEG, or Thermo-Electric Generator.
2 - The PTL or Power Transmission Laser.
3 - Engine Outpuit Monitoring Computer - Allows you to monitor the output of the engine remotely.
4 - Gas Mixing Control Computer - Allows you to control the Gas Mixer (19).
5 - Engineering SMES Units - Stores the power from the engine, like a battery.
6 - Plasma - This room is where the plasma canisters are stored. Equipped with a separate Firelock.
7 - Oxygen - These are the oxygen canisters.
8 - CO2 - These are the CO2 canisters.
9 - N2 - This room is where the N2 canisters are stored. Equipped with a separate Firelock.
10 - Furnaces - Allows you to burn char or other flammable objects in them to produce power.
11 - Hot Loop Pressure Tank - Allows you to release pressure from the hot loop into the tank.
12 - Hot Loop Manual Valves - Allows you to control whether the Hot Loop is running gasses through the TEG (1)
13 - Hot Loop Purge Valve - Controls flow to the Hot Loop Purge Pump to release pressure and gasses from the Hot Loop.
14 - Hot Loop Auxiliary Port 1 - Allows you to release Gas into the TEG Input end of the hot loop.
15 - Hot Loop Auxiliary Port 2 - Allows you to release Gas into the TEG Output end of the hot loop.
16 - Hot Loop Inlet Valves - Allows you to release Gas into the TEG Input end of the hot loop, before the heating portion. (Pumps controlled by the pump controller)
17 - Combustion Chamber Bypass Valve - Allows hot loop Gas to go continue to the TEG rather than into the Combustion Chamber to if you're not using it.
18 - Combustion Chamber Inlet and Outlet Valves - Allows hot loop Gas to enter and exit the Combustion Chamber
19 - Combustion Chamber Mixing Pump - Mixes the Gases contained in the Combustion Chamber Gas Ports (20) and sends it to the Combustion Chamber. Controlled by the Gas Mixing Control Computer (4)
20 - Combustion Chamber Gas Ports - Allows you to send Gases to the Combustion Chamber to be burned.
21 - Combustion Chamber Airlock - Allows you to enter and exit the Combustion Chamber without filling the room with hot gases.
22 - Combustion Chamber - Burns the gas mixes in (20) to heat up the hot loop Gases
23 - Freezer Room Bypass Valve - Allows cold loop Gas to continue to the TEG rather than into the freezers if you're not using them
24 - Freezer Room Inlet and Outlet Valves - Allows cold loop Gas to enter and exit the Freezers
25 - Cold Loop Pressure Tank - Allows you to release pressure from the cold loop into the tank
26 - Freezers - Cools the cold loop Gas using cryo cooling
27 - Cold Loop Inlet Valves - Allows you to release Gas into the TEG Input end of the cold loop, before the cooling portion. (Pumps controlled by the pump controller)
28 - Cold Loop Auxiliary Port 1 - Allows you to release Gas into the TEG Input end of the cold loop.
29 - Cold Loop Auxiliary Port 2 - Allows you to release Gas into the TEG Output end of the cold loop.
30 - Cold Loop Purge Valve - Controls flow to the Cold Loop Purge Pump to release pressure and gasses from the Cold Loop.
31 - Cold Loop Manual Valves - Allows you to control whether the Cold Loop is running gases through the TEG
32 - Cold Loop Bypass Valve - Allows Gas to go straight to the TEG rather than through the cold loop pipes exposed to space
33 - Cold Loop Inlet and Outlet Valves - Allows Gas to enter and exit the cold loop pipes going through space
34 - Manual Gas Mixer - Allows you to manually mix Gases without a Gas Mixer Control Computer
How it all works
The Engine is the heart of engineering and the best source of power on the station.
WARNING: There are a number of systems that are rather complicated and might even be bugged, so are best not be touched until you are more experienced at their use. These are : the Gas coolers (26) and the valves that lead to them (24), the emergency pressure release valves for the hot loop (13) and the cold loop (28). Instead, if you need to siphon of gas to release pressure or 'other safety reasons' use empty canisters on the auxiliary siphoning ports (14) and (29).
Start-up procedure: Basic Char Burn
This setup will produce about 200 to 500 kiloWatts, which is enough to keep the whole station supplied with power and fill up all the SMES units. It can be considered the standard procedure for making sure the station doesn't brown out halfway during the round. However, the engineers will need to keep an eye on the furnaces, periodically refilling them with char if the round last more then 30 minutes and there will be no power for firing the PTL.
- Drag a fuel crate to the furnaces (10) and stuff 2 of them full of char and turn them on.
- Use a wrench to connect 2 canisters of Plasma (6) to the 2 hot loop supply ports (16).
- In this specific order, Open up the 2 hot loop supply valves (16), the combustion chamber bypass valve (17) and the hot loop valve (12).
- Use a wrench to connect 2 canisters of Plasma (6) to the 2 cold loop supply ports (27).
- In this specific order, Open up the 2 cold loop supply valves (27) and the freezer room bypass valve (23).
Don't forget to set up the SMES!
Start-up procedure: Hell BURN
Hell Burn setups involve using the combustion chamber to heat the gas in the hot loop. With the right setup, the engine can rapidly start producing over 1 MegaWatt of power, but the output can grow endlessly. Goon engineers like to compete and brag about their highest engine output, which usually ends up into the hundreds of gigaWatts or even hundreds of teraWatts! At that point though, it's little more then a pissing contest as even the mighty PTL can only process 999 teraWatts at it's maximum setting, and the heat coming from the engine room is enough to become a problem on the rest of the station, causing things like pieces of paper to spontaneously catch fire and gas canisters in air supply rooms to explode.
The startup procedures for a hell burn is a secret shared between good engineers and CE's and is not going to be posted on the wiki. Suffice it to say it involves using the combustion chamber, with a mix of gasses made by using the combustion chamber mixing pump (19) (which is operated from the control room (4)) and using the RCD to make several holes in the combustion chamber to stimulate proper gas flow and in the floor in specific places of the engineering sector to prevent fires from consuming the corridors.
Tending to the engine: Holy Grail
So the basic start-up procedure will keep the station alive, but will rarely exceed 800 kiloWatts of power. A good Hell-burn will produce enough power to burn gods, but it will also incinerate the rest of the station. The true aim of a good engineer is to run the engine on minimal fuel for maximum Watts. AND IT CAN BE DONE! Even with humble char and a little love'n'care you can produce a surge of over 4 megaWatts of power, enough to send sparks flying and supervisors crying.
Here is a hint: What way is the gas flowing, and what can you do for it? And you see those warning light along the pipes? They are not a joke, if they are spazzing out, your work is calling.
The power transmission laser
The power transmission laser, or PTL for short, is a way of rewarding engineers who go above and beyond the usual power supply. Using the interface on the laser system (click the lower left side of control panel sprite), the laser can receive power as an input and then output it, just like a SMES unit can. However, unlike a SMES unit, the PTL outputs its power in the form of a huge laser beam that gets sent all the way across the station Z-Level and, presumably, to some other people in need of power somewhere in space. As the PTL continues running, the station starts receiving a steady amount of extra cash in the budget depending on how much power is transmitted. There are a few restrictions to keep in mind, however:
- The PTL will not input any more than half of the total engine output, even if you set it beyond that threshold on the console.
- The PTL also cannot transmit power beyond 999 TW (terawatts). You need to have an insanely powerful engine setup for this to be a problem, but it's worth mentioning.
- Finally, the PTL obviously cannot transmit power when the door blocking the laser is closed.
You'll need to constantly micromanage the laser input with the total engine output to make sure that your cash-making machine isn't at the expense of station function, but with sufficiently high-power engine setups, this won't be an issue. Experiment with how much power you're able to get away with beaming into space!
The singularity engine
More of a plaything for bored engineers, but nevertheless a novel means of powering the stations and a hit amongst Lord Singuloth Chaplains. Most of the required components are not in Engineering or anywhere on the station at roundstart, unlike the TEG, so you'll have to gather the parts yourself, either by exploring the Adventure Zone with a friendly Research team or ordering the parts from Quartermaster for a hefty amount of cash. Here's a quick rundown of the items.
How it all goes together
Once you've found enough parts, you'll have to put them in the proper arrangement. Here a a few guildlines
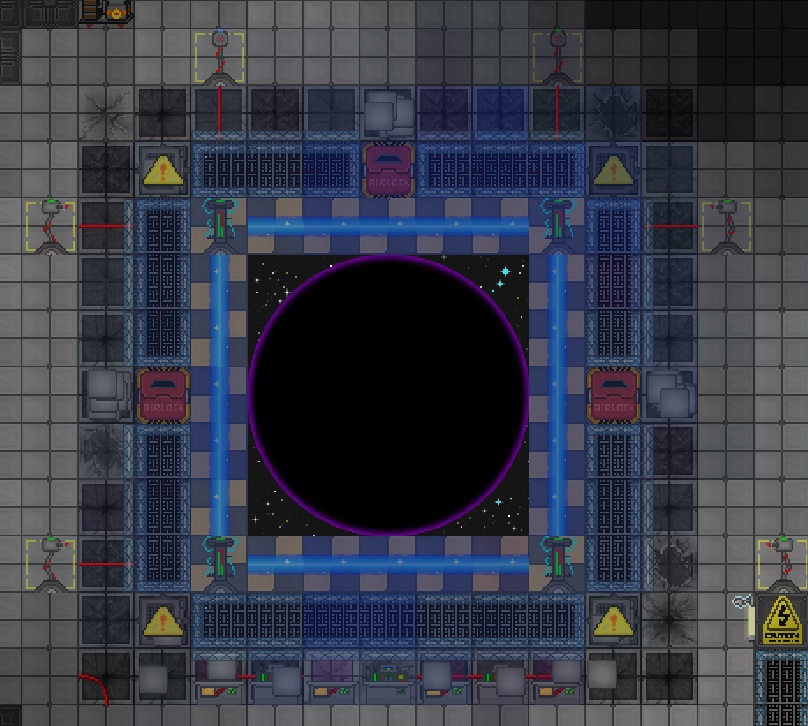
- The gravitional singularity generator needs to be in the center of a 5x5 area or bigger to spawn a singularity
- That means that the field generators need to be at least 5 squares apart from each other.
- The emitters should be aimed at the field generators, with at least one emitter to a field generator. Emitters can shoot through windows and have lots of range, so you afford a little protective glass or space between the emitters and field generators.
- Don't forget: emitters need power to be able to shoot at the field generators, so remember to wire them up so they'll receive power.
- The radiation collectors and the array controller can be put just about anywhere. These should be wired to the main power grid.
How to start it
Don't forget to put on your Mesons, lest you go blind while staring at the singularity.
- Secure the Emitters so they face the field generators. Turn them so they are pointing in the right direction. To secure them wrench and weld (mind your eyes and wait for the message 'you weld the emitter in place').
- Secure the Field Generators in each corner of the interior room they spawn in. To secure them wrench and weld.
- Get plasma tanks from the tank dispenser. The number of tanks is determined by the number of radiation collection arrays (one for each array), i.e. 4 tanks for 4 arrays.
- Place the plasma tanks into the collection arrays.
- Turn on all collection arrays and array controllers.
- Turn on all emitters (swipe id to lock/unlock the console, click on it to turn it on/off. It's a good idea to wait about a minute after the last emitter is on so the field generators receive some power.)
- CAREFULLY Turn on all field generators (same process as emitters)
- Go to the field generator
- Click on it. This will spawn a containment field between the two field generators. This field will shock you if you're one square away from it, that's why you should...
- RUN towards the outside! (The second time you do this you'll know when to run and when not to, but until then, do it every time)
- Lock all of the emitters' consoles by swiping your ID again if you have not done so already.
End result
The finished engine should look something like this, with all emitters on, field up and running, and collection arrays and their controllers on
