Pathology for Dummies
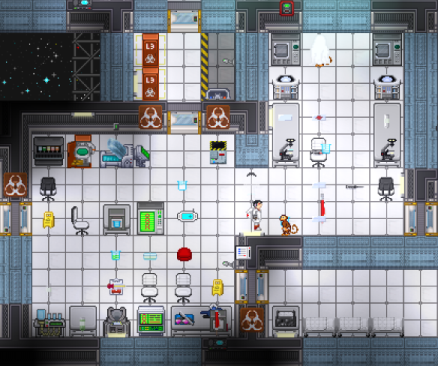
Exhibit A: A typical Pathology Lab, complete with foolish medical doctor and angry monkey.
How do we put all this stuff to use? Let’s break it down, machine by machine. But before we get to it, a word on basic lab safety.
Hygiene
Don’t eat the pathogens.
That’s it. That’s pretty much all you need to know. The pathogens in their base state (vial, blood slide, petri dish) etc. are inert and won’t decide to go airborne all on their own. Unless you deliberately introduce them to a body (such as yours, or a nearby monkey’s), you can safely toss ‘em about the pathology lab without a care in the world.
Suppose you want that extra bit of safety (or a monkey test subject). In that case, wear a bio suit and bio hood, surgical gloves and a surgical mask, and have active internals on. These items of clothing can be found in or around medbay, and should protect you from most methods of body-to-body pathogen transference methods. I can’t guarantee that it’s completely foolproof, though.
Finally, if you want to repurpose any of the tools you’ve been using in the lab (such as the syringe), use the Autoclave to clean them and remove any pathogen bits clinging to them.
Now, let’s get to the fun stuff.
Pathogen Manipulator
The heart and soul of the pathology lab. When you first click on the computer on the right, you’ll see this screen:
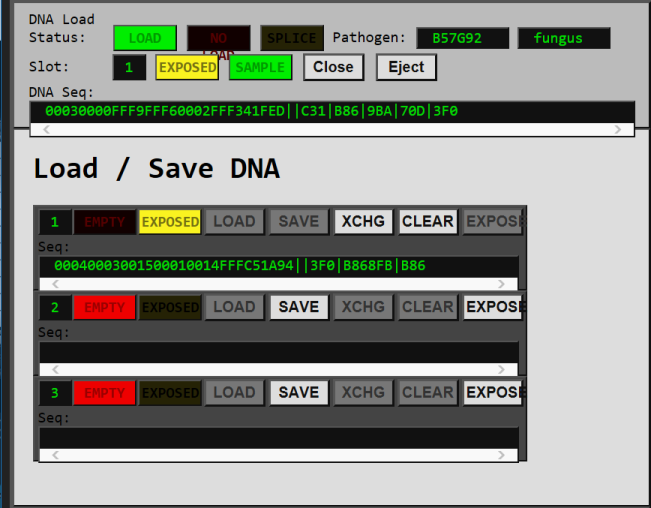
A few starting pathogens in vials can be located nearby, possibly in a fridge, depending on the map. To place one in the pathogen manipulator, EXPOSE one of the three slots, then click on the grey bit with the vial in question.
The vial will be loaded into one of the three slots. To work on a sample, LOAD it into the ‘loaded’ slot, then CLOSE it. Further pathogens can still be loaded into the exposed slot, and can be switched with the loaded pathogen with the XCHG button. Using SAVE with an empty slot will shift the ‘loaded’ pathogen into that slot, where it can then be spat out in vial form with the EJECT button.
As you can see, a pathogen is made up of a lot of numbers and letters. Generally speaking, a pathogen can be divided into two bits: the part before the ||, and the part after it. The former is the ‘private’ bit of the pathogen, the core that makes it what it is. The latter is the symptoms that it causes – what it’s going to do when you inject it in someone. Both bits can be modified to a certain extent, with help from the Pathogen Manipulator.
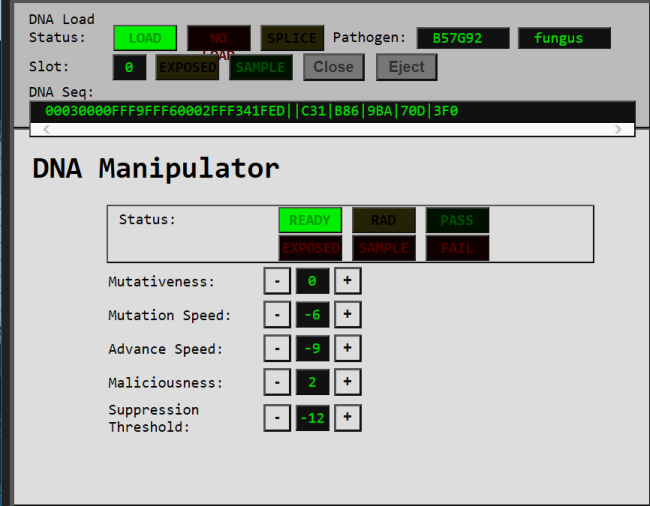
To modify the bit before the ||, we switch over to the DNA Manipulator tab. For clarity’s sake, the full string will be explained here, but if this stuff goes over your head, you can safely ignore the bits except for the variables which can be manipulated, shown right there in the picture.
For this particular sample, we’re dealing with a fungus with the string 0003-0000-FFF9-FFF6-0002-FFF3-4-1-FED (dashes placed between separate variables for clarity).
- 0003: The type of pathogen it is – in this case, a fungus. We can’t change this. Don’t worry about remembering which number corresponds to what type of pathogen – as you can see, it’s right there in the previous screen.
- 0000: The mutativeness of the pathogen. This represents how likely the pathogen is to develop additional mutations (either in the form of its ‘private’ variables changing or developing new symptoms) when a person is first infected by it. Certain other factors (such as specific symptoms or radiation) may also influence this.
- FFF9: The mutation speed of the pathogen, which represents how many changes the pathogen will undergo if it mutates.
- FFF6: The advance speed of the pathogen, which represents how fast it shifts from one stage to the next. Every pathogen has 3-5 stages (depending on the type of pathogen), and a person starts at stage 1 when infected. The stage represents what symptoms can manifest – for instance, at stage 2, tier 2 symptoms can start showing up.
- 0002: The maliciousness of the pathogen. This represents how bad the mutations will be on the off chance the pathogen mutates.
- FFF3: The suppressant threshold of the pathogen. This represents how many units of the suppressant chemical are needed in the Synth-o-matic (discussed later) to synthesize a cure.
- 4: The number of stages the pathogen can have – 4, in the case of fungal pathogens.
- 1: Whether the pathogen is symptomatic or not. This is either 1 or 0 – if it’s asymptomatic, that means that most symptoms will be inactive when a person is infected with it. If it’s symptomatic, the disease works as usual. It’s a good idea to keep this number in mind – messing with the other variables can flip this one, and if your sample turns asymptomatic, it’s as good as useless.
- FED: This is the suppressant code. It’s not much use if you don’t know the suppressant (discussed later), but it refers to a specific chemical – thus, if you find the suppressant for this particular pathogen, you’ve found it for every pathogen that shares this code.
As you can see from the screenshot, we can tweak the mutativeness, mutation speed, advance speed, maliciousness and suppressant threshold. Some of those numbers may start out negative – for instance, negative maliciousness means that the pathogen might mutate for the ‘better’, losing symptoms when it mutates. Negative mutation/mutativeness/advance speed means that said processes will be very slow (should they happen at all), and negative suppressant threshold means it requires barely any amount of said suppressant chemical to cure this pathogen.
To change those values, press the + or – button to tweak it in the desired direction. The machine will blast the pathogen with radiation, shifting the variable up or down as desired by a small amount. Unfortunately, it’s an inexact science – shifting one variable often shifts the others in random directions, and every time you tweak the pathogen, it has a chance to fall apart, blasted by too much radiation. If this is a sample you don’t want to lose, it’s best to have more of it growing in a dish nearby.
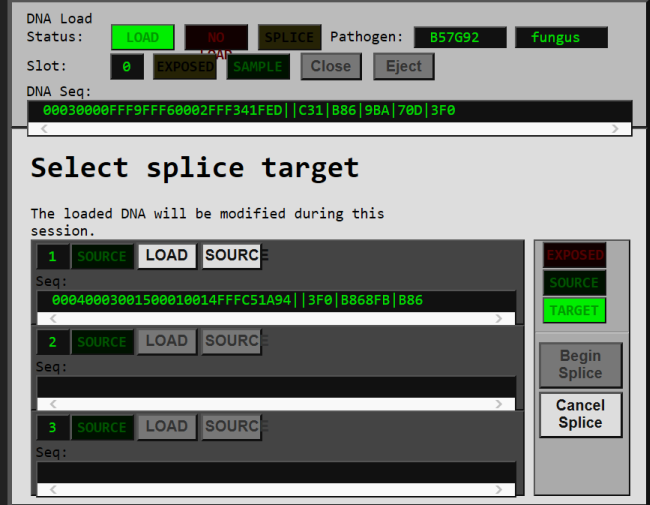
Now for the part on the other side of the ||. These are the symptoms of the pathogen – what their effects on your body’s system will be. With a loaded sample and another one in one of the three slots, we can Splice the two together, modifying the symptoms. To begin this process, make sure you’ve closed the loaded slot, selected a Source pathogen, and clicked Begin Splice.
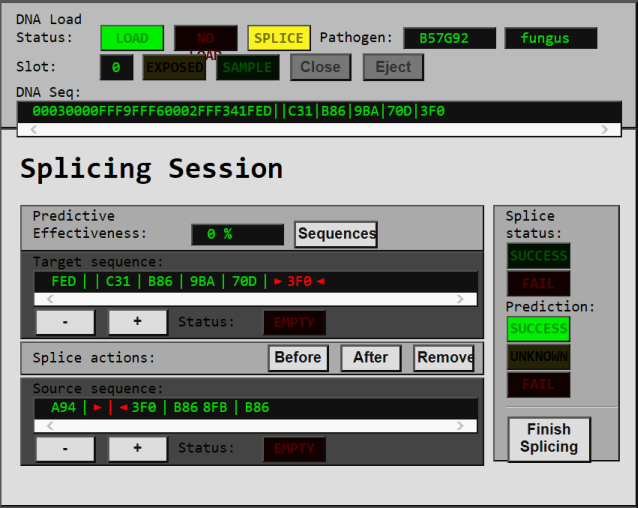
Doing so takes us to this screen. As shown in the figure above, symptoms are separated into 3-letter/digit segments. We can remove any segment from the target/source sequence after the ||, and shift any sequence from the source to any location on the target segment. If the splicing process is successful, the new target sequence will be loaded, and the empty Source pathogen vial spit out.
However, there are limitations to this. A symptom must be a ‘valid’ symptom – not every random assembly of segments will work. Valid symptoms must be separated by | lines – see the 3F0 | B86 8FB | B86 sequence in the source sequence for an example. If an invalid symptom is assembled when you click ‘Finish Splicing’, the whole thing will fail and you lose both pathogens.
How do we know what symptoms are valid? We'll find out in a moment.
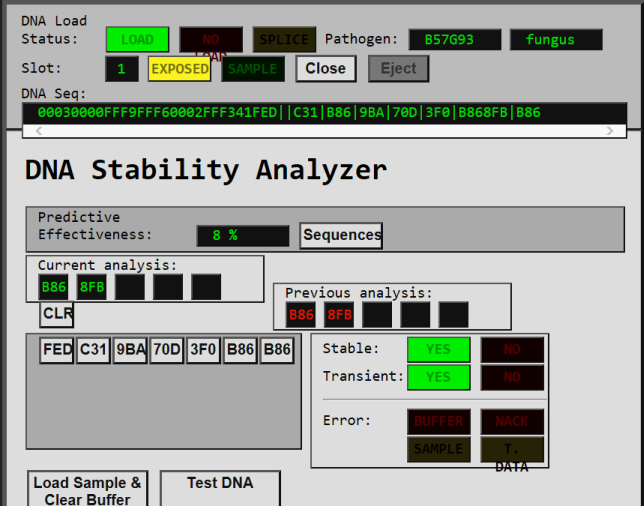
The final tab on the Pathogen Manipulator is the DNA Stability Analyzer. The most time-consuming portion of Pathology, this screen is what you’ll be staring at for most of the time.
To begin the process, load a pathogen sample into the ‘loaded’ slot, and click Load Sample and Clear Buffer. This DESTROYS the loaded pathogen sample, breaking its symptoms up into its component 3-digit segments and loading the resulting mess of segments into the buffer. Make sure you have more samples waiting in the wing/growing in a petri dish before you do this, if you don’t want to lose a lot of work.
Clicking on a segment in the buffer will load it into the analyzer slot. As you can see, we can load 1-5 segments in there. However, we can’t get them back in the buffer – once we click Test DNA, those segments are gone until we reload a new pathogen sample containing those segments.
When we click Test DNA, the analyzer will tell us two things: whether the sequence we assembled was Stable, and whether it was Transient.
- Stable: The segment we assembled is a ‘valid’ symptom. If we try to splice it together in the splicing screen, it will work.
- Transient: The segment we assembled is a prefix to a longer ‘valid’ symptom. We don’t know how long this new symptom is, nor what remaining segments are required – just that e.g. B86 8FB XXX (XXX XXX?) is a valid symptom.
Naturally, it’s possible for a symptom to be Stable-Transient (both a valid symptom and a prefix to another valid one), Transient-Unstable (Not valid, but a prefix to a valid one), Stable-Nontransient (a valid symptom, but not a prefix) and neither (garbage, but at least we know it doesn’t work).
You can see where the trial and error/RNG part that everyone warned you about comes in. To find new/high-tier symptoms pretty much requires just smashing symptom bits together until you find something that works. A longer description of the process will be described later on, if you’re still confused.
Pathomatic
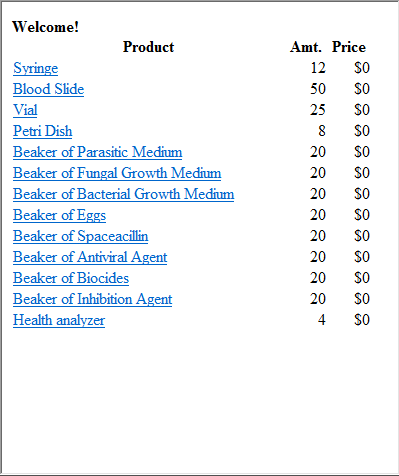
The all-in-one dispenser that contains all the tools we need. Clicking on it brings up this screen:
Let’s break it down:
- Syringe: if you’re familiar in any way with Goonmed, you know what these are for. Move chemicals in/out bodies or containers, in units of five.
- Blood Slide: These go in the Microscope (described later). They can be injected with pathogen or blood samples. Technically, you can also inject anything else in them, but that’s not relevant to the discussion at hand.
- Vial: These go in the Pathogen Manipulator. You need at least 2 units of pathogen to be able to manipulate it.
- Petri Dish: These are for growing more pathogen, and can also be used in the Microscope. To grow more pathogen, add the pathogen to the petri dish, then add the nutrition agent corresponding to the pathogen’s type. The pathogen will slowly increase, but the nutrition agent in the dish will decrease. Additional pathogen can be syringed out to be placed in vials/bodies.
- Parasitic/Fungal Growth/Bacterial Medium/Eggs: The nutrition agent of the four most common pathogen types – parasites, fungi, bacteria, and viruses. Note that each of them is made up of a ratio of common chemicals – if you don’t want to keep adding more agent in, you can just dump in those chemicals straight from the nearby chem dispenser. However, unless you’ve already got a starting amount of the growth medium inside the petri dish, you’ll just ruin the dish and your valuable sample.
- Spaceacillin/Antiviral Agent/Biocides/Inhibition Agent: The anti-agent of the most common pathogen types. In order to create a cure (discussed later), we need the appropriate anti-agent as well as the appropriate suppressant chemical.
Getting lost? Here’s a handy table, copied straight from the existing guide:
| Microbody | Vaccine | Anti-agent | Growth medium | Nutrition | Initial stages | Activity | Self-immunization |
|---|---|---|---|---|---|---|---|
| Virus | Yes | Antiviral Agent | Egg | Iron, Nitrogen, Sodium, Sugar, Water | 5 | Low to high | Yes |
| Bacterium | No | Spaceacillin | Bacterial Medium | Iron, Nitrogen, Sodium, Sugar, Water | 3 | Low to high | Yes |
| Fungus | No | Biocide | Fungal Medium | Iron, Nitrogen, Sodium, Sugar, Water | 4 | Near constant | No |
| Parasite | No | Biocide | Parasitic Medium | Iron, Nitrogen, Sodium, Sugar, Water | 5 | High to low | No |
| Great Mutatis cell | No | Mutation Inhibitor | Stable Mutagen | Stable Mutagen | 5 | Constant | No |
(You might find references to Great Mutatis Cells fairly rare in this guide. They’re almost never around, and I’ve pretty much never seen one without admin intervention. Nonetheless, they can be treated just like any other pathogen, and manipulated/cured the same way, if you know the appropriate tools.)
Autoclave
If a petri dish is dirty and can’t be used anymore, stick it in one of these and it’ll spit out a shiny clean one after a while. Can also be used to decontaminate your tools so you don’t infect people, if you’re into that whole ‘hygiene’ fad.
Centrifuge
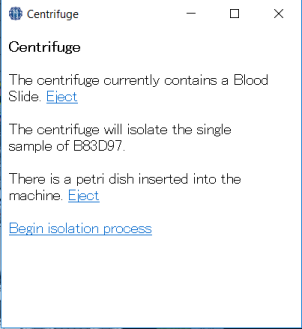
Occasionally, you might come across an already infected person. To transform his blood into a usable sample, syringe some out of him, stick that onto a blood slide, stick that slide into this machine, then add a petri dish.
The process should be pretty self-explanatory, and will spit out a sample of the pathogen in the petri dish. If the blood contains more than one pathogen, you’ll have to decide which sample you want.
Microscope
This nifty machine takes both Blood Slides and Petri Dishes. Stick the appropriate item underneath them, then click the microscope. You can view the sample in a zoomed-out state, or zoomed in.
If you zoom out, you’ll most likely see something like this:
Well, it doesn’t tell us much, but we know what type of pathogen it is, and the color gives us a slight hint at the suppressant required.
A quick note on strains: a person can only catch one strain of a pathogen at a time. Suppose you release this bacteria (strain B83D) out into the wild (by accident or intentionally), and it makes people mildly annoyed as they catch a slight cold. Later on, you tinker with strain B83D later, and successfully find a symptom that makes you puke your own guts out (disclaimer: may not be an actual symptom). Releasing this new one most likely won’t do anything – everyone’s already caught the strain of B83D that gives them a slight cold.
On the other hand, you can stick those symptoms on another bacteria strain (or even another pathogen type altogether), and that’ll be fine. You can also just stick the same symptoms on different strains, and those will stack if a person catches them both – more on that later.
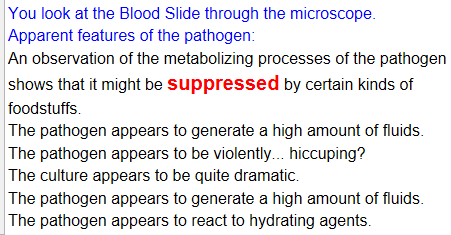
Now, if you zoom in, you’ll see something like this.
The first line refers to the Suppressing agent of the pathogen – what chemical it requires to fix it. More on this later.
The next few lines are the symptoms of the pathogen. They’ll show up from top to bottom in the order they were on the pathogen, left to right.
Unfortunately, these can be a bit vague, and to make matters worse, some symptoms share the exact same description. You’ll just have to puzzle it out, experiment with monkeys, or seek the wisdom of your elders. Here are a few to get you started off:
‘Generate a high amount of fluids’ – coughing, sneezing or sweating. If the symptom is t2 or higher, then it may signify violent coughing/sneezing, which occasionally freezes the infected in their steps and causes them to drop stuff. These symptoms are contagious – good for spreading the pathogen around. Without contagious symptoms, people won’t get infected unless injected with the pathogen/infected blood directly.
‘Large volume of gas’ – farting, also a contagious symptom. Higher-tier symptoms may mean chemsmoke farts or plasma farts.
‘Quite dramatic’ – Shakespearitis. :getin:
‘constant field of radiating heat/trail of ice’ – fever/chills, which swing the infected’s temperature up/down respectively. Higher-tier symptoms cause larger temperature swings, to the point where they may spontaneously combust or leave trails of ice behind them. At t5, they might even firegib or turn into an ice statue.
'bubbles of vacuum' - gasping. Deprives people of oxygen for a short while, can be nasty if stacked.
'reacts with hydrating agents' - muscle ache/indigestion. Common, but minor effect.
‘wilder than usual’ – space madness or paranoia.
As for the rest, I’ll leave you to discover that on your own.
Now, how do we discover the suppressant? We take a syringe/dropper of the suspected suppressing agent, then drop it on the petri dish while it’s in the microscope (done by clicking on the microscope, and it must be a petri dish, blood slides won’t work.) If you get the suppressing agent right, an additional message will show up – for instance, if the suppressing agent was silver sulfadizine, you might see ‘The pathogens near the Silver Sulfadizine’s presence appear to be weakened by the burn medicine’s presence.’
Here’s a list of common suppressants to get you started off.
Foodstuffs: chicken soup, cholesterol, porktonium
Medicine: Silver Sulfadizine, Styptic Powder, Synthflesh, Mannitol
Radiation: Radium, Polonium, Uranium, etc.
Temp-related: Phlogiston, Napalm, Cryostylane, Cryoxadone
And a few more obscure ones that don’t show up often, but can usually be worked out by examining the description and puzzling it out.
Synth-o-Matic
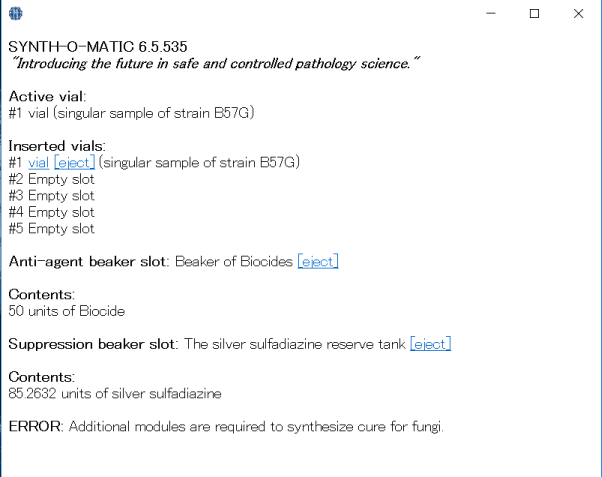
The Synth-O-Matic is where you can cure pathogens and make vaccines, if you have the parts for that. Clicking on it brings up this screen:
To synthesize a cure, we need at least three things:
- A sample of the pathogen we want to cure.
- The appropriate anti-agent of the pathogen we want to cure (see table above).
- A sample of the appropriate suppressing agent, with the amount indicated by the suppression threshold as the bare minimum.
In this particular case, we also need a fungus synthesizing module, which the synth-o-matic does not start with. Fortunately, this is the only pathogen-specific module that the base synth-o-matic lacks.
Once everything is assembled, click on the ‘synthesize’ button and wait a bit. The machine should eventually spit out a cure to that strain. Each cure is a single-use syringe that can only be used on one person, but once that person is cured, they can’t catch that particular strain ever again.
The synth-o-matic can also be upgraded with additional modules that can be found around – ask your local telescientists/debris field explorers/QMs for details. Some of the stuff they might bring you includes:
- Synthesizer/Irradiation modules, which replace the need for the anti-agent/suppressant respectively.
- Upgrade modules, which allow the machine to spit out more cures at once.
- Assistant modules, which allows the machine to calculate the type and amount of suppressing agent required.
- Vaccine modules, which allow the machine to create vaccines – injecting one of these into an uninfected person prevents them from catching the strain. Vaccines require only the suppressing agent to manufacture.
Walkthroughs
Now that all the equipment has been introduced, let’s walkthrough the usual processes pathology is used for.
Big Fancy Bioweapon
All these plain t1 and t2 symptoms don’t impress you – it’s t4s and t5s or bust. So how do you go about that?
1: Find your starting samples in the fridge/nearby, and stick them into the manipulator. Remember, if you run out, you can obtain more from space – some lurk in spots that require a bit of work to reach, but D.O.C from the faint signal will sell some in a pinch.
2: Pick one starting sample to load – preferably something like a parasite or virus, which can reach stage 5.
3: Splice the symptoms from all the other samples onto the loaded sample. Remember, if they’re already in the sample, they’re valid, so just copy them wholesale and make sure they’re separated out with the appropriate lines carefully. Don’t worry too much about repeated symptoms. Sometimes the game bugs out and fails even with valid symptoms though – shit happens.
4: At the end of it, you should have the beginnings of a super-pathogen – a single strain with all the t1s and t2s (maybe t3s if you’re lucky) from all your starting samples. Eject it, stick it in a petri dish, and pour in the appropriate growth medium. Don’t worry if it takes a while – it takes 5-10 minutes to start growing, but once it does the pathogen increases faster and faster (though it tops out at 30 units). If you screw this part up, you’ll know almost immediately, because examining the petri dish will just tell you it’s unusable and has to be cleaned.
5: Now here comes the trial and error bit. If you have any t2s/3s in the original, it’s a good idea to start off with analyzing those, to see if they’re transient – that’s a good jumpstart right there.
6: Let’s say we got lucky with XXX YYY AAA (stable, transient). Follow it up with BBB? Nope. Not CCC or DDD either.
7: Fuck, we’re out of XXX segments. We can either try other combinations, or load in another sample of our proto-supervirus to try again.
8: EEE? FFF? Yes, XXX YYY AAA FFF is stable! It’s not transient, though, so this line of inquiry is a dead end. We’ll have to run with a different line.
9: After some more experimentation, looks like YYY BBB AAA XXX is transient…and after mashing on some more bits, we find our first t5 – YYY BBB AAA XXX CCC. By now, some of you might be asking if there’s a way to shortcut this process. Surely there has to be some way of figuring out later segments from preceding ones, possibly by looking at the symptom types and effects and such? Nope – it’s all completely random. XXX BBB AAA could be high fever and CCC YYY QQQ VVV DDD could be firegib – despite being similar effects, they might have absolutely nothing in common. And yes, the segments are all randomized every round, so there’s no way to meta this – at least, not this particular portion of experimentation.
10: Repeat steps 5-9 as necessary, until you’re tired of it. By now it should be 30+ minutes into the round at least, maybe 40-50 if you were really unlucky and/or persistent. If you’ve been consistently cataloguing things, you should have found a few new t2s, some t3s, and maybe a t4 or 5 if you’ve struck gold today. Don’t forget to refuel your petri dish with the appropriate medium every once in a while. It runs out faster than you might expect.
11: Start assembling the actual supervirus. Stick one sample of the original into the loaded slot, then tinker with the ‘private’ bit in the DNA manipulator. My advice is not to get too fancy – a reasonably high (20+) advance speed is usually sufficient. Mutations don’t come into play all that often and if you’ve been spending all this time working on fancy symptoms, those should usually suffice. It’s best to just make sure advance speed is high and all the other values are at least positive. Don’t worry if it falls apart – you’ve still got some more growing in the petri dish, right?
12: Once you have a satisfactory strain, start splicing in all the fancy new symptoms you’ve come up with, using additional samples from the petri dish as the source strain for their segments.
13: (Optional) Vaccinate yourself/infect and cure yourself as needed or wanted, if you’re really keen on that whole ‘survival’ thing.
14: Stroll out, inject your supervirus into a nearby staff assistant/monkey and watch the sparks fly – preferably from a safe distance.
Plain and Simple Plague
You just want to cause trouble, and don’t particularly need big, fancy symptoms to do that. This method is useful for both the aspiring prankster who doesn’t want to actually hurt anyone, and for people who want to unleash the full force of pathology without all that trial and error.
1: As with the above method, start assembling a proto-supervirus. Keep any spare pathogen samples that contain repeat symptoms that you don’t need to splice around – if you have time to spare, consider growing them in their own petri dishes.
2: Analyze the proto-supervirus you’ve assembled under the microscope, to see if the symptoms are satisfactory. At the bare minimum, you’re going to want a contagious symptom (such as farting/sneezing/coughing), otherwise spreading the disease will be difficult. If you’re a non-antag prankster, keep track of which symptoms could cause actual problems and remember to strip them out later.
3: Start growing P-SV in petri dish, then return to all those other samples you put aside.
4: Stick them in the pathogen manipulator, head over to the DNA manipulator, and tinker with their variables until they’re satisfactory. As before, high advance speed and non-negative other variables is all you really need for the most part. You might still lose some to radiation damage this way, though – if you don’t have that many spare samples to work with, you might want to grow them first. Once you’ve done this, you should have about a half-dozen or so ‘working’ samples.
5: (optional) If you’re unhappy with what you’ve got to work with, tinker with the P-SV in the DNA manipulator for a little while. It’s best not to research farther than t3s or so, though – nice if you can find them, but big fancy symptoms aren’t really the focus of this method.
6: Stick the ‘working’ samples in the loaded slot, load the P-SV into the source slot, and splice over all the symptoms you want, assembling new ones you’ve found or removing bad ones you don’t want as necessary.
7: At the end of this, you should have several strains of pathogens, each of them with the same cocktail of symptoms from the original P-SV you spliced. Here’s the dirty little secret: they stack. While it might not be quite as impressive as firegibbing, a person infected with several strains of ‘heavy coughing’ and ‘disorientation’ will still find it very hard to get anything accomplished, what with walking in random directions every two seconds while dropping anything in their hands. And for the aspiring non-antag prankster, eight strains of shakespearitis roaming the station makes for quite the sight.
8: Vaccinate/cure yourself. If you really want to. Remember that this is going to be a significantly longer process than immunizing yourself against a single pathogen, even a really powerful one. If you don’t have time for this, you might want to just put on a cleansuit as detailed in the ‘hygiene’ section.
9: Stick the pathogen cocktail into a pill or syringe or something, inject/feed to a roaming monkey or assistant, and watch the sparks fly.
Curing
A mad doctor or capricious god has unleashed a plague of some kind! How do you fix it?
1: Take a sample of infected blood and put it on a blood slide. To make things easy in this hypothetical exercise, let’s just assume there’s one pathogen floating around.
2: Analyze blood slide with microscope to see symptoms/guess suppressant.
3: Stick blood slide and petri dish into centrifuge, obtain pure sample of pathogen. Don’t forget to stick growth medium inside it so it can grow.
4: Once you have a decent pathogen sample size, stick some of it in the Pathogen Manipulator so you can see the suppression threshold required.
5: Stick another sample into a new petri dish, stick that dish into the microscope, and start dribbling potential suppressants into it. You’ll know when you’ve struck gold when you see a visible reaction.
6: Stick a sample of the pathogen, a beaker of the appropriate anti-agent and a beaker of the appropriate suppressant into the Synth-O-Matic.
7: Repeat until everyone is cured. Or more realistically, repeat until you and whoever comes by to ask about it is cured. Comfort yourself with the thought that you accomplished something, at least.
Alternatively, you can send a sample of the pathogen (in blood slide, petri dish or vial form) off to the CDC, via sticking it in a biohazard crate the QM can order and tossing it out into space. The CDC will then analyze it for you, and offer to sell you cure syringes, but the cost increases the stronger the disease is – a pathogen with t4 or t5 symptoms will cost an arm and a leg to cure.
Good luck, and happy pathing!
FAQ
Where do I get more pathogen samples?
A: D.O.C from the faint signal sells them for 500 a pop. Alternatively, some more can be found with a little space exploration. Pro tip: bring a spacesuit, phaser and mining drill (rip drill pods).
Where do I get more synth-o-matic modules?
A: As before, space exploration or from D.O.C. Some QM traders may also stock them.
I assembled/copied a valid symptom, but the Manipulator says it’s going to fail. What do I do?
A: Doublecheck to make sure, and if you’re sure, press the button anyway. The prediction mechanism is old and janky and doesn’t always work.
I assembled/copied a valid symptom, and the Manipulator said it was going to succeed, but I failed anyway and lost both my samples? Why?!
A: Because the game hates you and wants you to suffer. That’s literally it. There is no possible reason for this ‘feature’ to exist, and yet here we are. Either sigh and go get more samples, or channel that rage into something nice and productive, like painting or a c-saber rampage.
Can I use disease reagents (e.g. bee, nanomachines, prions) in pathology?
A: No. They are two separate systems and don’t work together. You can’t manipulate disease reagents with pathology tools, nor can you cure reagent-caused diseases with pathology.
If I copy and paste the same symptom in a strain over and over, will it stack?
A: No, it won’t be any more effective than having just one copy of the symptom in the strain. For the effect you’re looking for, you need to copy that symptom to different strains, as mentioned in the process above.
I think I might be infected. What do I do?
A: Grab a health analyzer and scan yourself for pathogenic bodies. If yes, you have several options. Pop on down to medbay and see if anyone’s working on a cure, and if nobody is, ask if they can let you in, then follow the ‘Curing’ guide above.
Alternatively, if the suppressant can be determined, you can forgo a full cure and just chug down a large amount of the suppressant reagent. Note that in some cases (such as when phlogiston is the suppressant), the cure might be often worse than the disease.
If neither option is available to you, just shrug and go about your day. If the disease is debilitating you to the point that that’s not an option, see if you can get yourself cloned, or if Robotics is accepting volunteers.
What if I made a pathogen with super-high Mutativeness, Mutation Speed and Maliciousness, then released it? Would that work?
A: Certainly worth a shot. Remember that the pathogen will only mutate the first time it enters a person’s body, though. For the vast majority of the station, they’ll most likely catch something fairly close to the baseline pathogen. And of course, the original needs to have a contagious symptom to spread at all. Also, don’t forget that tweaking those variables is a way more risky process than messing with symptoms. Every time you press a + or – on that screen, you have to brace yourself for the possibility of losing that sample entirely. This has nothing to do with how many times you’ve already blasted it, aside from the simple fact that the more times you roll a dice, the more likely it is you’re eventually going to roll a 1.
My cure isn’t working. What do I do?
A: Wait a bit – sometimes it takes a while. If it’s still not working, shrug and try again. Messed-up cures can sometimes make the pathogen worse, but all you need to do is get it right once to fix it.
My pathogen doesn’t seem to be growing in the dish. What do I do?
A: It really does take a long time to start growing – over 5 minutes with a starting sample of 2 pathogen units. Don’t worry – if you’ve screwed up, you’ll know almost immediately because the petri dish will be shown as unusable when you examine it.
I stuck my pathogen in a guy, but no one else seems to be displaying visible symptoms. Why?
A: There are several possible reasons why:
- The pathogen turned asymptomatic while you were messing with the variables and you didn’t notice. None of the symptoms will have any effect.
- The pathogen might not have any contagious symptoms (coughing, sneezing, farting, etc.)
- The advance speed of the pathogen is too low, and the pathogen is developing at a glacial pace.
- The maliciousness of the pathogen is too low. The pathogen is curing itself whenever it hops to another person.
- The guy you injected it in ran off and got himself spaced or something before he could spread it to anyone. It happens.
Remember that if your pathogen contains any high-tier symptoms, it needs a strain that can at least reach that stage – t5s can only be manifested by parasites, viruses or Great Mutatis.
I made a fun pathogen, but I’m not an antag. What do I do?
A: As with all horrific experiments, monkeys are the answer. Seal up an area, toss some monkeys in, inject one and watch the sparks fly.
If you really want to make sure no one catches it, there’s a Valuchimp in the debris field, and there’s always the diner inhabitants. To ensure that you remain undisturbed, yell out that no one should come to the space diner under any circumstances. This will surely deter all right-thinking spacemen.
How do I make the most of 2 units of pathogen?
A: Assuming you mean for antagging purposes, you can inject them into a person, siphon out their blood, then inject the infected blood into other people to deliberately infect them as well. Good if you’re pressed for time and can’t be arsed to wait around for contagion.
Instead of growing them in a petri dish, can I inject the pathogen(s) I’m working with into a monkey, then siphon out their blood and Centrifuge it for a sample every time I need one?
A: Sure, but a centrifuge takes a long-ass time to work, and it’s a little inconvenient to do so every time. Of course, nothing’s stopping you from doing both, and having a backup source that doesn’t rely on constantly tossing nutrients in can be helpful. Remember that now you have an infected monkey on your hands, though, and you should probably wear a cleansuit to not get infected if that’s a concern. Also, don’t forget that the captain can barge in and play a rousing game of ‘Stab the Monkey’ anytime.
Are there any helpful symptoms? Can I use pathology for good?
A: It’s possible, but unlikely. Helpful symptoms are very, very rare, and it’s not like you can deliberately aim for them – you pretty much have to hope one falls into your hands.
I spent forty-five minutes whipping up the perfect pathogen, and then someone blew up medbay and the shuttle was called. Why?!
A: That’s pathology for you.
