Difference between revisions of "User:MarkNstein/Sandbox"
MarkNstein (talk | contribs) |
MarkNstein (talk | contribs) m (→MarkNstein/Sandbox: Working on TEG guide refresh.) |
||
| Line 1: | Line 1: | ||
== | ==Help! I'm the only engineer and I don't know what to do!== | ||
Take a deep breath, you got this. Keeping the station powered is easy. This setup won't generate <I>lots</I> of excess power, but it'll generate more than any station needs. This setup focuses ease, not performance. | |||
Go find an engeering locker, get a belt on, and click your blue-toolbox onto your belt. Failing that: just find a wrench, that's all you need. | |||
<b>Follow the steps in bold. The step-number correlates to the images.</b> Brief explanations are provided as well. | |||
<b>Select the current map from the tabs below.</b> | |||
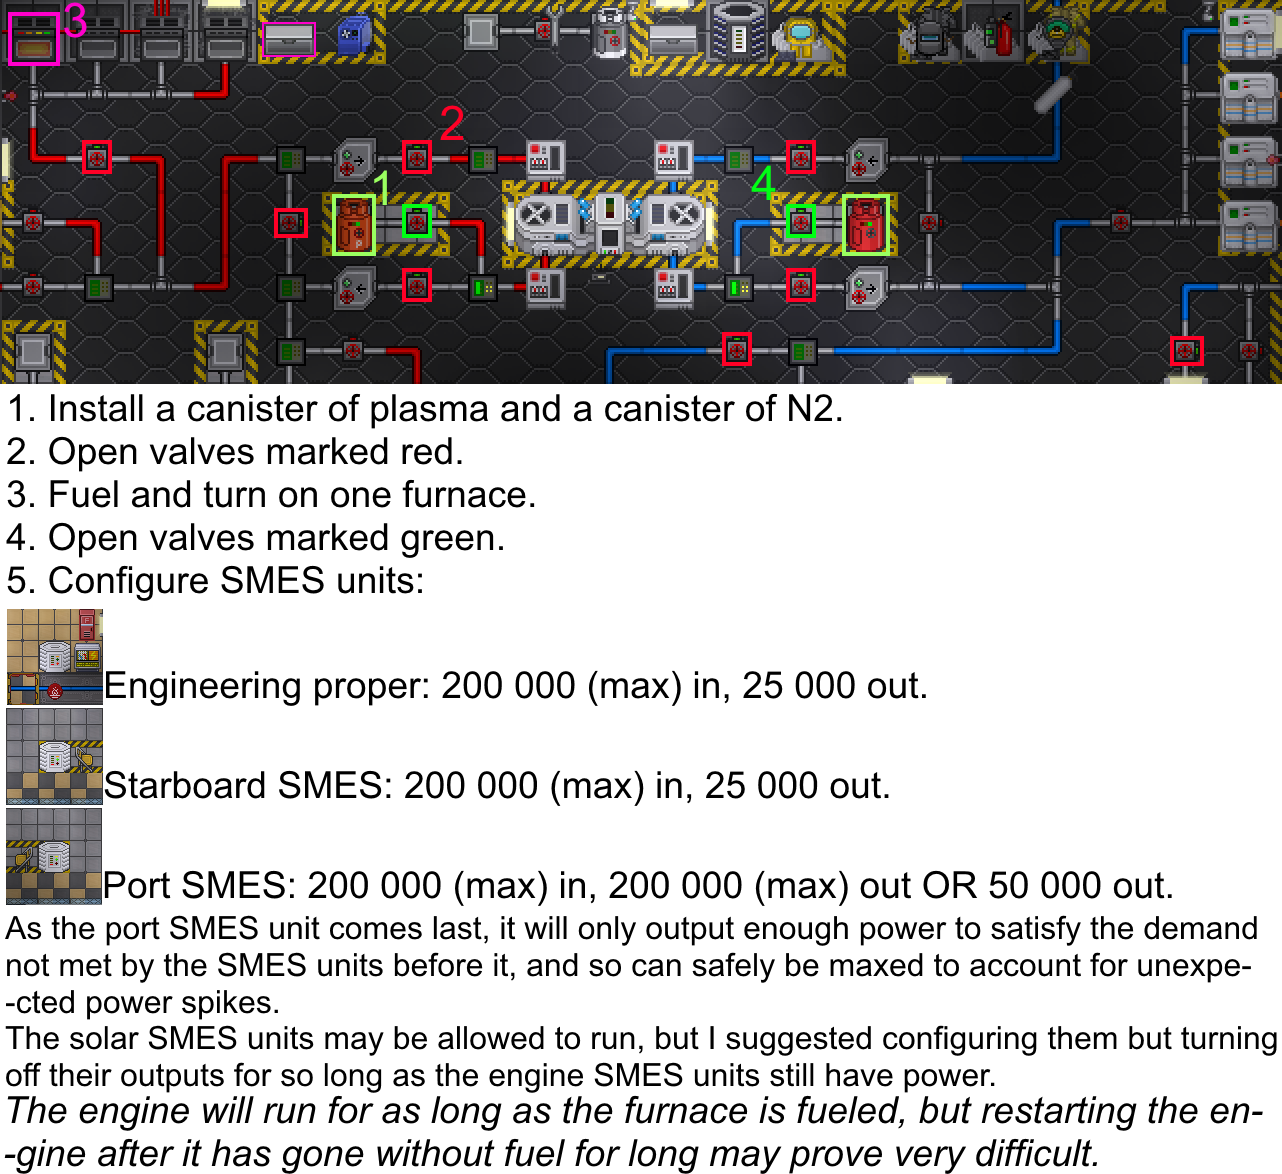
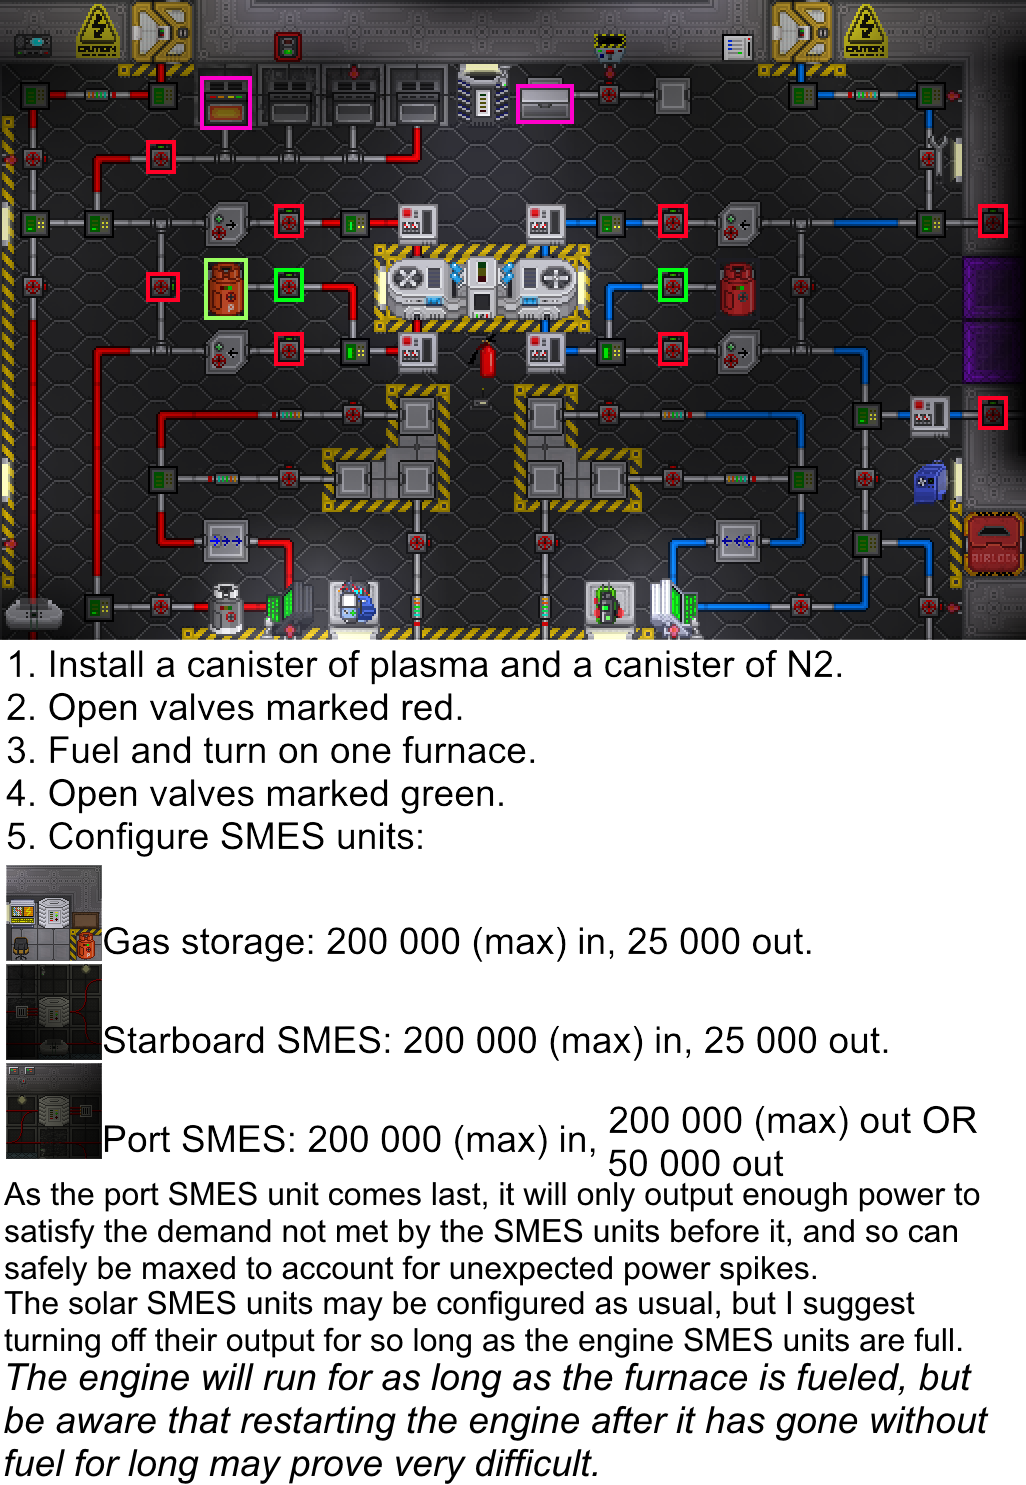
1. <b>Drag a plasma canister (orange) and an N2 canister (red) onto the positions shown. Once in place, secure them to the connections by using the wrench on each canister.</b> At least some gas needs to be in the lines to carry heat from heat-sources to heat-sinks. Leaving the canisters connected will help dampen the pressure in the lines, preventing the lines from rupturing. | |||
2. <b>Open these valves.</b> The valve(s) with the blue "C" annotation lead to the space-radiators, they remove heat from the cold loop, keeping the gas cool. The valve annotated with a red "B" is the burn-chamber bypass; when the burn-chamber is unused it's radiator acts like a space-radiator (removes heat from the hot-loops gas) so we bypass it to prevent unwanted heat-loss. | |||
3. <b>Load coal into at least 1 furnace, and turn it on by clicking on it with an empty hand.</b> Coal can be quickly transferred by opening and closing the crate at least once (it's a quirk) then dragging the crate's sprite onto the furnace. The furnace will be the source of heat for the hot loop. More furnaces can be loaded and activated to increase the gas's temperature, to diminishing returns. | |||
4. <b>Open these valves.</b> While these could have been opened in step 2, this step is symbolic of you "turning the engine on". Within a minute, the gas should propagate through the pipes, and the fans of the T.E.G. should begin to spin. Do not expect the engine to be at steady-state power quickly, it can take a few minutes to ramp up. Meanwhile, you can move on to step 5. | |||
5. <b>Find and set the two (sometimes more) nearby SMES units. Set input to max (200,000 Watts) and output to 50,000 Watts per SMES.</b> S.M.E.S. units are big batteries. They exist between the station's grid and power sources (such as solar arrays, and the T.E.G.). 50 kilowatts per unit is a little high, but flexible to the station's needs. | |||
<b>You're done for the moment.</b> The engine should warm up and generate at least a megawatt of power for roughly 30 minutes. The furnace(s) will eventually need refueling, and there should be two spare crates of furnace fuel nearby (except Atlas). I would recommend either reading the wiki further, or actively poking and exploring the engineering department. This setup is robust so long as you don't open the purge valves for <I>too</I> long, so feel free to play with the consoles, mess with valves, and mess with the other canisters; the worst you can do is decrease the power output and set yourself on fire. | |||
<tabs> | |||
<tab name="Cog 1"> | |||
Isolate station screen, add text | |||
[[File:Clarion_safe_engine_guide.png]] | |||
</tab> | |||
<tab name="Kondaru"> | |||
Isolate station screen, add text | |||
[[File:Clarion_safe_engine_guide.png]] | |||
</tab> | |||
<tab name="Cog 2"> | |||
Isolate station screen, add text | |||
[[File:Clarion_safe_engine_guide.png]] | |||
</tab> | |||
<tab name="Horizon"> | |||
Isolate station screen, add text | |||
[[File:Clarion_safe_engine_guide.png]] | |||
</tab> | |||
<tab name="Atlas"> | |||
Isolate station screen, add text | |||
[[File:Clarion_safe_engine_guide.png]] | |||
</tab> | |||
<tab name="Clarion"> | |||
Isolate station screen, add text | |||
[[File:Clarion_safe_engine_guide.png]] | |||
</tab> | |||
<tab name="Destiny"> | |||
Isolate station screen, add text | |||
[[File:Destiny_engine_guide.png]] | |||
</tab> | |||
</tabs> | |||
Revision as of 07:32, 4 May 2020
Help! I'm the only engineer and I don't know what to do!
Take a deep breath, you got this. Keeping the station powered is easy. This setup won't generate lots of excess power, but it'll generate more than any station needs. This setup focuses ease, not performance.
Go find an engeering locker, get a belt on, and click your blue-toolbox onto your belt. Failing that: just find a wrench, that's all you need.
Follow the steps in bold. The step-number correlates to the images. Brief explanations are provided as well.
Select the current map from the tabs below.
1. Drag a plasma canister (orange) and an N2 canister (red) onto the positions shown. Once in place, secure them to the connections by using the wrench on each canister. At least some gas needs to be in the lines to carry heat from heat-sources to heat-sinks. Leaving the canisters connected will help dampen the pressure in the lines, preventing the lines from rupturing.
2. Open these valves. The valve(s) with the blue "C" annotation lead to the space-radiators, they remove heat from the cold loop, keeping the gas cool. The valve annotated with a red "B" is the burn-chamber bypass; when the burn-chamber is unused it's radiator acts like a space-radiator (removes heat from the hot-loops gas) so we bypass it to prevent unwanted heat-loss.
3. Load coal into at least 1 furnace, and turn it on by clicking on it with an empty hand. Coal can be quickly transferred by opening and closing the crate at least once (it's a quirk) then dragging the crate's sprite onto the furnace. The furnace will be the source of heat for the hot loop. More furnaces can be loaded and activated to increase the gas's temperature, to diminishing returns.
4. Open these valves. While these could have been opened in step 2, this step is symbolic of you "turning the engine on". Within a minute, the gas should propagate through the pipes, and the fans of the T.E.G. should begin to spin. Do not expect the engine to be at steady-state power quickly, it can take a few minutes to ramp up. Meanwhile, you can move on to step 5.
5. Find and set the two (sometimes more) nearby SMES units. Set input to max (200,000 Watts) and output to 50,000 Watts per SMES. S.M.E.S. units are big batteries. They exist between the station's grid and power sources (such as solar arrays, and the T.E.G.). 50 kilowatts per unit is a little high, but flexible to the station's needs.
You're done for the moment. The engine should warm up and generate at least a megawatt of power for roughly 30 minutes. The furnace(s) will eventually need refueling, and there should be two spare crates of furnace fuel nearby (except Atlas). I would recommend either reading the wiki further, or actively poking and exploring the engineering department. This setup is robust so long as you don't open the purge valves for too long, so feel free to play with the consoles, mess with valves, and mess with the other canisters; the worst you can do is decrease the power output and set yourself on fire.

