User:ThatsMamaLuigiToYouMario/Pod Wars
Pod Wars
Got perms from aloe to work on this in case if anyone was wondering. Thank you aloe!
| This page is under construction. The following information may be incomplete. The Pod Wars game mode is still new, and is undergoing various balance changes and updates at the moment. Information may become outdated very quickly. In addition, this page is currently being worked on. |
Welcome to the Front Lines
Good morning, NT Pilot Identification-1345. Time aboard the NSV Pytheas is currently 0654 Hours, and we are currently orbiting above Rota Fortuna. Forecast for surrounding space is sunny, with a 75% chance of radiation storms throughout the day. Please proceed to battlestations as soon as you are ready. Heavy syndicate resistance is likely within the area.
Before the events of Space Station 13, a large standoff with the syndicate occurred near the Rota Fortuna system, a high-traffic area that served as a major refueling platform for cross-system shipping and travel. Within this area, Nanotransen plans to build several space stations which are now known as Space Station 13, Space Station 14 and Space Station 15 respectively but heavy syndicate presence plagues the area, fortified and entrenched in the several spaceships and structures around Rota Fortuna.
You play the role of either an NT or Syndicate pilot on this fateful event. The rest of space's history lies within you and your fellow pilot's hands. Will you seize control of the Rota Fortuna system, or will you be forced on a road of shame, fleeing with the tail between your legs? Only time will tell.
How to Play
The Battleground
Home Ships
| NSV Pytheas | |
| Location | |
|---|---|
|
NT's Home away from Home | |
|
N/A | |
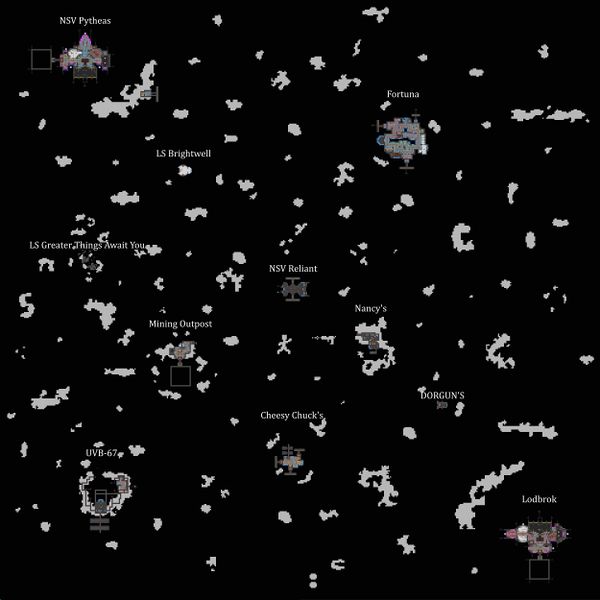
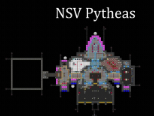
The NanoTrasen team's home base. It boasts a large hangar, a hi-tech medbay with an automatic cloner, a mining section to the west, and even a bar! The Pytheas is defended by an automated turret system which will shoot anyone without a valid NT ID.
The base of operations for the Syndicate team. It has all of the same systems as the Pytheas, but the layout is significantly different.
Control Points
The largest of the control points. Controlling this station grants access to an upgraded medbay capable of producing more powerful medicines than those on the home ships.
A claustrophobic arena, with little interior space and asteroid walls on 3 sides. Expect close-quarters combat here, as the tight walls and limited number of entry points mean that this outpost will be well-fortified against an assault.
Smack dab in the middle of the map is the NSV Reliant. The location means that whichever team holds this ship has an easy forward base to push from, but also ensures that this point is hotly contested at all times.
Minor Locations
A fully functional mining outpost. Comes with mining gear, Nano-Fabs, and a mining magnet (some assembly required).
A cozy restaurant with a serviceable kitchen, a fryer, and cheese. A LOT of cheese.
Everything you need for a functional space shuttle. Which... really isn't much at all.
A deserted trading post. The backroom contains some boxes of goods- mostly junk, but you might find something useful.
A shattered wreck.
A compact ship equipped with a couple rechargers.
Equipment
Starter Gear
| Name | Icon | Description |
|---|---|---|
| Pilot Helmet | A helmet to protect you from space (and your enemies). | |
| Pilot Armor | An armored space suit to keep you warm in the cold of space, and keep you cool in the heat of battle. | |
| SWAT Gloves | A set of armored gloves, built for close-quarters combat. They grant you some electrical and thermal resistance, and have a 20% chance to block disarms and shoves. | |
| Blaster | A compact energy pistol which packs a punch. It's small enough to fit on your belt, but can't be crammed into your pockets. Your blaster deals 33 BURN per shot, takes 20 PUs to fire, and comes with a self-recharging cell- though with enough materials, you can get a better one. Blasters are biolocked to their owner's team, so you won't be able to fire blasters you steal from the enemy. | |
| Survival Machete | A last-ditch weapon, it can be used to slice up your enemies once you've exhausted all other options. It also makes for a decent throwing knife. |
6 secondsish probably
Other Gear
Pod Types
| Name | Icon | Description |
|---|---|---|
| Combat Dinghy | A cheap, speedy combat putt. Comes equipped with an unremovable, low-range version of the MK 1.5 phaser, 100 max health, and a 1.7 speed multiplier. Can be constructed for free from the pod builders in both team's hangars. | |
| Mining Dinghy | A simple mining putt. Has an unremovable mining phaser, 100 max health, and a 1.7 speed multiplier. Can be constructed for free from the pod fabricators in both team's hangars. Fairly ineffective for actual mining- stick to a real mining tool. | |
| Light Putt | An average putt. Better than the free ones, but nothing scary. Has 150 health and an 0.8 speed multiplier. | |
| Robust Putt | A strong putt. These things can tank some hits, but the material costs make them difficult to produce if your miners aren't working overtime. Has 350 health and an 0.6 speed multiplier. | |
| Light Pod | The standard pod. Good for troop deployment or scouting, but will break down under any sort of sustained fire. Has 250 health and an 0.9 speed multiplier. | |
| Robust Pod | The best of the best. Will tank hits like nothing else- just make sure you give it a suitable weapon. Has 500 health and an 0.8 speed multiplier. |
Pod Equipment
Pod Weapons
| Item | Image | Resource Cost | Description |
|---|---|---|---|
| Mk.1 Combat Taser | 20 Sturdy Metal, 20 Conductive Material, 30 Crystal | Pods shooting tasers! Taser shots disable the random systems in hostile crafts and stun the driver, making them useful for stopping pod-borne enemies. They, of course, stun people on the ground/not in pods too. | |
| Mk 1.5 Light Phasers | 15 Sturdy Metal, 15 Conductive Material, 15 Crystal | A weak phaser weapon. Fires energy bolts which deal 20 BURN a shot and have low range. | |
| Mk.2 Scout Laser | 25 Sturdy Metal, 40 Conductive Material, 30 Crystal | Pods shooting lasers! They deal 45 BURN a shot. | |
| Mk.3 Disruptor | 20 Sturdy Metal, 20 Conductive Material, 30 Crystal | Deals a minor amount of BURN damage and stuns people, even if they're in a pod, so it effectively combines the characteristics of the phaser and taser. Has a chance to break windows. | |
| Heavy Disruptor Array | 20 Dense Metal, 20 High Energy Conductor, 50 Crystal, 20 Telecrystal | Fires heavy disruptor shots. Its power is a little lower than that of the assault laser, and it doesn't cause damage to walls. Barely stuns people on foot, but disables pods very effectively. | |
| Svet-Oruzhiye Mk.4 | N/A Found in supply drops at control points |
Better known as the prismatic laser. The Soviet version of Nanotrasen's phaser array. Deals 25 BURN a shot, but fires VERY fast. | |
| SPK-12 Ballistic System | 50 Dense Metal, 40 High Energy Conductor, 10 Crystal | Essentially a pod-mounted shotgun. Deals 50 BRUTE a shot. Inflicts high stamina damage and knocks people back, making these very strong against foot soldiers and pods alike. | |
| Assault Laser Array | 35 Dense Metal, 30 High Energy Conductor, 30 Crystal, 30 Telecrystal | A slow-firing heavy laser, which sets people on fire and can destroy walls. Deals 75 BURN a hit, but make your shots count! | |
| Mining Phaser System | 10 Metal, 10 Conductive Material | Shoots weak phasers that can break rock in two hits but can barely damage ore-bearing stone. Mining dinghies come equipped with these. | |
| Plasma Cutter System | 50 Sturdy Metal, 50 High Energy Conductor, 10 Telecrystal | Shoots bolts of plasma that instantly dig up asteroids. | |
| Rock Drilling Rig | 10 Power Source, 10 Dense Metal, 10 Extraordinarily Dense Crystalline Matter | This IS a drill. As in one that quickly digs up asteroids, albeit one row at time unlike the plasma cutter. Surprisingly decent in cutting up other pods (and people) too. |


